")
")
")
")
")


 When assembling GPU mining rigs, the question always arises of choosing the operating system: Windows, Linux, or a specialized OS for mining. If Windows is still preferred by novice miners because of the easy entry threshold, then experienced miners with a large number of GPUs have OS choice priorities shifting towards stability, ease of management, monitoring, video card tuning capabilities and reducing PC resource usage. And all these requirements are met by specialized Linux-based operating systems, a striking representative of which is the popular among miners - HiveOS. The purpose of this material is to highlight the features of installing and configuring HiveOS for beginners, as HiveOS has a number of undeniable advantages over Windows, which greatly simplify the process of mining cryptocurrencies on the GPU.
The main difference between HiveOS and other similar projects is its free use for 4 or less rigs per account. For more rigs (workers), a monthly fee of 3USD or 3% comission on HiveOn pool for each worker is taken. For competing solutions, a fee of 1% to 5% is taken from the entire connected capacity by analogy with the way it is done in all popular miners.
That is why we recommend HiveOS to beginners with 1-4 GPU mining rigs. Moreover, installing and configuring HiveOS for mining is easier than with Windows.
Registration HiveOS.
The first thing you need is a USB flash drive or USB drive with a capacity of at least 8GB. In this case, a USB disk (HDD or SSD) will be preferable, because USB flash drives are not designed for a large number of recording cycles and tend to die during the first year of use as the medium of the operating system.
Tip: When HiveOS crashes, the system may not find the boot disk. This does not always mean that you need to overwrite the USB flash drive. Simply turn off the entire rig completely and wait until the LED on the USB flash drive stops flashing. After rebooting, HiveOS will work again.
For comparison, Windows 10 requires 20GB plus 16Gb for the page file. In addition, Windows 10 requires more RAM, a more powerful CPU, and the graphical interface takes up significant 700MB of video memory, which are very important for some mining algorithms (Ethash).
Installing HiveOS is also possible on the system drive, but it is better to leave it under Windows for the possibility of mining new cryptocurrencies that are not yet available on HiveOS.
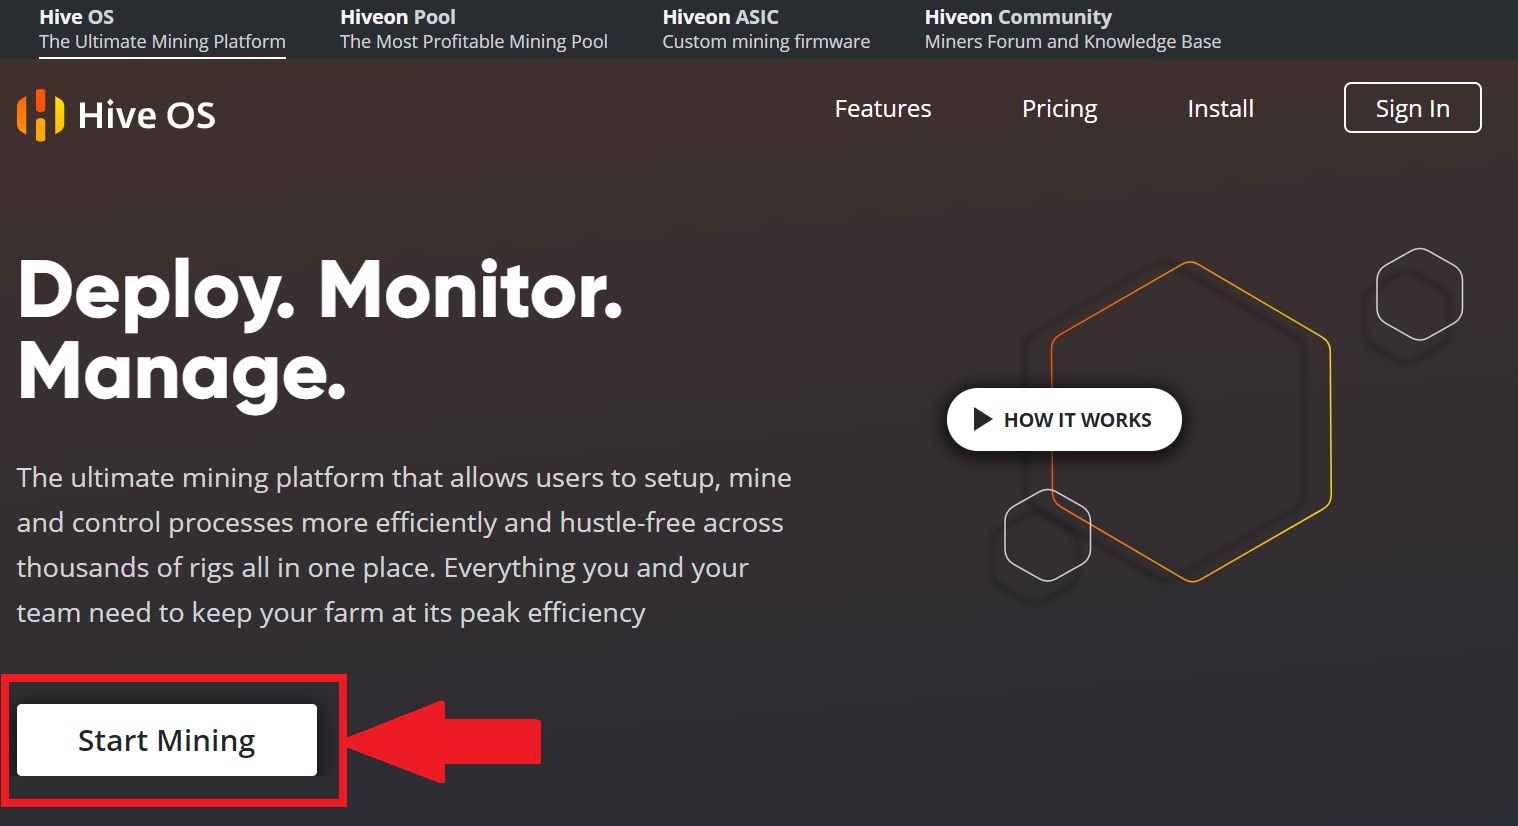
And so, if you already have media on 8GB or more, we go to the HiveOS website to register and download an image of the operating system.
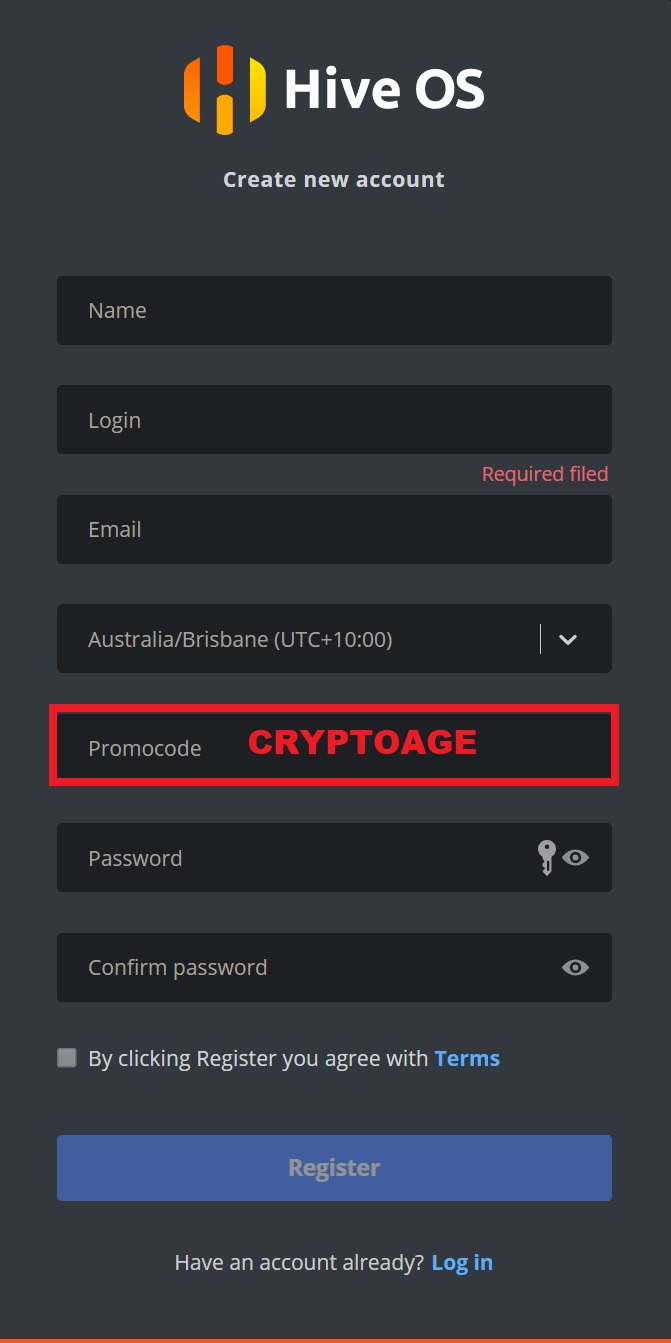
When registering, enter the CRYPTOAGE PromoCode to receive a bonus of 10 USD to your account.
Creating a bootable flash drive with HiveOS HiveOS
Go to the Install website menu to download the desired installation image.
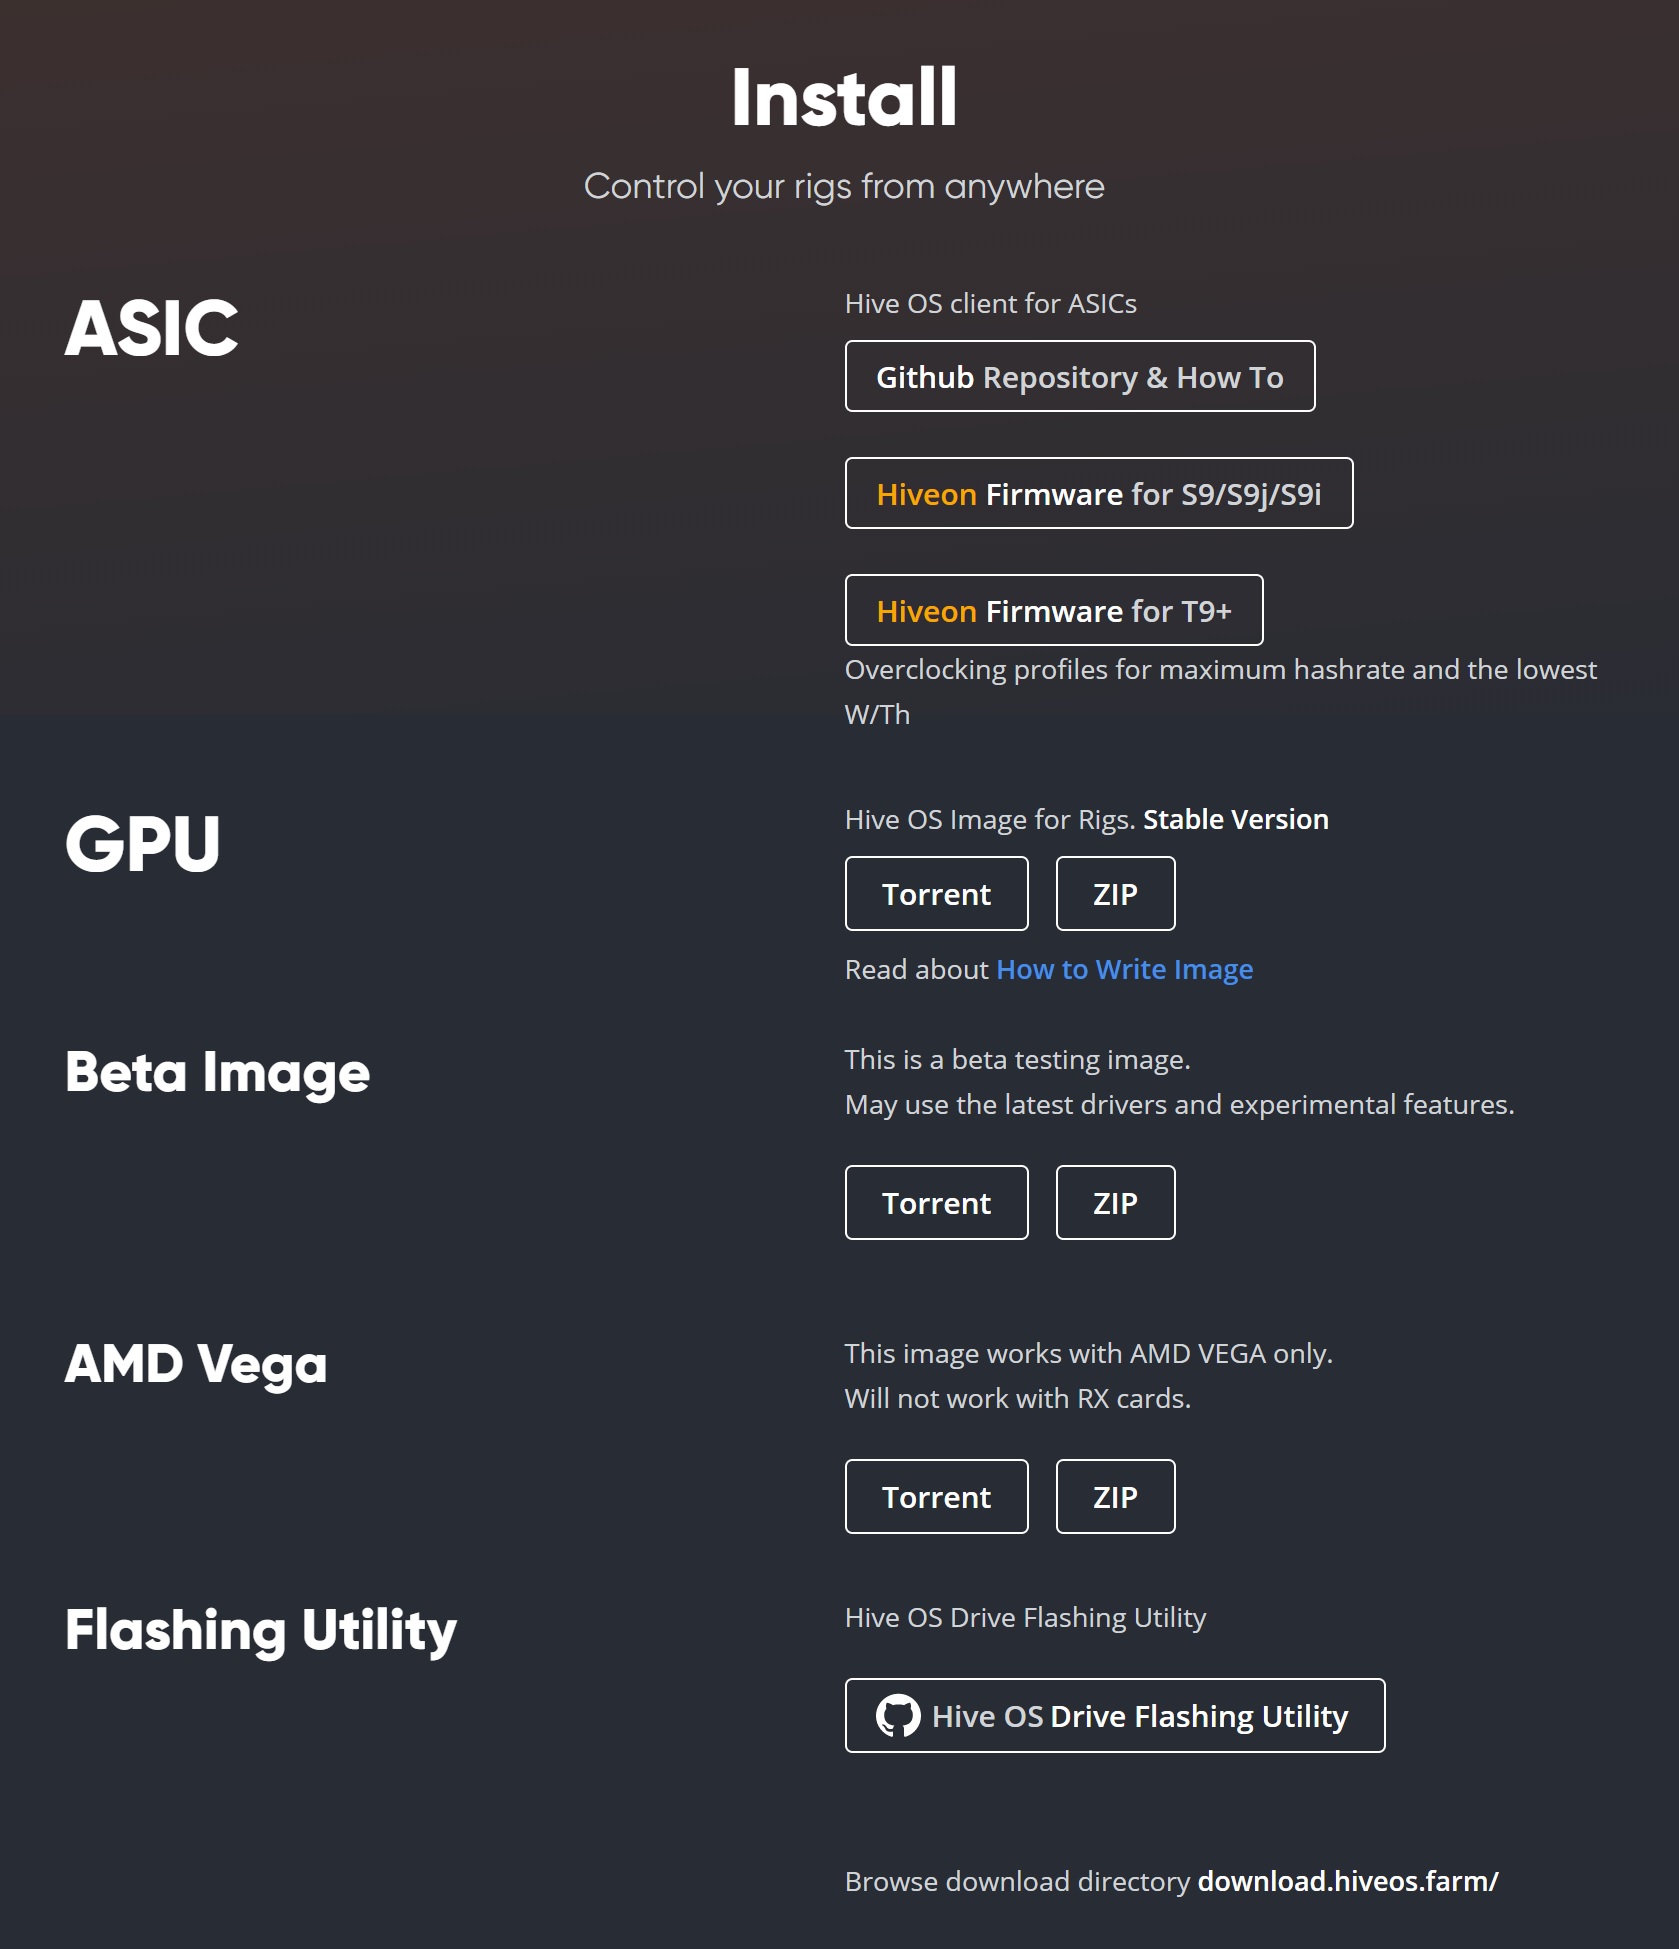
There are several types of installation images: for ASICs, for GPU rigs and a separate image for Vega video cards. For all other video cards you need to choose a GPU image. There are two ways to download: a ZIP file directly from the site or a torrent file if the HiveOS site is overloaded.
To record a downloaded image, you can’t just copy the file to a USB flash drive, because you need a special "bit-by-bit" recording mode so that the flash drive becomes bootable.
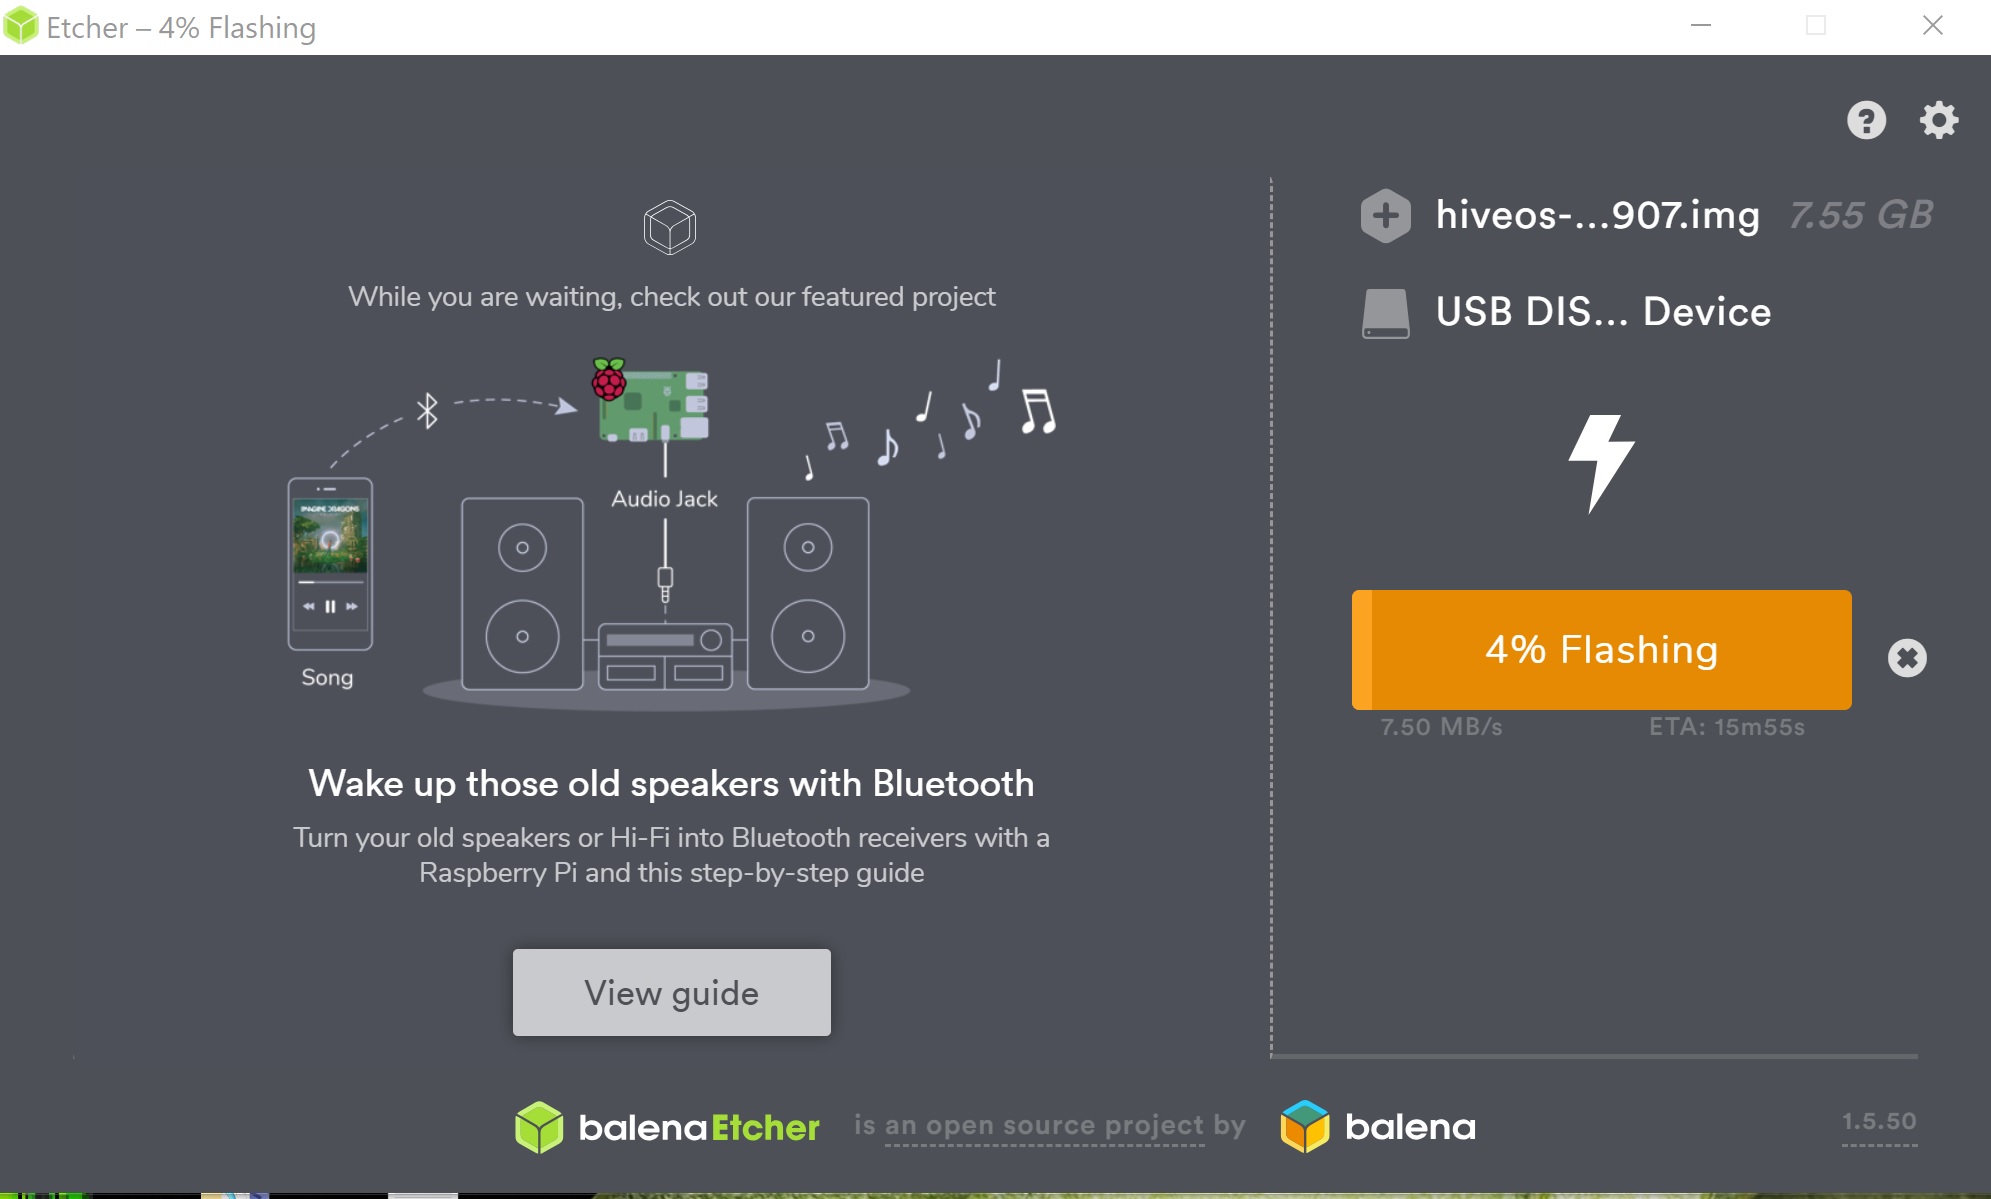
This recording mode is provided by a specially developed program with a simple interface - Etcher. You can download it on the official site etcher.io

Image recording takes place in three stages.
1. The choice of the downloaded hiveos image, it is not necessary to extract the image itself from the archive, because the program will do it itself. Select Image Button
2. Select a USB flash drive or disk where the image will be recorded.
3 Click on the Flash button! And wait for the image to be written to external media.
During image recording, Windows will offer to format the USB flash drive or disk. This is not necessary, just click cancel.
Set up HiveOS to get started
While the image is being written to disk, go back to the HiveOS website, go to your personal account.
After installing the NiveOS image, your USB Flash drive will be visible as 3 different disks. One of them will have the name "HIVE".
You may need to reconnect the flash drive after recording the HiveOS image.
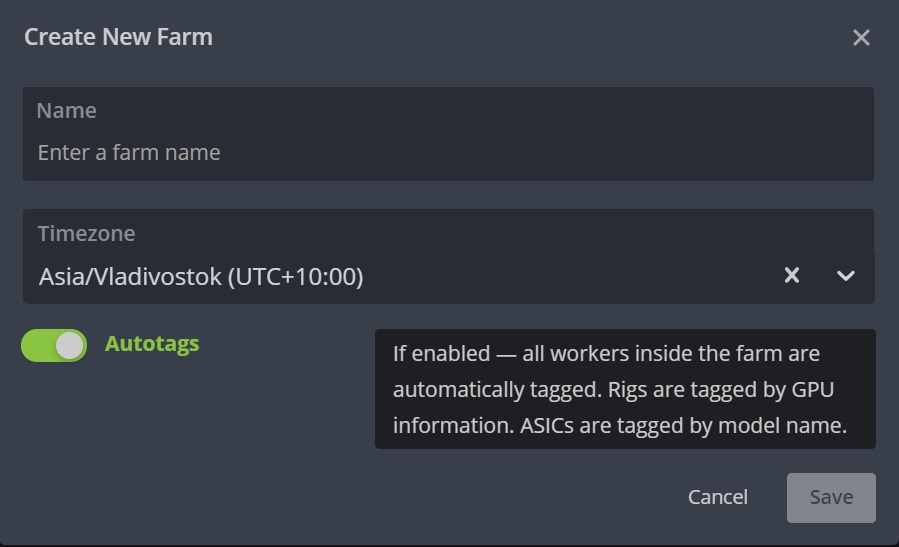
First you need to create a new farm, for this there is a PLUS button in the top menu.

After creating a new rig - it will appear on the main window, go to its settings.
Already in the rig settings window, we also click on the "PLUS" button in the top menu, where we select "Add Worker"
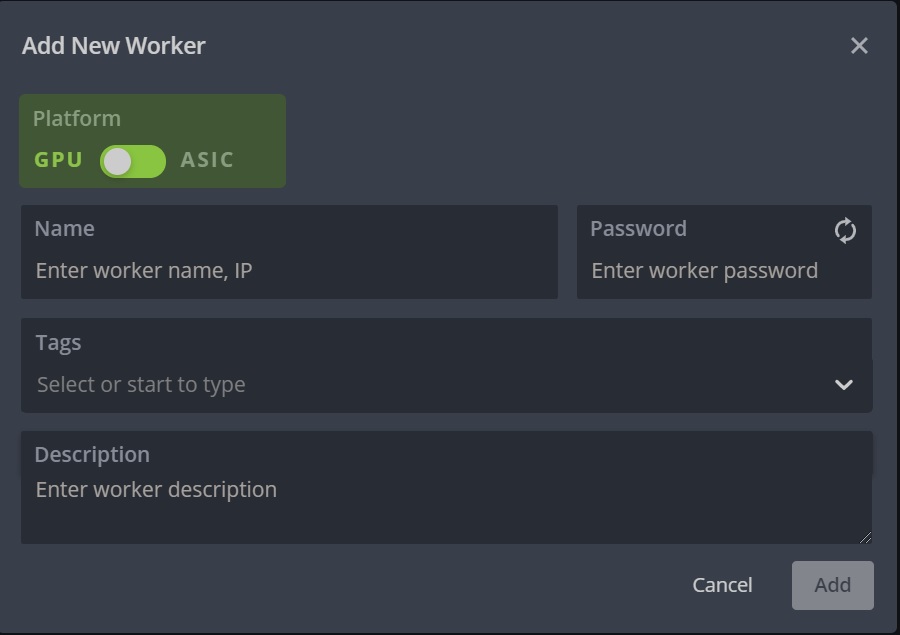
In the worker's creation menu, select the GPU or ASIC device, come up with a name and password. The remaining fields are optional.
After creating the worker, you will see the data for the worker: Farm_Hash, RIG_ID and RIG_Password. This data is necessary to identify your rig. And they need to be written to the flash drive that you created using the Etcher program.
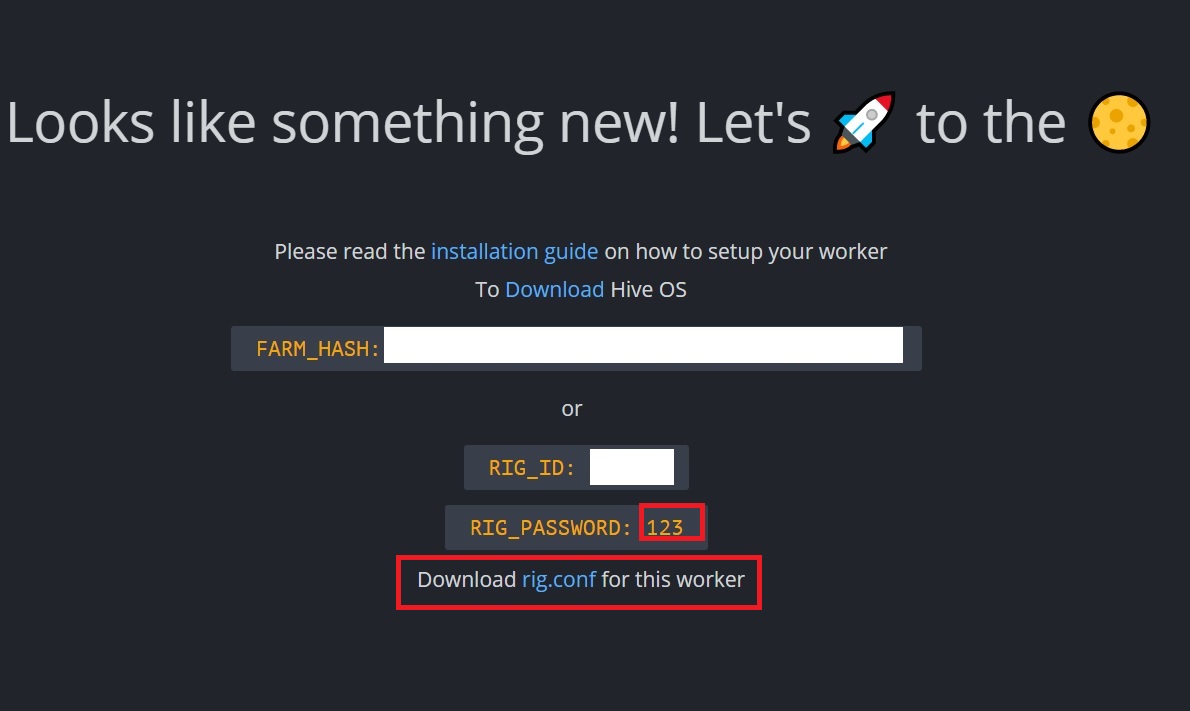
We go into the created HIVE drive on a USB flash drive, after downloading the RIG.CONF file. Downloading this file is available after creating the worker.
The RIG.CONF file must be copied to the "HIVE" flash drive in the root directory of the flash drive.
You can skip this step, but instead, when you first start HIVEOS, you will have to enter RIG_ID and RIG_PASSWORD to activate the system.
Configuring HIVEOS to start cryptocurrency mining
We have already taken the first step to create a worker to get the RIG.CONF file, then it remains to configure Wallets, Flight Sheets and choose the optimal settings for video cards.
Immediately after creating the worker, you need to create a Wallet for each cryptocurrency that you will mine.
Further in the example, we consider setting up a GPU rig on HiveOS for mining the popular cryptocurrency ETHEREUM. Similar actions will be relevant for all other options.
In the HiveOS main menu, where a list of all your rigs, look for the "Wallets" menu, go there and create a new wallet. The "Add wallet" button in the right corner.

Creating a wallet from the main menu, you create a global wallet that will be valid for all mining rigs, and not for one, if you create a wallet in the menu of one selected rig.
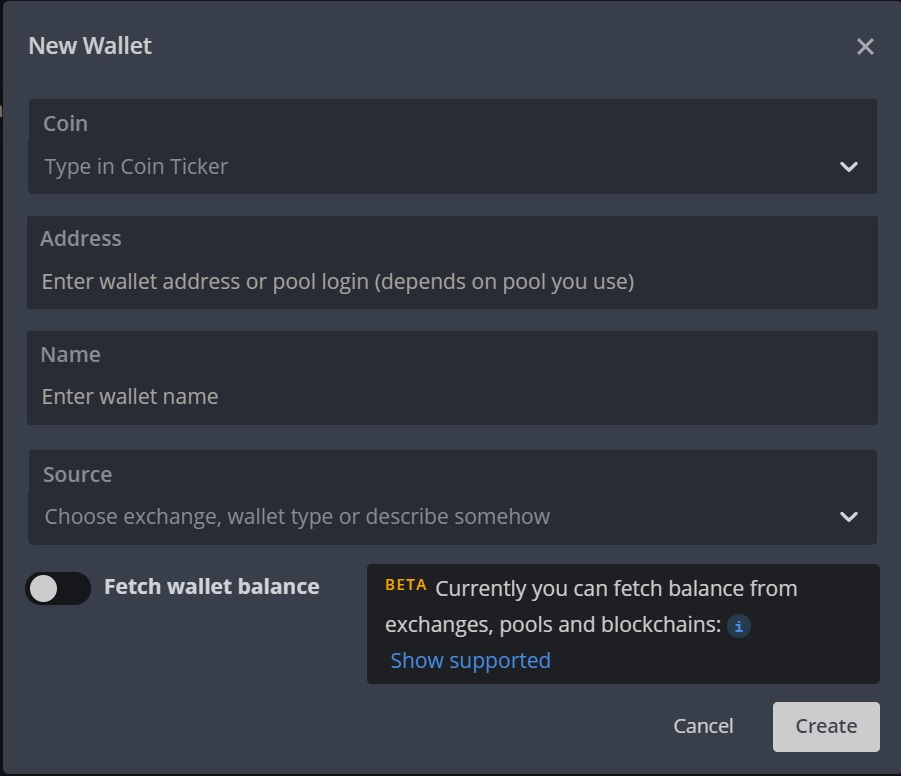
Next, you need to select "Coin" or cryptocurrency. Indicate the address where the mined coins will come. As a storage, it is better to choose local wallets or large cryptocurrency exchanges, for example, Binance.
Wallet name is the choice of the name of your choice. For Ether, you can call it Ethereum.
The source is optional, as is the API key.
The "Get wallet balance" switch is preferably turned on for your convenience. Because The account balance will be shown immediately in HiveOS, so that it would be easier to monitor the final result of mining.
The next step is to create a Flight Sheet.
Flight sheet is an option for final setting up HiveOS to start mining. Flight sheets as well as wallets are global for all rigs and individual for certain rigs. Create a flight sheet in the main menu to create a global flight sheet for all rigs at once.
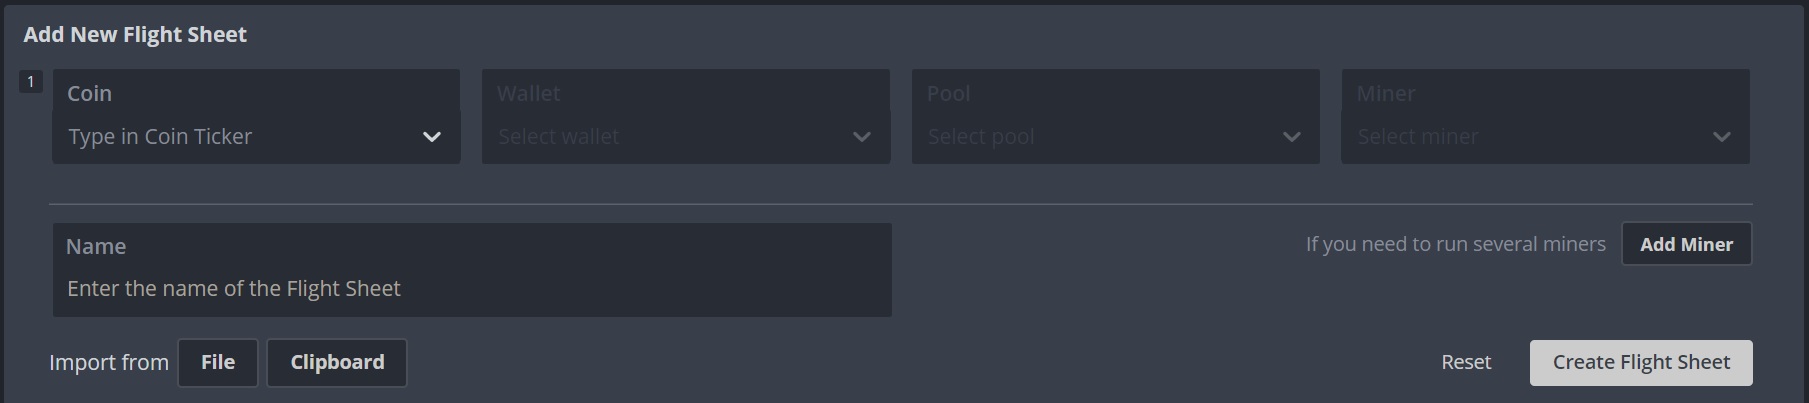
Coin - the choice of cryptocurrency for which a flight sheet is created. Choose ETH.
Wallet - the choice of the Ethereum cryptocurrency wallet created in the previous step.
Pool - the choice of a pool for mining, it is advisable to choose from the supported pools for ease of setup.
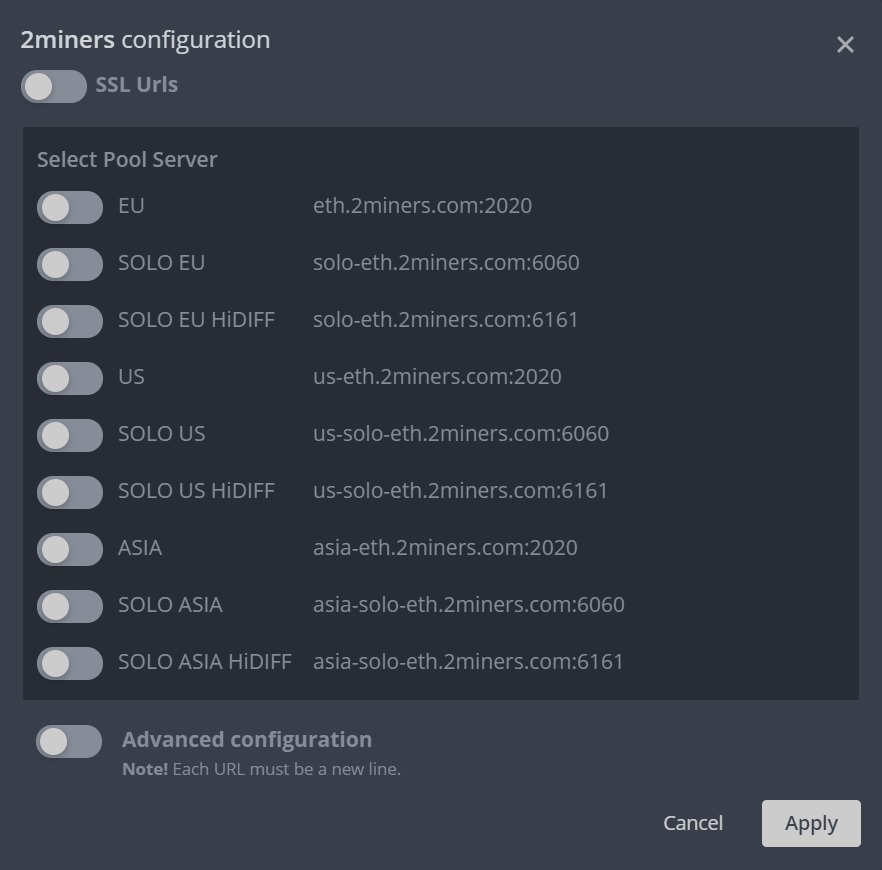
For Ethereum, we chose the Binance pool. Before you start working with this pool, you need to register using this link.
We select in the Pool window - Binance Pool, a server selection window appears. Select EU Server and click "Apply." You do not need to configure anything else.
Miner - the choice of a program for mining. For Ethereum, select Phoenix. Some miners like Claymore suggest using dual mining, i.e. mining two coins at once. Therefore, for these miners, you can use additional configuration windows, which we will not touch on now and just skip. Because such operating modes can lead to a quick failure of the equipment and for beginner miners in the early stages it is better to avoid them.
Additional settings for miner, if you selected a pool from the list of supported ones, is not required. Therefore, the miner settings menu may be required only in rare cases when the standard settings are unstable.
Click on the button "Create Flight List".
Now everything is ready to launch your first mining rig on HiveOS.
We go to the created RIG in the Workers menu.
Check that the system sees all the video cards in our case, there are 4 of them, while the power consumption of the system is already shown. At the bottom, the worker we created called GRIN should not have a white WI-FI icon with an exclamation mark. Otherwise, your RIG GPU is offline and you cannot manage it.
If your rig is still offline, then connect a monitor to the rig and verify that the system has booted and does not require a password at the first login. In the event that the HiveOS boot does not occur, you need to go into the BIOS of the motherboard (DEL button at boot) and install the boot from USB.
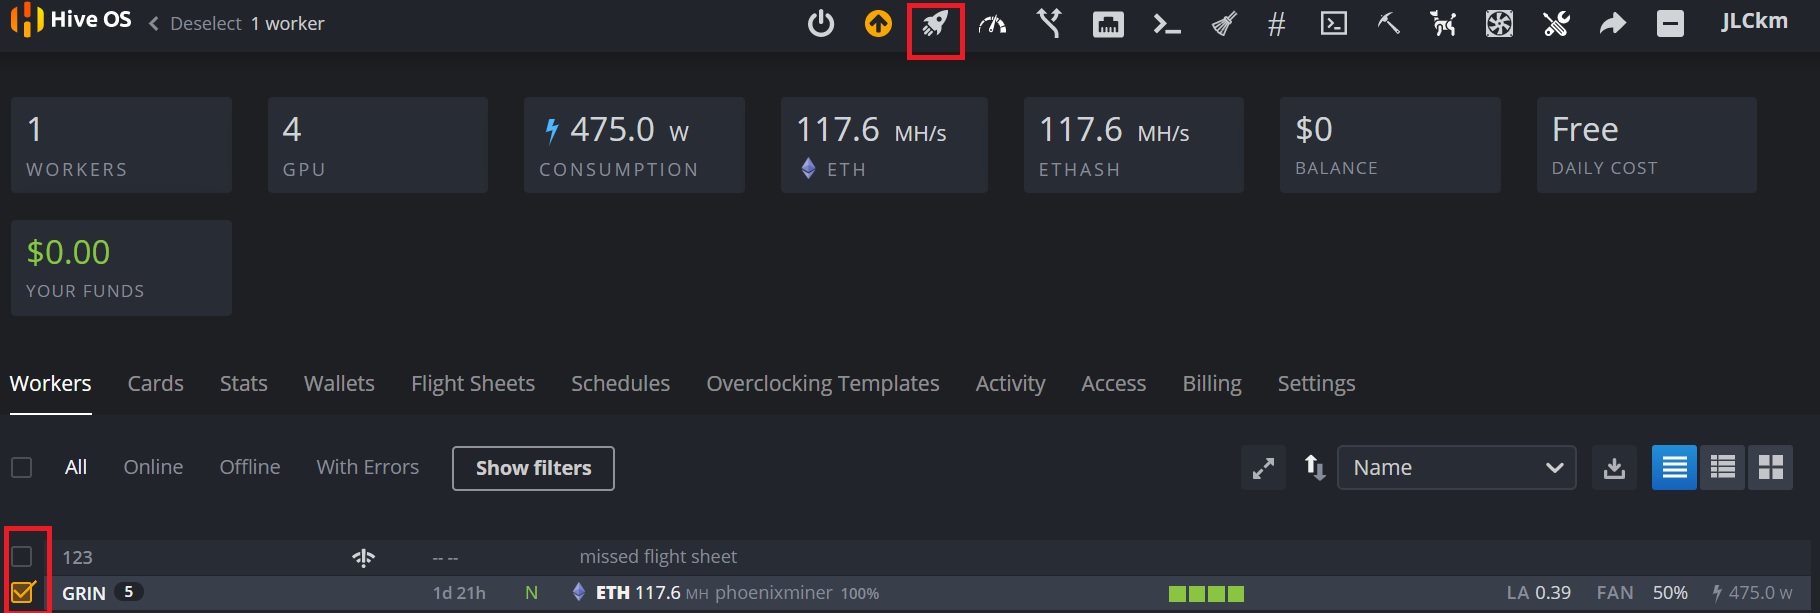
Ideally, you will see a picture similar to that in the screenshot.
To start mining, check the box opposite the rig (we have it GRIN). After that, the control panel will appear in the upper right corner.
Click on the ROCKET
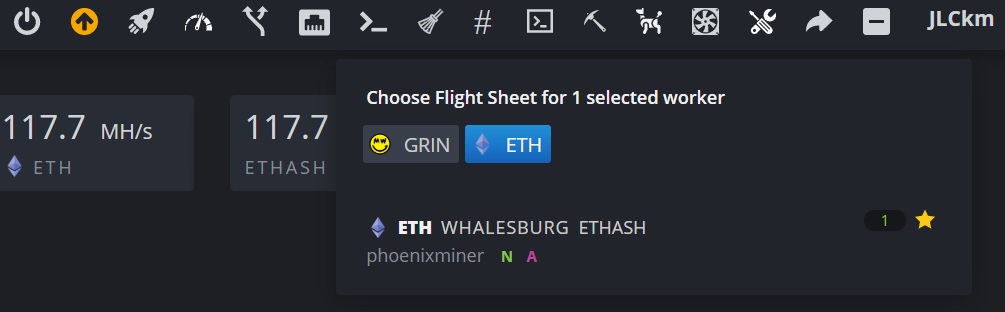
Next, select the flight sheet
After a minute, we refresh the page in the browser and get a similar result:
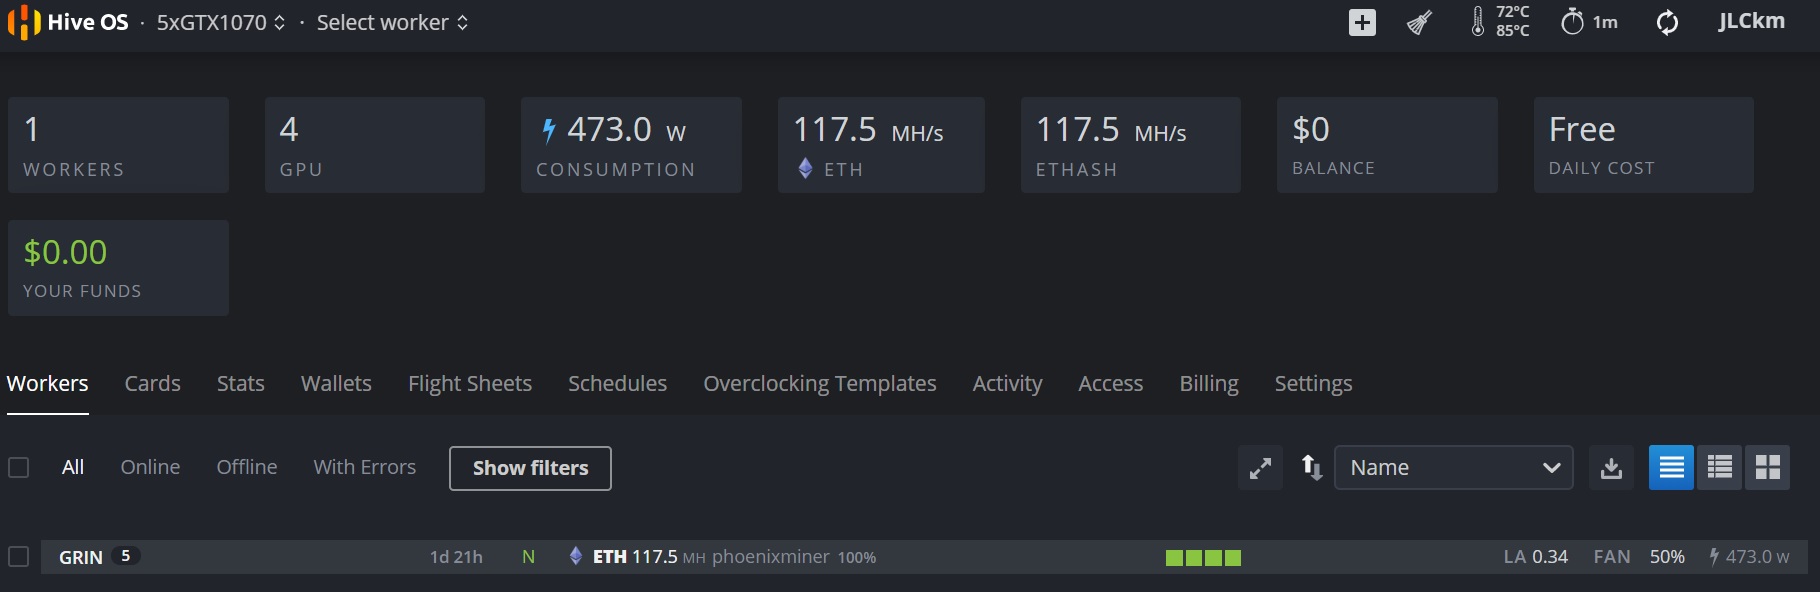
The main menu of the rig shows the power consumption and the hash of the entire rig during mining.
Now you can go to the selected pool and check that hashrate is shown there.
This concludes the main part about how to set up HiveOS for the first time.
Next, we will talk about the main features of using HiveOS because of which, in fact, everyone switches to this OS.
Key features and functionality of HiveOS
The first thing worth noting is the ready-made options for tuning video cards for mining. Two options are available here: VBIOS firmware and/or frequency setting and Power Limit for all video cards in the system immediately according to the options already selected.
This functionality is available in the Cards menu.

We select one or all of the video cards at once, click on the SPEEDOMETER in the upper right corner and get into the overclock menu of the video cards.

Select a coin and a video card and immediately see the most popular overclocking options for the selected GPU. You can also set all parameters manually in the "CONFIG" tab.
It is worth noting here that Power Limit (PL) is not set here as a percentage of the nominal value, but in watts. Those. PL100 is a 100 watts limitation of GPU consumption.
Choose one of these options and look at the result:

As a result, we increased the hashrate from 27Mh/s to 28MH/s and at the same time reduced the power consumption from 130 to 110W. At the same time, no reboots and direct access to the PC were required.
Thus, you can experiment in search of a better result. Moreover, with this method the maximum that you can get is not stable operation during mining.
What can not be said about the VBIOS firmware, because overclocking with this method can completely break your video card.
As a conclusion, use overclocking without VBIOS firmware, especially since this method covers 95% of all miner needs.
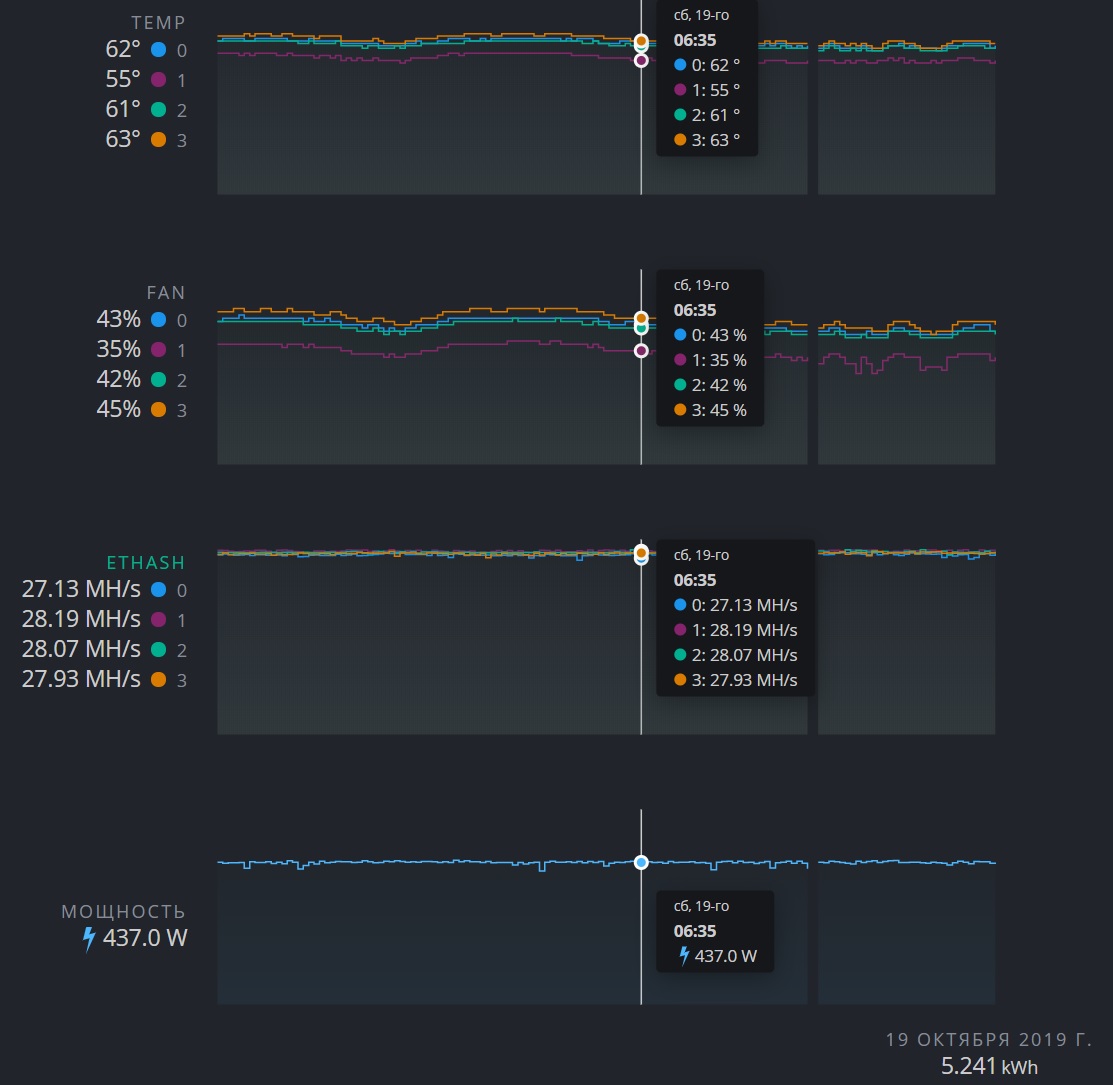
The next useful item on the menu is STATISTICS
Statistics are available for Rig as a whole and for each worker individually. if general statistics are more focused on stability (disabling of cards, reloads, etc.), then the statistics of the worker are more informative, because shows GPU temperature and fan speed
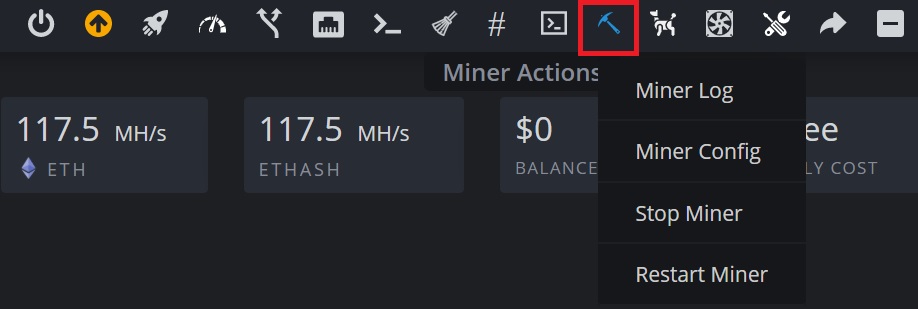
The second useful feature is remote control of the miner: reading logs, configuration and restarting. In the menu, the symbol - PICKAXE is responsible for controlling the miner.
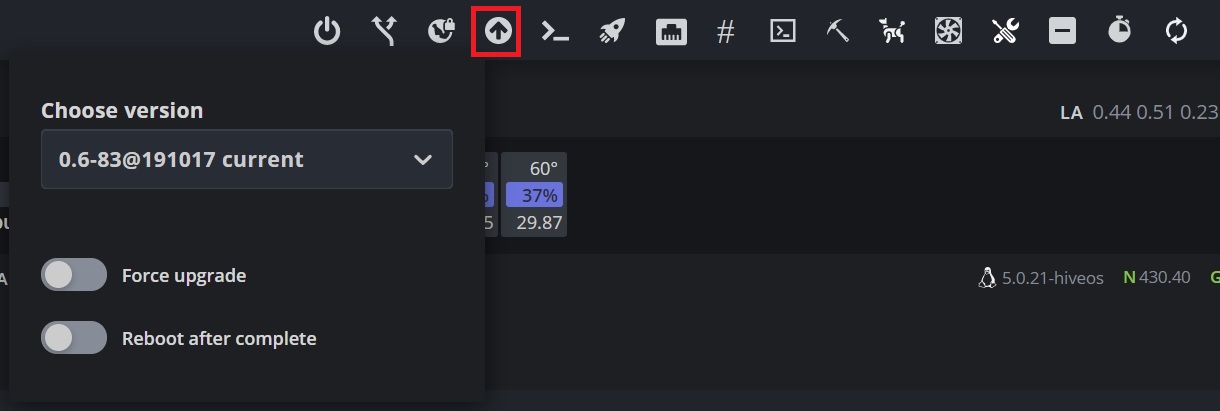
The next necessary function is updating HiveOS (Up Arrow Symbol). Along with the operating system, miners are also automatically updated to the latest version. The default update is in manual mode, but you can automate this process.
The remaining functionality (power management, URL server, VPN, network configuration, remote access, watchdog) may also be needed in some situations, but by default, HiveOS works stably and these functions are most likely not needed.
https://mining-help.ru/