")
")
")
")
")


![]() If you are on the topic of “profitable mining” at the beginning of 2024, then you are probably already mining Qubic, since this is one of the most profitable options for these coins (if not the most profitable at all) and is many times more profitable than what various calculators offer. Perhaps you have heard something about such a coin as TW in different telegram channels for mining and that some people mine the “mysterious” TW instead of Qubic. Let's try to figure out what kind of beast this Team Work is and how to mine it under HiveOS and Windows.
If you are on the topic of “profitable mining” at the beginning of 2024, then you are probably already mining Qubic, since this is one of the most profitable options for these coins (if not the most profitable at all) and is many times more profitable than what various calculators offer. Perhaps you have heard something about such a coin as TW in different telegram channels for mining and that some people mine the “mysterious” TW instead of Qubic. Let's try to figure out what kind of beast this Team Work is and how to mine it under HiveOS and Windows.
In fact, TW (Team Work) is not some new cryptocurrency with its own blockchain, but simply a token in the Binance Smart Chain network, which is paid to miners for mining Qubic to the address of the token owner. As for profitability, according to our calculations, the profitability of mining Qubic (QBIC) and Team Work (TW) is almost at the same level, and depends on the current exchange rate of these coins and at what prices to sell them.
However, there is a certain nuance with “mining” TW (if this process can be called mining at all); when mining Team Work (TW), you receive not only the TW tokens themselves, but also the USDT-TW LP liquidity tokens of the Pancake-swap swap for the TW pool -USDT on the BSC-20 network, which can also be withdrawn and receive additional TW and USDT. We will also tell you how to do this below.
Creating a Team Work (TW) Wallet
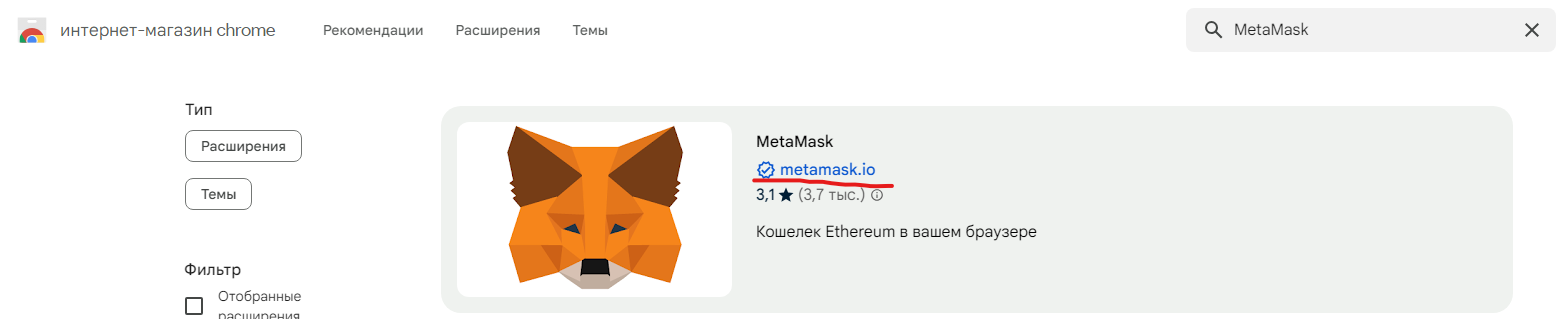
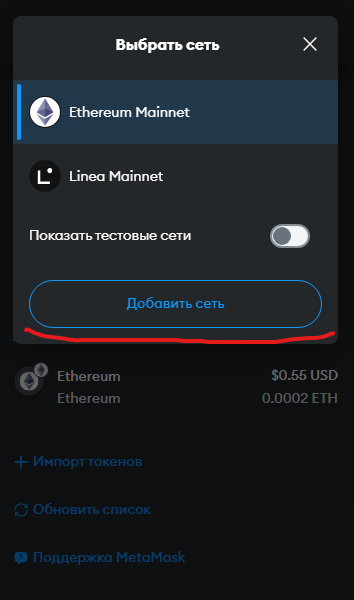
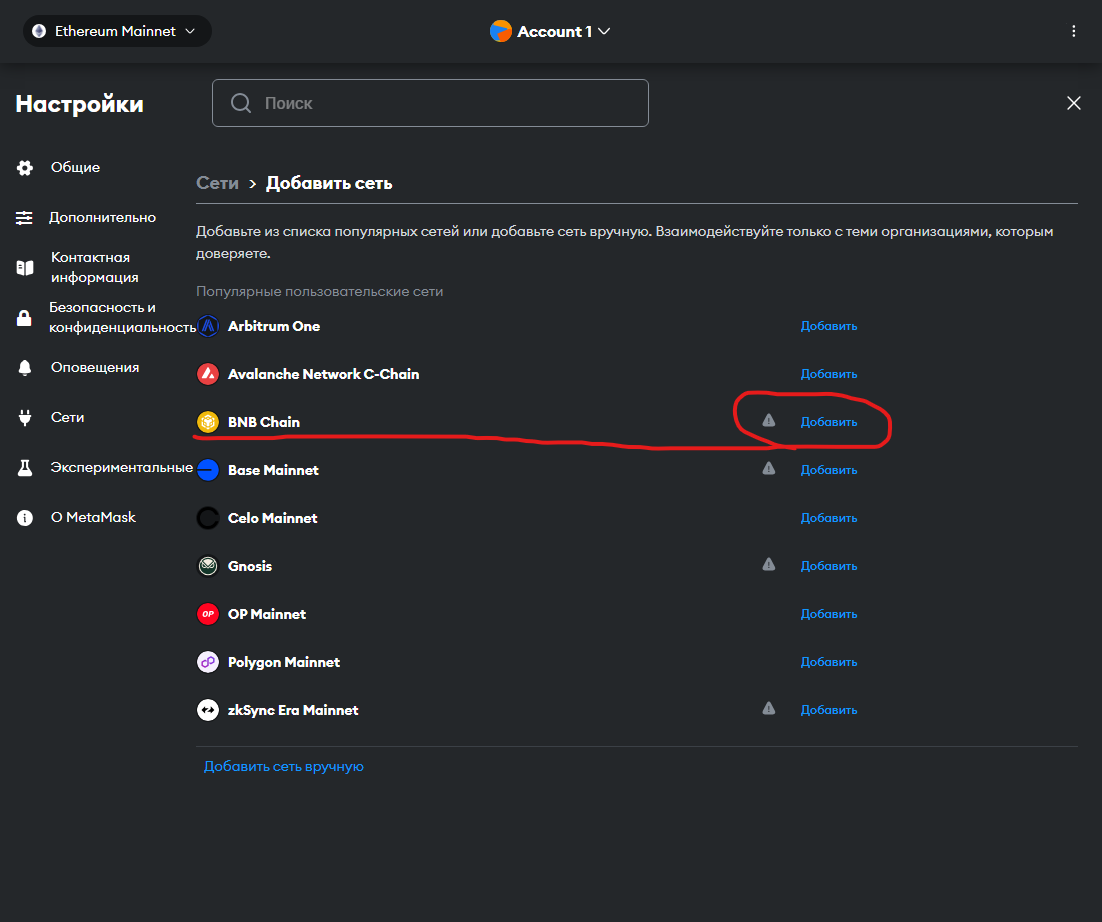
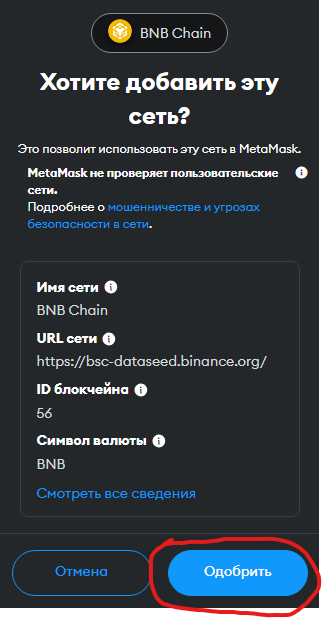
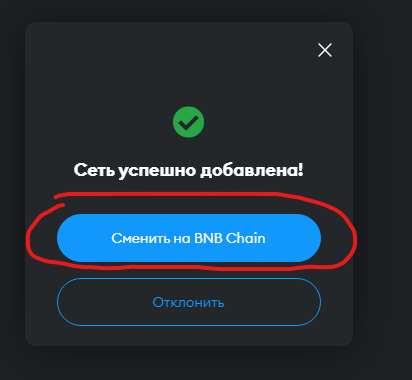
To obtain an address for Team Work deposits, we will need a browser wallet extension for various MetaMask networks, which you most likely already have installed if you have ever worked with Ether. If you have not installed it, then do so (the extension exists for both Chrome and Firefox), we will not consider this process in detail within the framework of this material. Next, you will have to add the Binance Smart Chain network to Metamask, if you have not added it previously. To do this, click the down arrow to the left of your account name and then the Add network button. In the window that opens, click Add next to BNB chain. Then click the Approve button, and then immediately Change to BNB Chain to make it active.
I would like to note right away that for any transactions on the BSC-20 network (withdrawal or exchange of tokens) you will need to have BNB coins on your balance - this is the main coin of the network in which transaction fees are paid. Therefore, you will have to make at least a minimum deposit of BNB to your wallet, you can buy BNB and send it to your wallet from almost any popular exchange, for example Binance, Bybit, Mexc, OKX, or from the most popular “mining exchange” Xeggex on which very low withdrawal fees. To do this, send BNB from the exchange of your choice to the address from the MetaMask wallet and specify the BSC-20 network (Binance Smart Chain) when sending. A couple of dollars will be enough for several transactions.
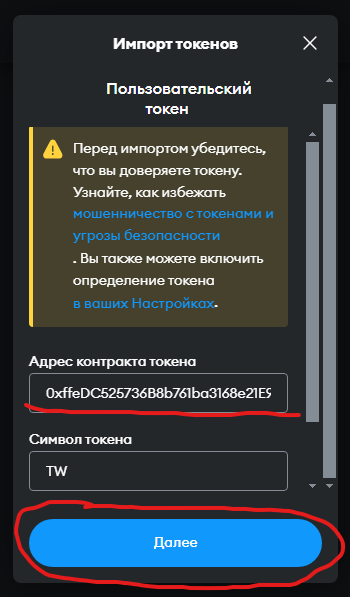
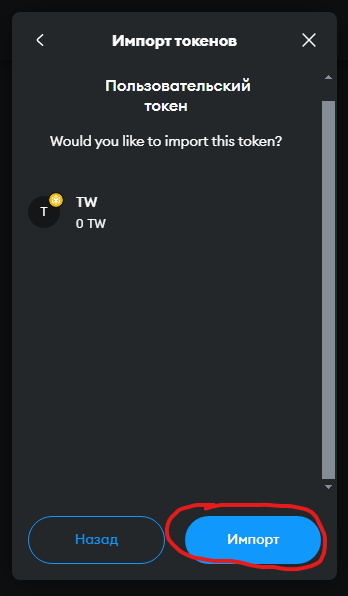
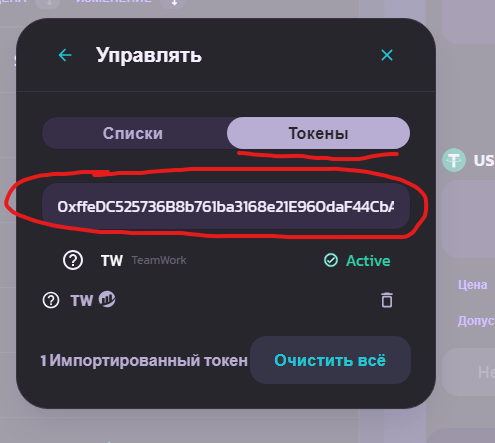
In order for the reward for mining in TW tokens to be displayed in your wallet, you must add this token to MetaMask. To do this, click on Import tokens and enter the smart contract address of this token, here it is: 0xffeDC525736B8b761ba3168e21E960daF44CbAe9 and then click Next and Import.
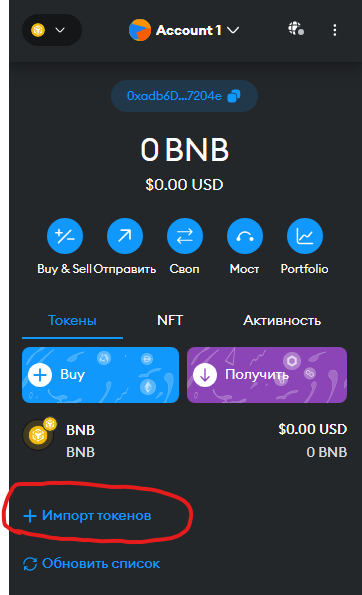
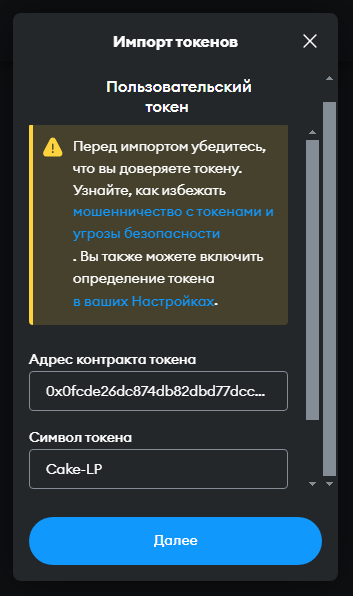
You can immediately add a liquidity pool token, since in addition to TW for mining you will also receive them. Let's add a liquidity pool token to the Pancake swap. To do this, by analogy with the TW token, we add the smart contract address to the Token Import. Here is the address for it: 0x0fcde26dc874db82dbd77dcca341ff529965ff37
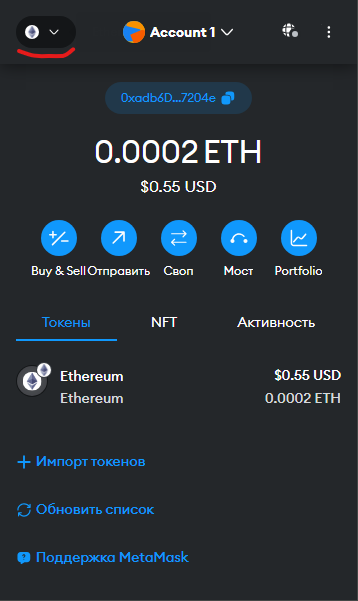
As a result, your wallet should display 3 coins (tokens): BNB, TW and Cake-LP.

Obtaining a Payout ID for TW mining on the Qubic network.
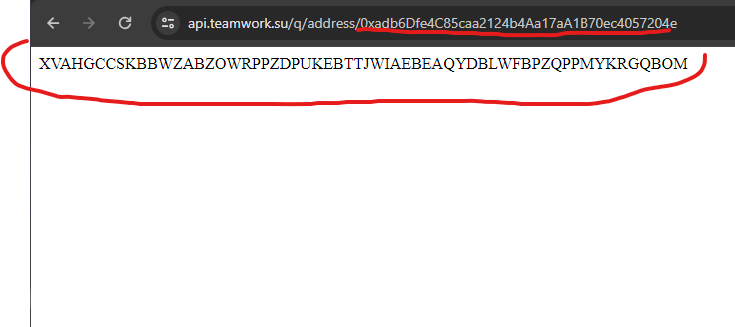
To do this, copy your wallet address in the BSC-20 network into Metamask and follow this link: https://api.teamwork.su/q/address/YOUR_WALLET_ADDRESS_IN_NETWORK_BINANCE_SMART_CHAIN.
By replacing the text YOUR_WALLET_ADDRESS_ON_NETWORK_BINANCE_SMART_CHAIN with Your wallet from Metamask. After which you will see your PayoutId on the screen, copy and save it, this is the address you will mine at.

Setting up mining on HiveOs.
Mining in HiveOs is configured by analogy with Qubic, how to do this, read in our previous material about Qubic mining (mining item on HiveOs), in this case we do everything exactly the same except for the mining config.
- First, make sure you have the latest release of HiveOs or the latest beta version installed. The main thing is that the Nvidia driver at least version 525 or higher is installed on the system. If you have an older driver, then update your HiveOs or update the driver itself.
- Install CUDA 12.4+ and install the GLIBS >=2.34 library, how to do this also read here.
- Check if your processor can be used for mining with the command cat /proc/cpuinfo | grep avx2 , if there is empty output in the console, then you cannot mine (your processor does not support the AVX-2 or AVX-512 instructions necessary for this), if there is text, then you can.

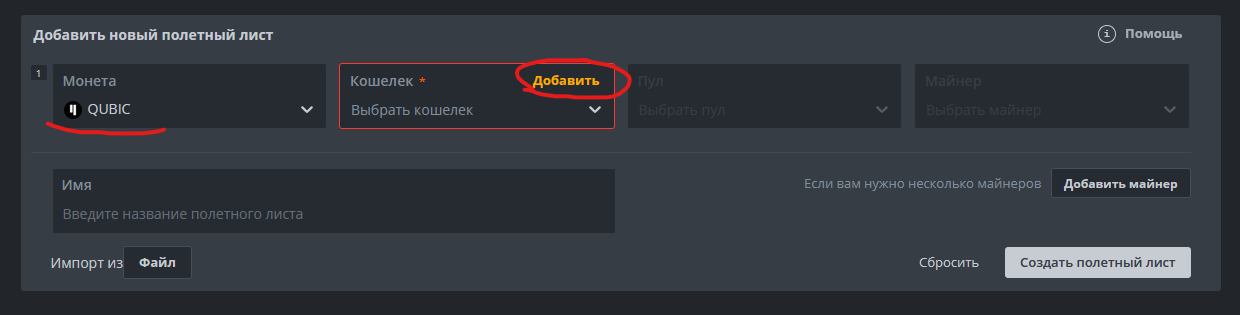
Go to the HiveOs control panel and create a new flight sheet (you can edit the one created for Qubic).
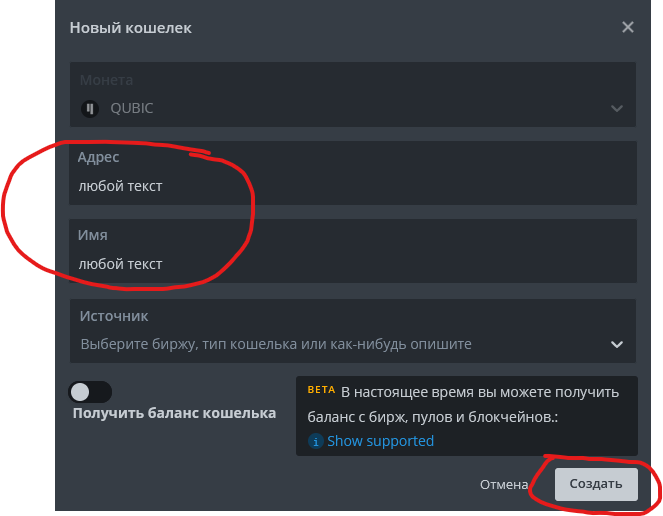
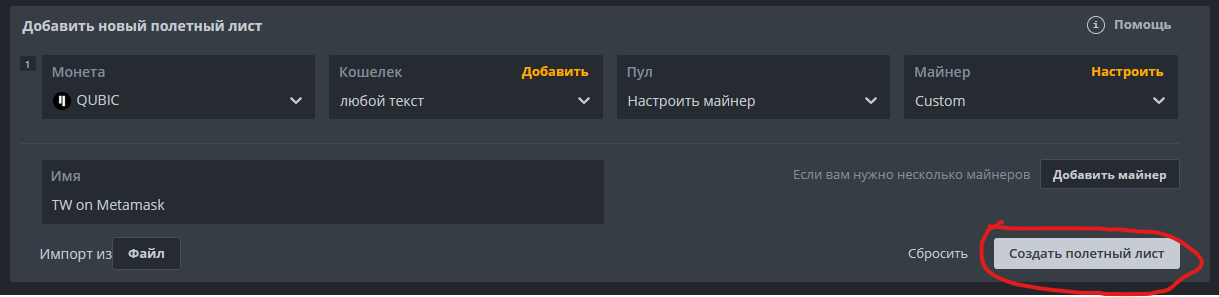
In the Coin field, select QUBIC. In the Wallet field, click Add and in the window that opens, enter any text in the Address and Name fields; we will enter the necessary data directly in the miner itself, and then click on Create. In the Pool field, select Configure miner. We come up with any name you like for the new flight sheet and enter it in the Name field (in our case, I called it TW on Metamask).
In the Miner field, select Custom and click Configure. In the Custom configuration pop-up window, in the Miner name field, enter elword, in the installation URL field, enter the address to the miner installation archive, here it is: https://github.com/EloWord/hiveos/releases/download/v1.8.6/eloword-v1. 8.6fix2.tar.gz then select ---- in the Hash algorithm, Pool address: https://mine.qubic.li as is the case with Qubic. In the template wallet and worker we come up with and enter the name of your worker.
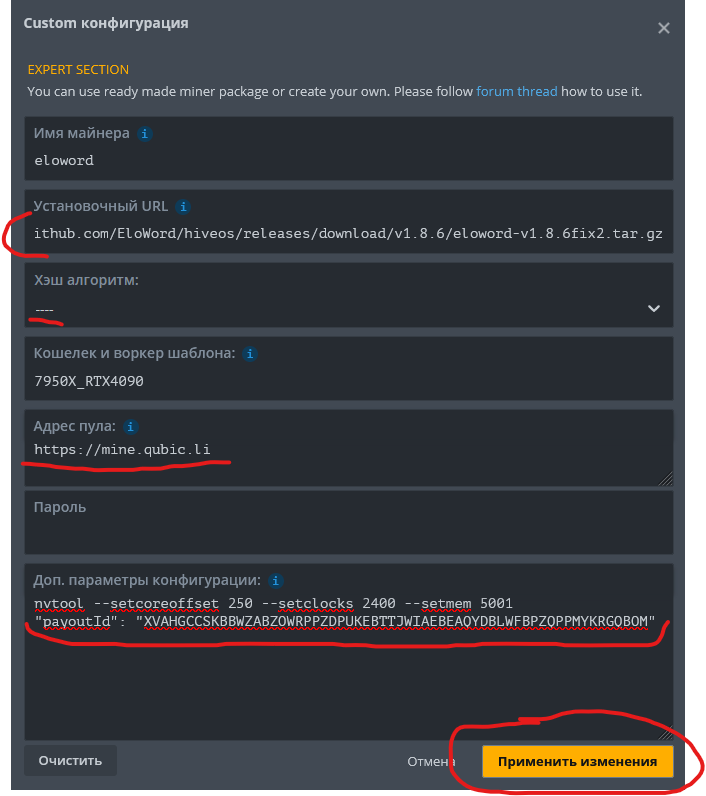
And most importantly, in the Additional field. configuration parameters we register our PayoutId, which we received from this link https://api.teamwork.su/q/address/YOUR_WALLET_ADDRESS_ON_NETWORK_BINANCE_SMART_CHAIN. in the format "payoutId": "CODE OBTAINED FROM THE LINK ABOVE"
You can also enter overclocking parameters in this field (nvtool command), look for a list of commands in our article about Qubic, you can also turn mining on the CPU on and off (option "amountOfThreads": NUMBER_THREADS), and if you want to mine only on the central processor - then the command "cpuOnly": "yes"
After filling out all the fields in the miner settings, click Apply changes, and then Create flight sheet. Now run the created flight sheet and enjoy mining.
Now, to check that mining is indeed configured correctly, go to the pool and after a while you will be able to see your hashrate there. This can be done using the following link https://app.qubic.li/public/pool/YOUR_PAYOUT_ID where you will see the name of the worker and its hashrate.
Please do not confuse the PayoutId for TW (how to get which we described in the first part of this article) with the Access token on the Qubic pool, which is required to mine Qubic on the pool.
Mining Team Work on Windows.
The process of setting up TW mining almost completely repeats that for Qubic, so we will not repeat it, in any case, I recommend that you first read the articles on setting up Qubic mining and how to mine Qubic on Windows using WSL2 since there we looked at a bunch of nuances that it is advisable to keep in mind .
The differences will only be in the miner config; instead of the access token for Qubic (Access token), you will need to register PayoutId for TW.
Here is an example of the appsettings.json config for TW mining:
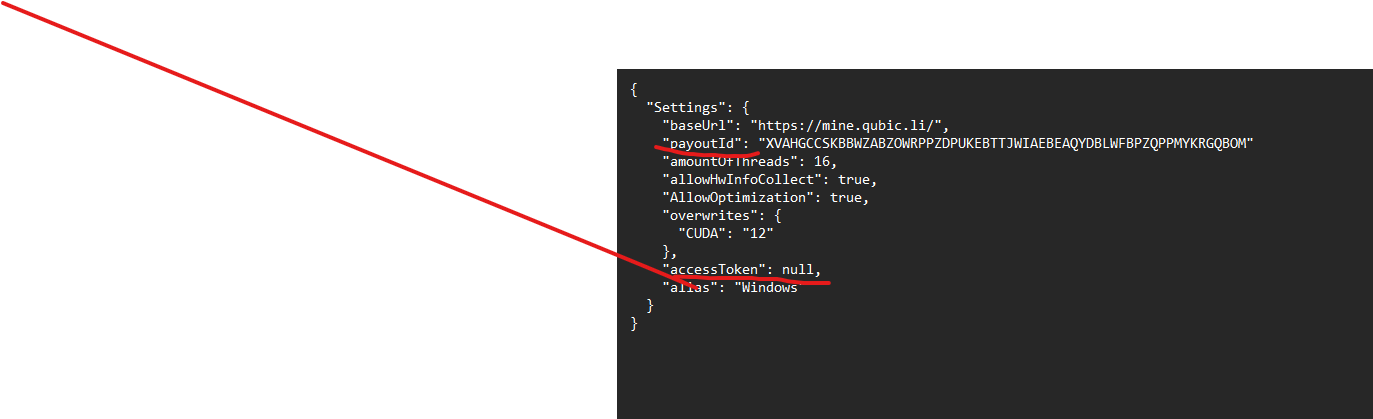
Don't forget to include "accessToken": null, and "payoutId": "YOUR_PAYOUT_ID"
Receiving payments
As with Qubic, payments are made once a week on Thursdays, since a new era is launched on the Qubic network every Thursday. The payment will come in TW and Cake_LP tokens to your MetaMask wallet.
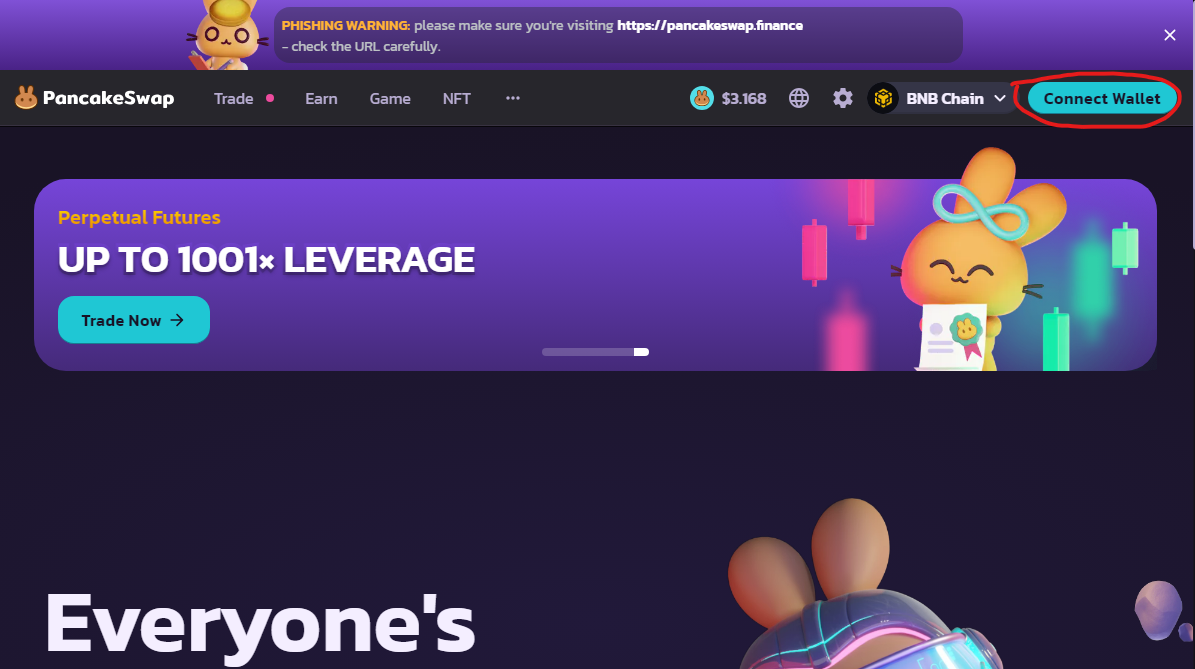
You can cash out TW tokens either on the classic NonKyC exchange or through the WEB3 “swap” Pancake SWAP.
To sell TW tokens on Pancake Swap, go to the swap site and click on Connect Wallet. In the pop-up window, select MetaMask, in Metamask, put a checkmark in front of the account that we want to connect to the swap and click Next and then Connect.

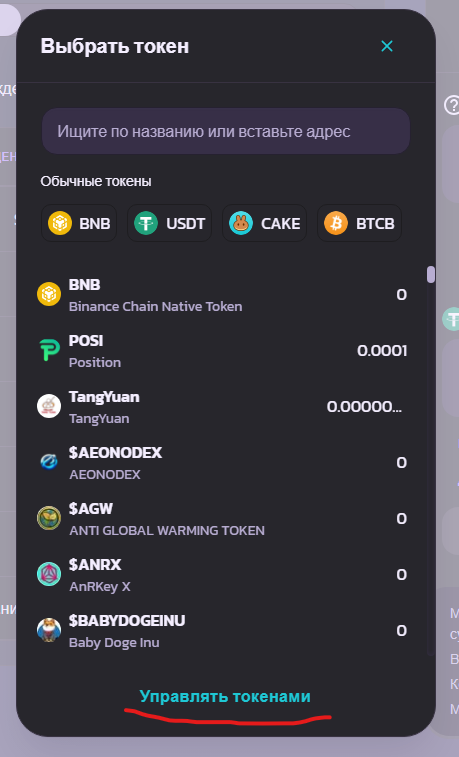
You can now exchange TW tokens into USDT tokens on the BSC-20 network. If the TW token is suddenly not in the list, add it manually by adding the smart contract address 0xffeDC525736B8b761ba3168e21E960daF44CbAe9
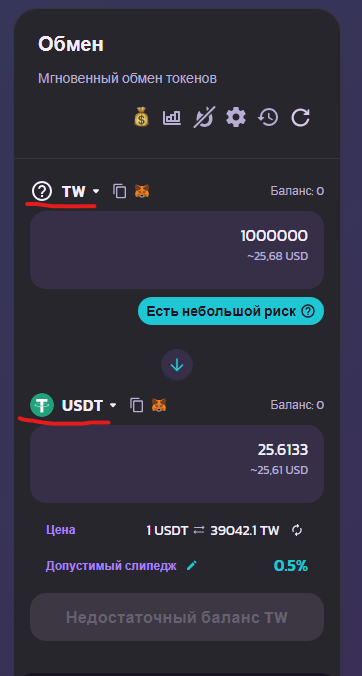
Now you can easily withdraw USDT to any regular exchange that supports deposits on the BSC-20 network. However, do not forget that for any transactions you will need a certain small amount of BNB coins on your balance.
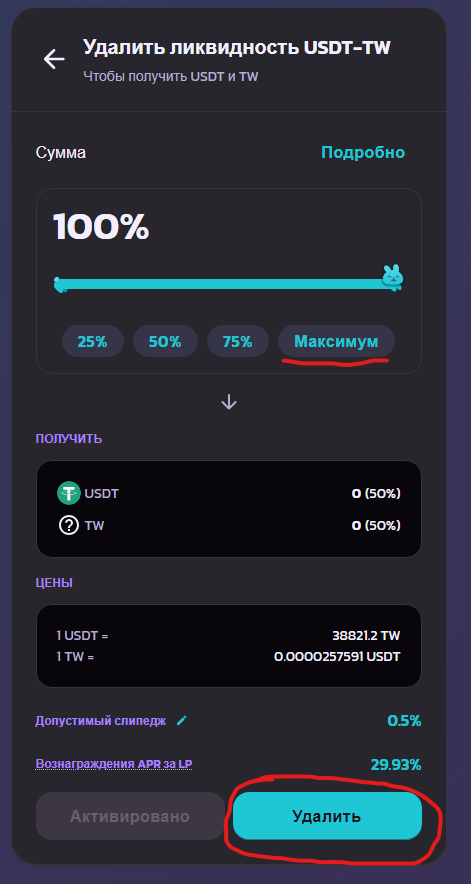
Withdrawing tokens from the liquidity pool (additional income)
We've already imported the Cake-LP token to show up in your MetaMask wallet. Now follow the link to the liquidity pool https://pancakeswap.finance/v2/pair/0x55d398326f99059fF775485246999027B3197955/0xffeDC525736B8b761ba3168e21E960daF44CbAe9, where you can easily withdraw funds from the pool (by clicking the Remove button t), for which you will receive some more TW and USDT tokens, or you can leave it in it and receive a percentage for farming in the liquidity pool (currently it is 30% per annum).