")
")
")
")
")


![]() In this article we will set up Qubic coin (QBIC) mining on Windows and HiveOs. In fact, in this case, this is not even mining in the literal sense of the word, the developers of the Qubic project essentially rent your equipment to train their neural network and pay you a reward in QBIC tokens once a week in proportion to the power of your equipment and how much time during this week (that’s how long one Epoch epoch lasts in the blockchain of this network) you participated in training the neural network. Due to the fact that it is difficult to immediately determine the profitability of Qubic mining (a week-long delay in payments), the setup is not as simple as is usually the case with classical mining and the small amount of information on the Internet, as well as the high requirements for equipment, the profitability of such mining is a very high level (some even consider this coin to be “secret”), in addition, both GPU and CPU are used equally for mining. For Qubic mining, it is highly recommended to have a high-performance processor and a powerful video card, as well as a sufficient amount of RAM. Further in this article you will find information and detailed step-by-step instructions on how to start the Qubic mining process under HiveOs (GPU + CPU) and under Windows (CPU), as well as more information about the coin itself.
In this article we will set up Qubic coin (QBIC) mining on Windows and HiveOs. In fact, in this case, this is not even mining in the literal sense of the word, the developers of the Qubic project essentially rent your equipment to train their neural network and pay you a reward in QBIC tokens once a week in proportion to the power of your equipment and how much time during this week (that’s how long one Epoch epoch lasts in the blockchain of this network) you participated in training the neural network. Due to the fact that it is difficult to immediately determine the profitability of Qubic mining (a week-long delay in payments), the setup is not as simple as is usually the case with classical mining and the small amount of information on the Internet, as well as the high requirements for equipment, the profitability of such mining is a very high level (some even consider this coin to be “secret”), in addition, both GPU and CPU are used equally for mining. For Qubic mining, it is highly recommended to have a high-performance processor and a powerful video card, as well as a sufficient amount of RAM. Further in this article you will find information and detailed step-by-step instructions on how to start the Qubic mining process under HiveOs (GPU + CPU) and under Windows (CPU), as well as more information about the coin itself.
General information about the coin and basic links
The Qubic Project (QBIC) is the world's first L1 blockchain with a useful Proof of Work. The project invites you to become part of the path to achieving real artificial intelligence, which is based on payloads for miners. Qubic is one of the few L1 blockchains that does not charge fees for on-chain transactions, this is guaranteed by votes from 451 “Computers” to verify offline payments. The Qubic project is completely open source and is available on GitHub. Aigarth - AI powered by Qubic offers open source AI for anyone and everyone. The project supports unique smart contracts with a burning mechanism and launched through an IPO with the possibility of passive earnings. The project uses the concept of useful proof of work, instead of wasting energy in mining for nothing, the power of the miners' hardware is used to perform AI tasks for Aigarth. Oracles are bridges between digital blockchain data and the outside world, providing real-world data for smart contracts and the Qubic protocol. Aigarth is an artificial intelligence powered by the Qubic project, which receives information from hundreds of thousands of Qubic miners who create billions of artificial neural networks (additional information about Aigarth). The supply is 1 trillion QBIC coins per epoch (7 days) and is distributed to 676 “Computers” (the local name for validators) in proportion to their network performance. A new era starts every Wednesday and coins are paid out on Thursday.
Qubic is a unique, useful Layer 1 (L1) crypto platform that uses the new Quorum protocol to power the network and enable fast smart contracts. The computing resources of the "miners" are used to train the AI, which makes ProofOfWork useful - uPow. The Qubic network is powered by 676 select computers (validators), which are the latest hardware running the Qubic bare metal protocol for maximum performance. These computers interact with “Oracles” and quickly execute smart contracts, protect the network, process transactions and, as a result, receive a reward for this work in $Qubic tokens, depending on the performance of their network. In order to remain at the top of the rating system (as we remember, there may be only 676 computers), these “computers” can work as pools and receive computing power from miners (the number of which can be in the thousands for each such “computer”). Miners train artificial intelligence to maximize the use of mining energy. Although the miners themselves do not receive a reward directly for training the AI, computers (pools) distribute the reward among their miners at the end of the era depending on the performance and share invested in training the AI.
What problems does the Qubic project solve? Firstly, all transactions on the Qubic protocol are free, which makes this network convenient and cheap for widespread adoption (NFTs, tokens, DAPPs, etc.). Secondly, in the field of mining, the project solves the problem of wasting energy to nowhere, directing all the power of miners’ equipment to a useful task - training artificial neural networks. Third, Qubic is one of the few platforms that allows you to combine smart contracts and oracles, improving smart contracts and allowing them to receive real-time data from the real world.
Qubic uses its own unique consensus algorithm known as Quorum. Qubic does not function like a regular blockchain and the mining process is not required to form new blocks (ticks), even if all miners are disconnected from the Qubic network, the network will continue to function, however the lack of miners will create problems in determining the most productive computer candidates for the next era. To create the next block in the network, there is a tick leader who broadcasts the proposed new tick, and 676 computers send cryptographically signed votes that include hashes of all the internal states of the Qubic network. For a tick to be accepted, 2/3 of the computers must vote.
List of main ideas of the Qubic project:
- Mining on video cards and processors.
- Getting real data in real time from Oracles.
- Computing outsourcing - Aigerth allows you to outsource computing from all over the world using Oracle machines.
- True AI for everyone.
- Open source.
- uPoW - proof of work with payload.
Main links:
- Official website of the Qubic project (QBIC)
- Qubic.li portal is the main web application of the network for monitoring and mining.
- Documentation.
- Tokenomics of the Qubic project.
- Block explorer.
- Miner for Linux and Windows.
- Qubic mining calculator.
- Discord.
- X (Twitter).
- Telegram.
- Medium.
Wallets:
Crypto exchanges:
Setting up Qubic wallet
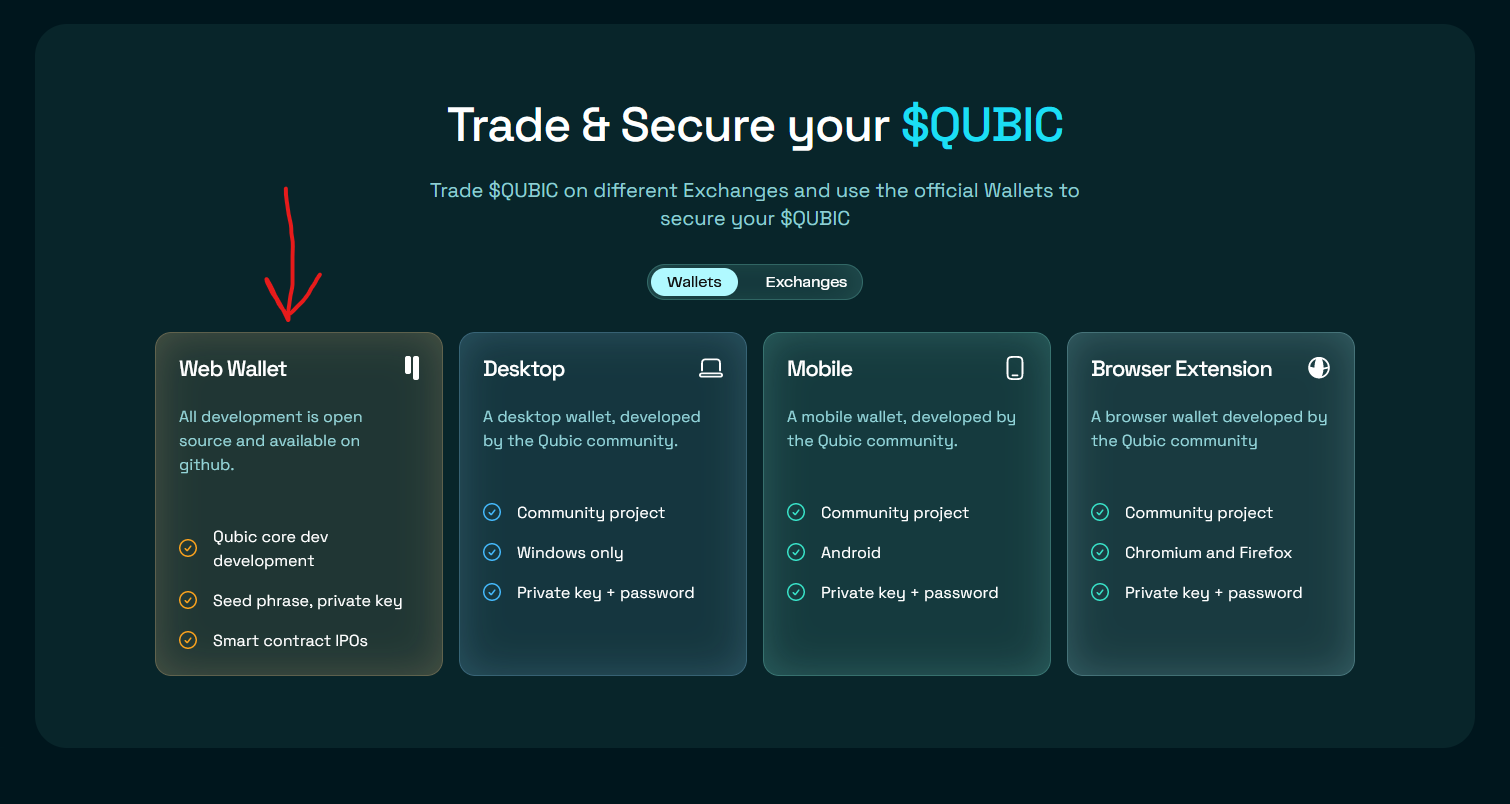
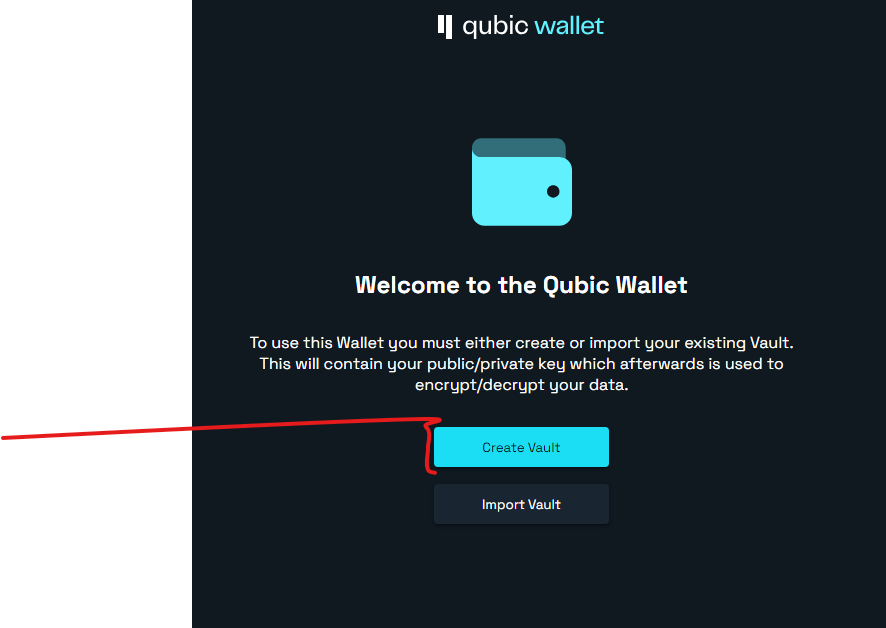
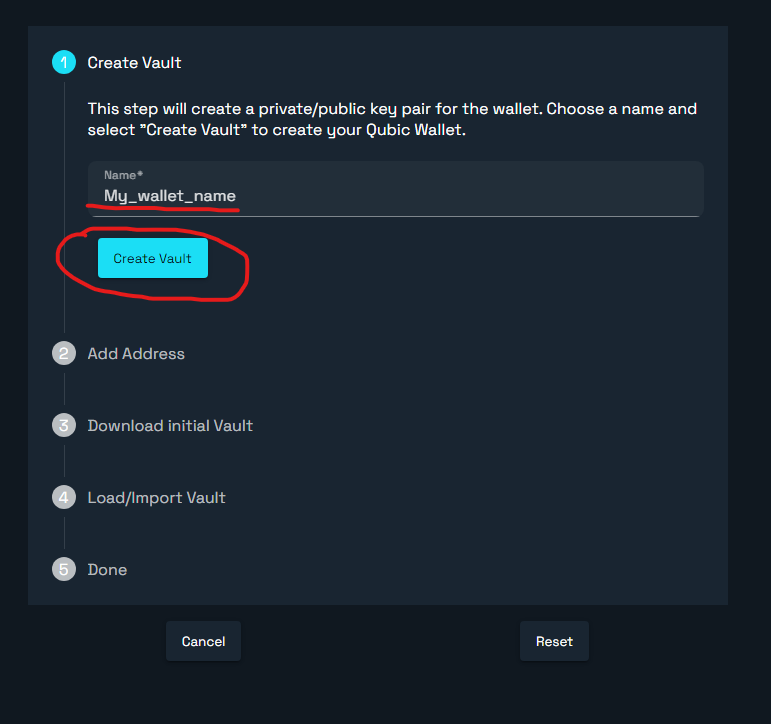
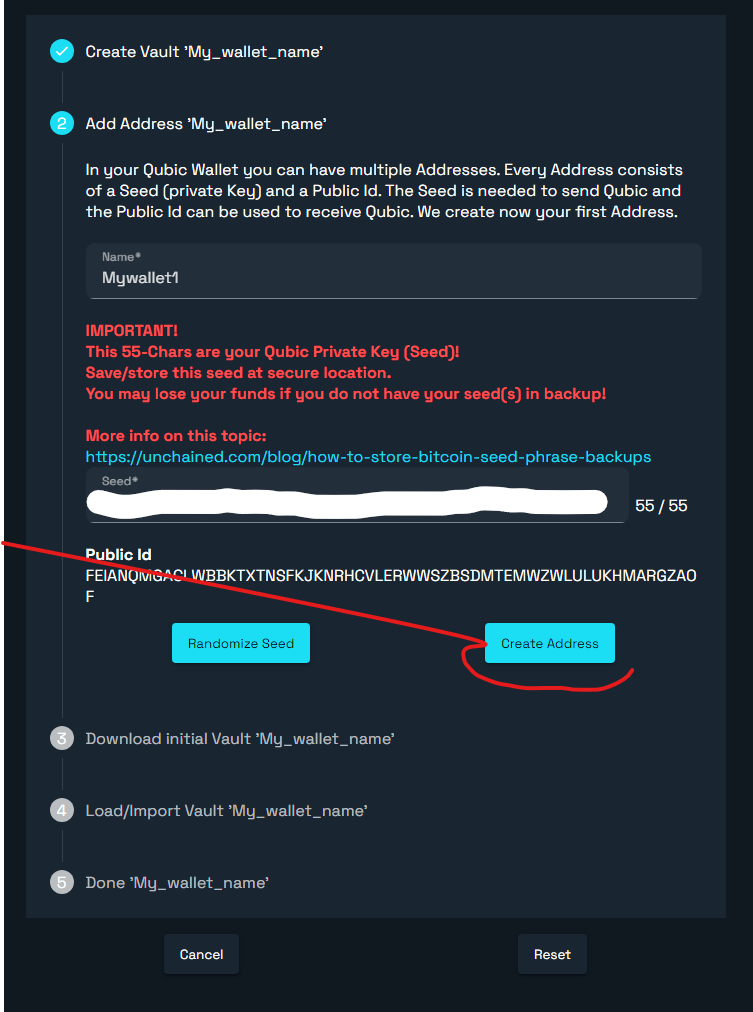
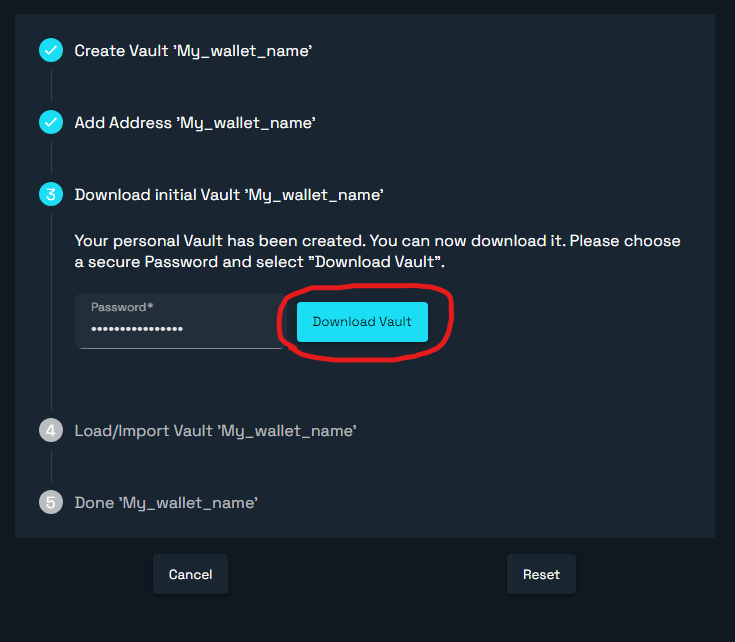
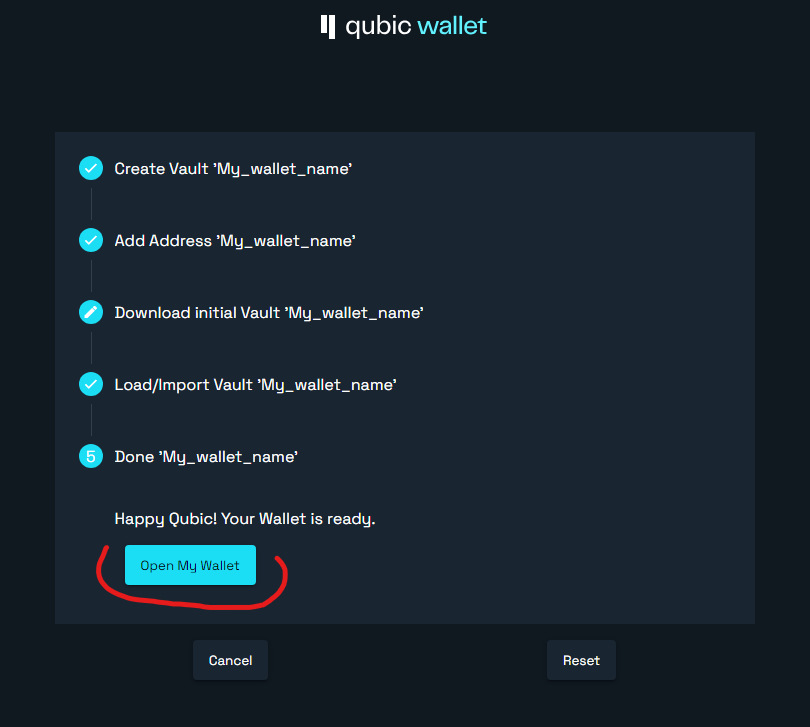
Before you start mining a coin, you will need to create a wallet. To do this, go to the official Qubic website in the wallets section. We select the first option Web wallet as the most convenient in our case. There is also a desktop version for Windows and a mobile version for Android. Then click on the “Create wallet” button. Then fill out the step-by-step form: in the Name field, enter the name of the storage you created in which the private keys will be stored and click on Create Vault. In the second step, we name our wallet, in our case Mywallet1, and click the Randomize seed button to generate a private key (never tell anyone your private key, and save it in a secluded place, if you lose this key, you will lose all your coins). Then click on Create Address. Now create and enter a password for your key vault and click Download Vault to download the vault file. Now again enter the password you created in the previous step and attach the just downloaded file (“Select Vault file”) to import the created private key vault into the Web wallet, then click Verify Vault File to confirm. If in the future you need to log into your wallet on another PC or Account, you will again need to import the vault file and confirm the password. Congratulations, your private key has been created and imported into the Web Wallet, click Open My Wallet to get into it and proceed directly to setting up mining.

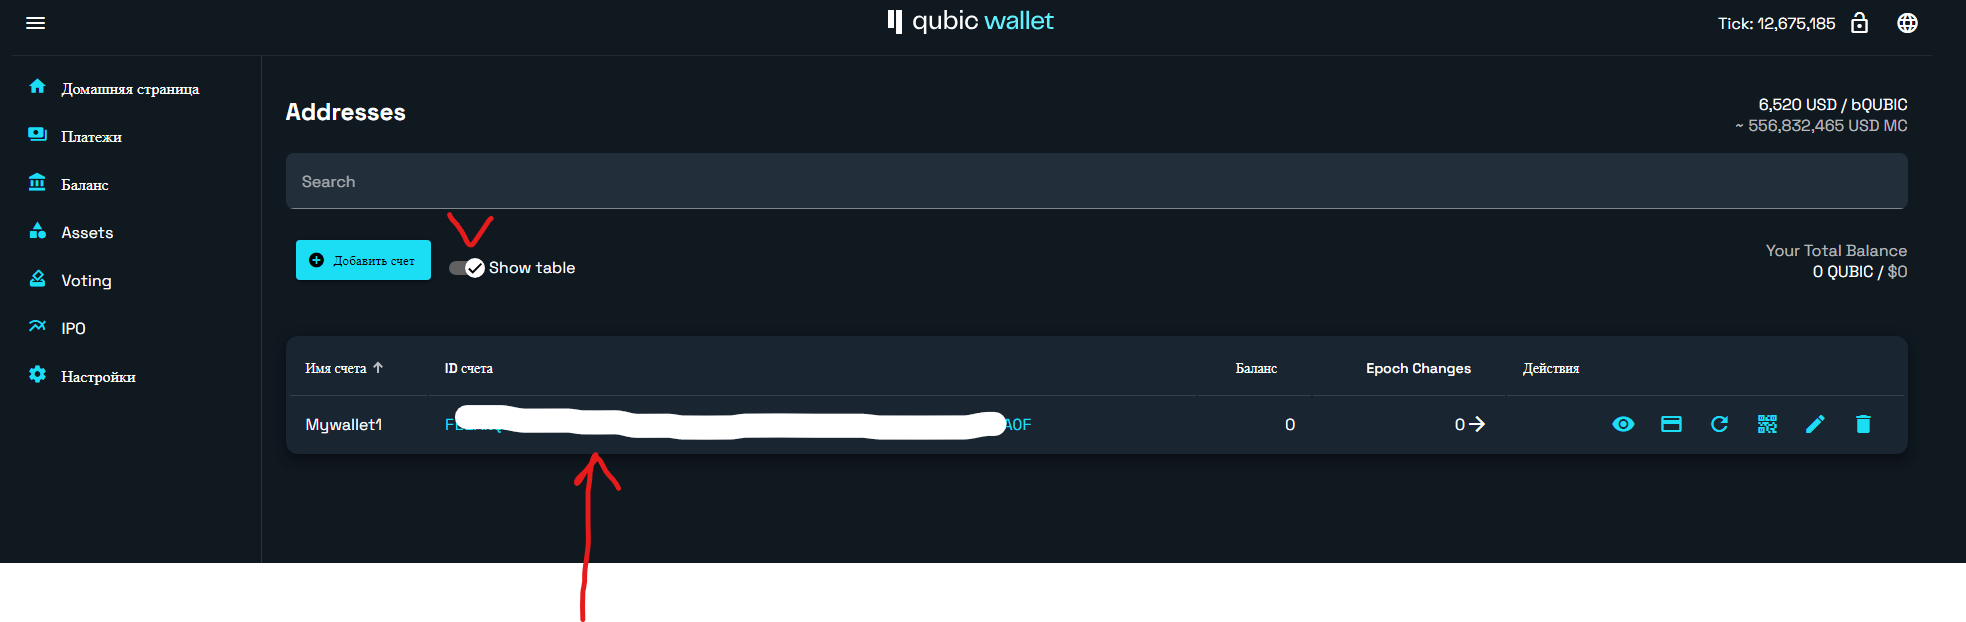
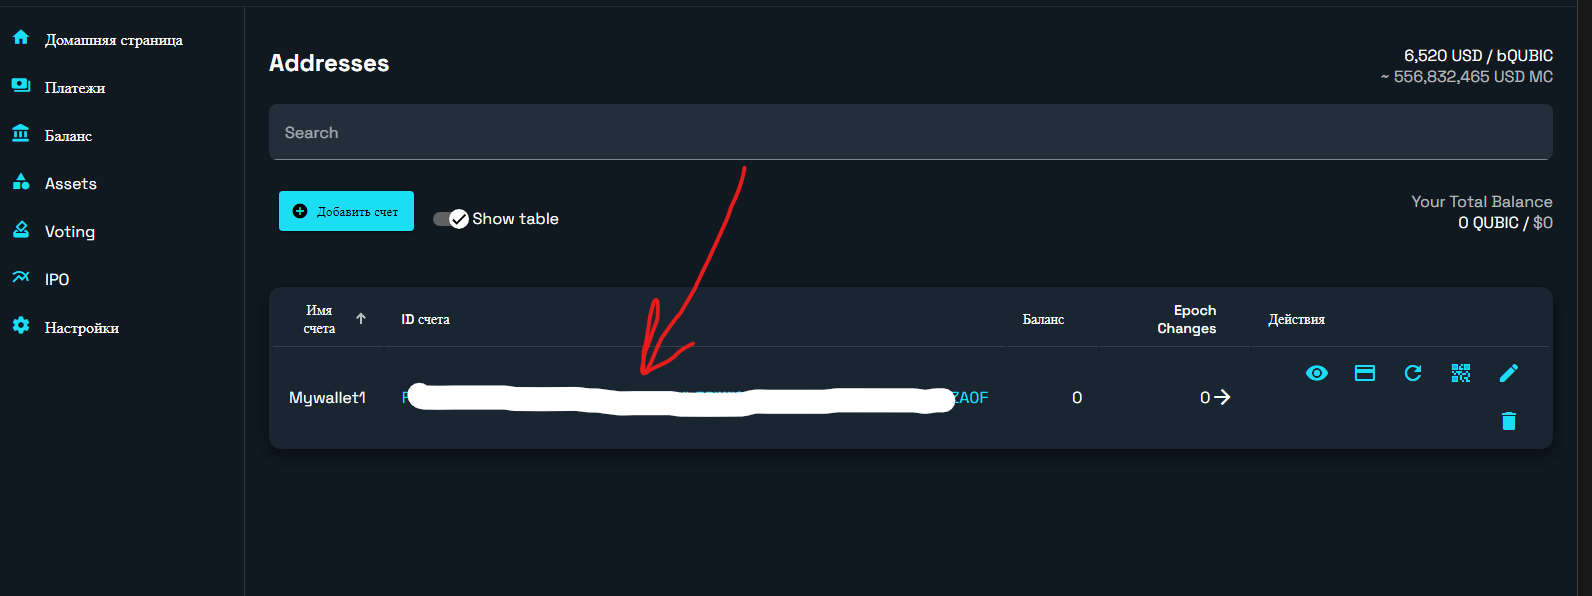
In the "Home Page" section you can find out your wallet address (public address), which you will need later to set up mining on the pool. To display the address, click on the eye icon or switch to table view using the "Show Table" switch.
Setting up a Qubic mining pool
Unfortunately, it is practically impossible for a “regular miner” to mine Qubic solo, since only 676 “Computers” can exist in the Qubic Network - this is the local name for validators that support the operation of the network. In fact, each such computer is a powerful server with some kind of EPYC processors, a large amount of RAM, a wide Internet channel, direct access to hardware at a low level via UEFI systems, and most importantly, thousands or even tens of thousands of miners connected to each such “Computer” and transferring to it the power of their Central Processing Units and Video Cards to perform tasks of training a neural network. That is, in the Qubic paradigm, each computer is also a pool, which at the end of each epoch (7 days) distributes the reward from among the miners who participated in the work through this “Computer”. Each era, only 676 of these computers that were the most productive during the current era are selected and awarded. All remaining computers that turned out to be weaker will not participate in the distribution of rewards for 7 days.
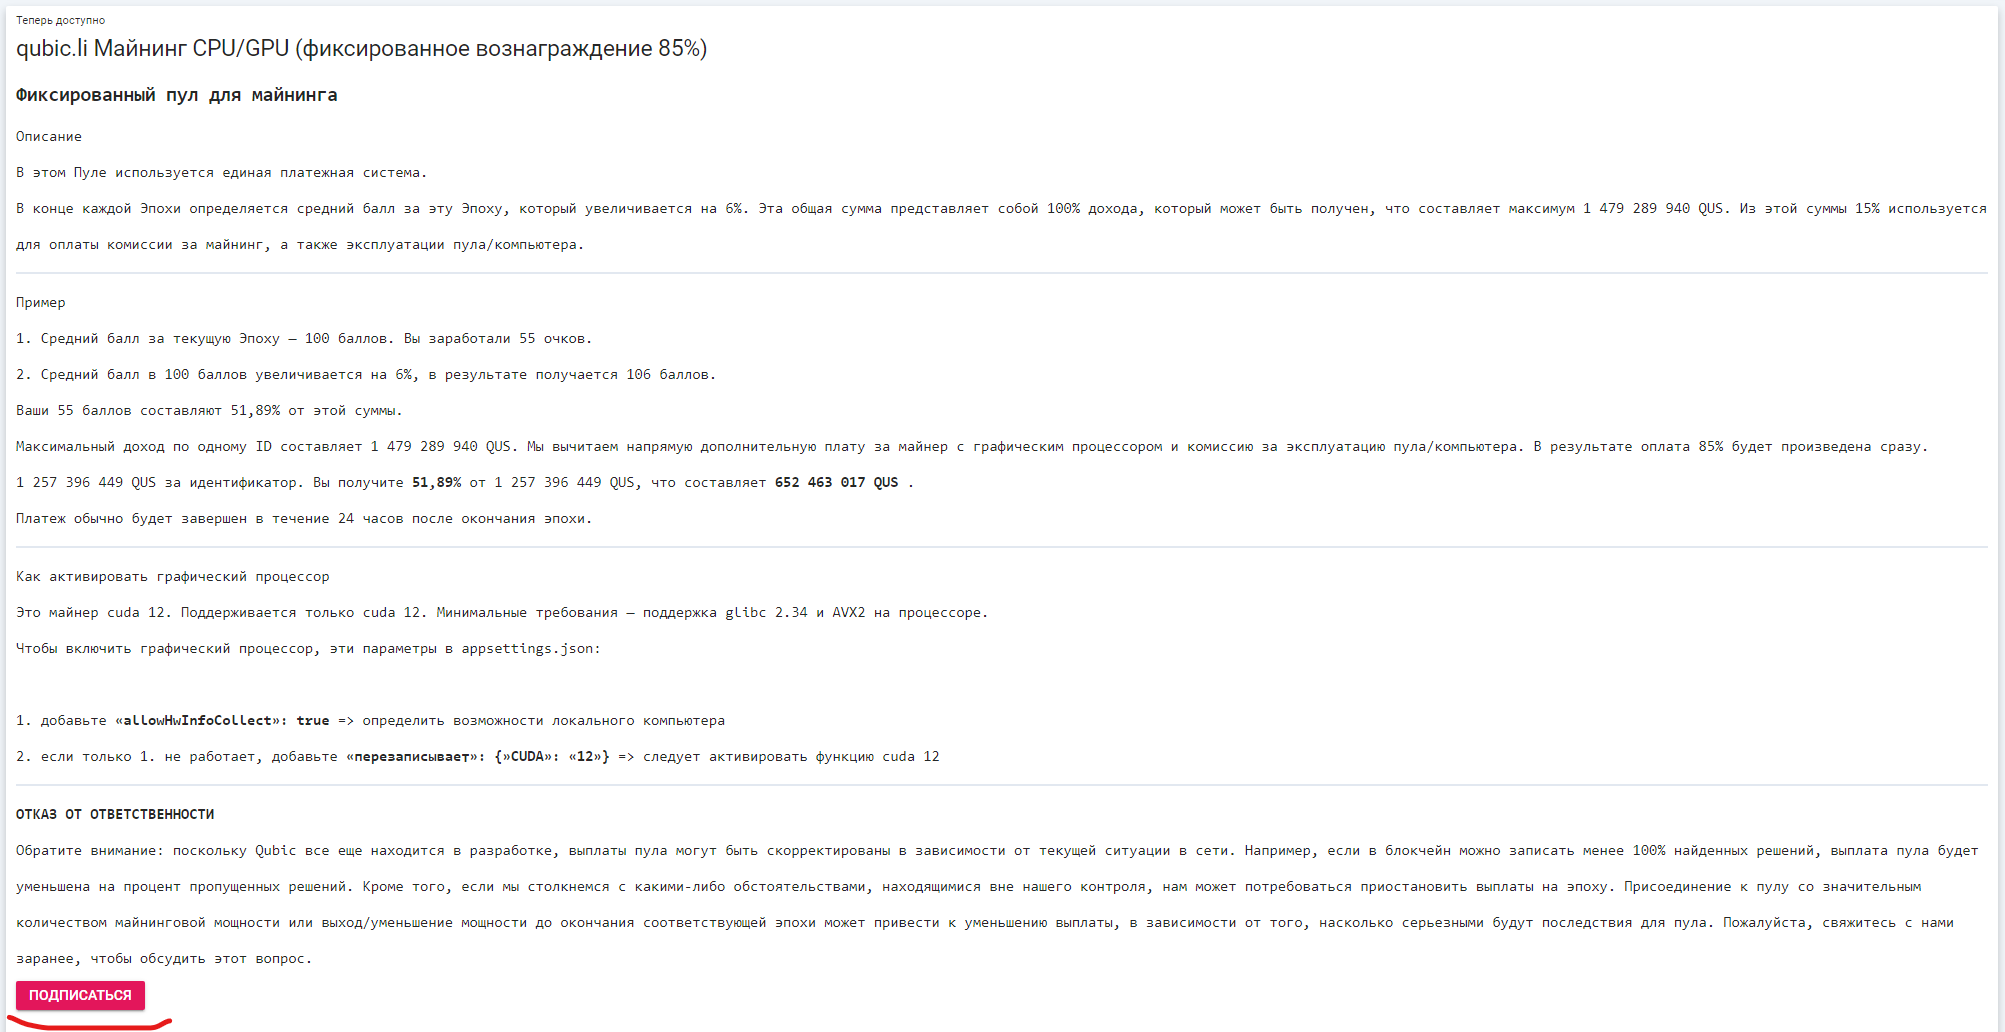
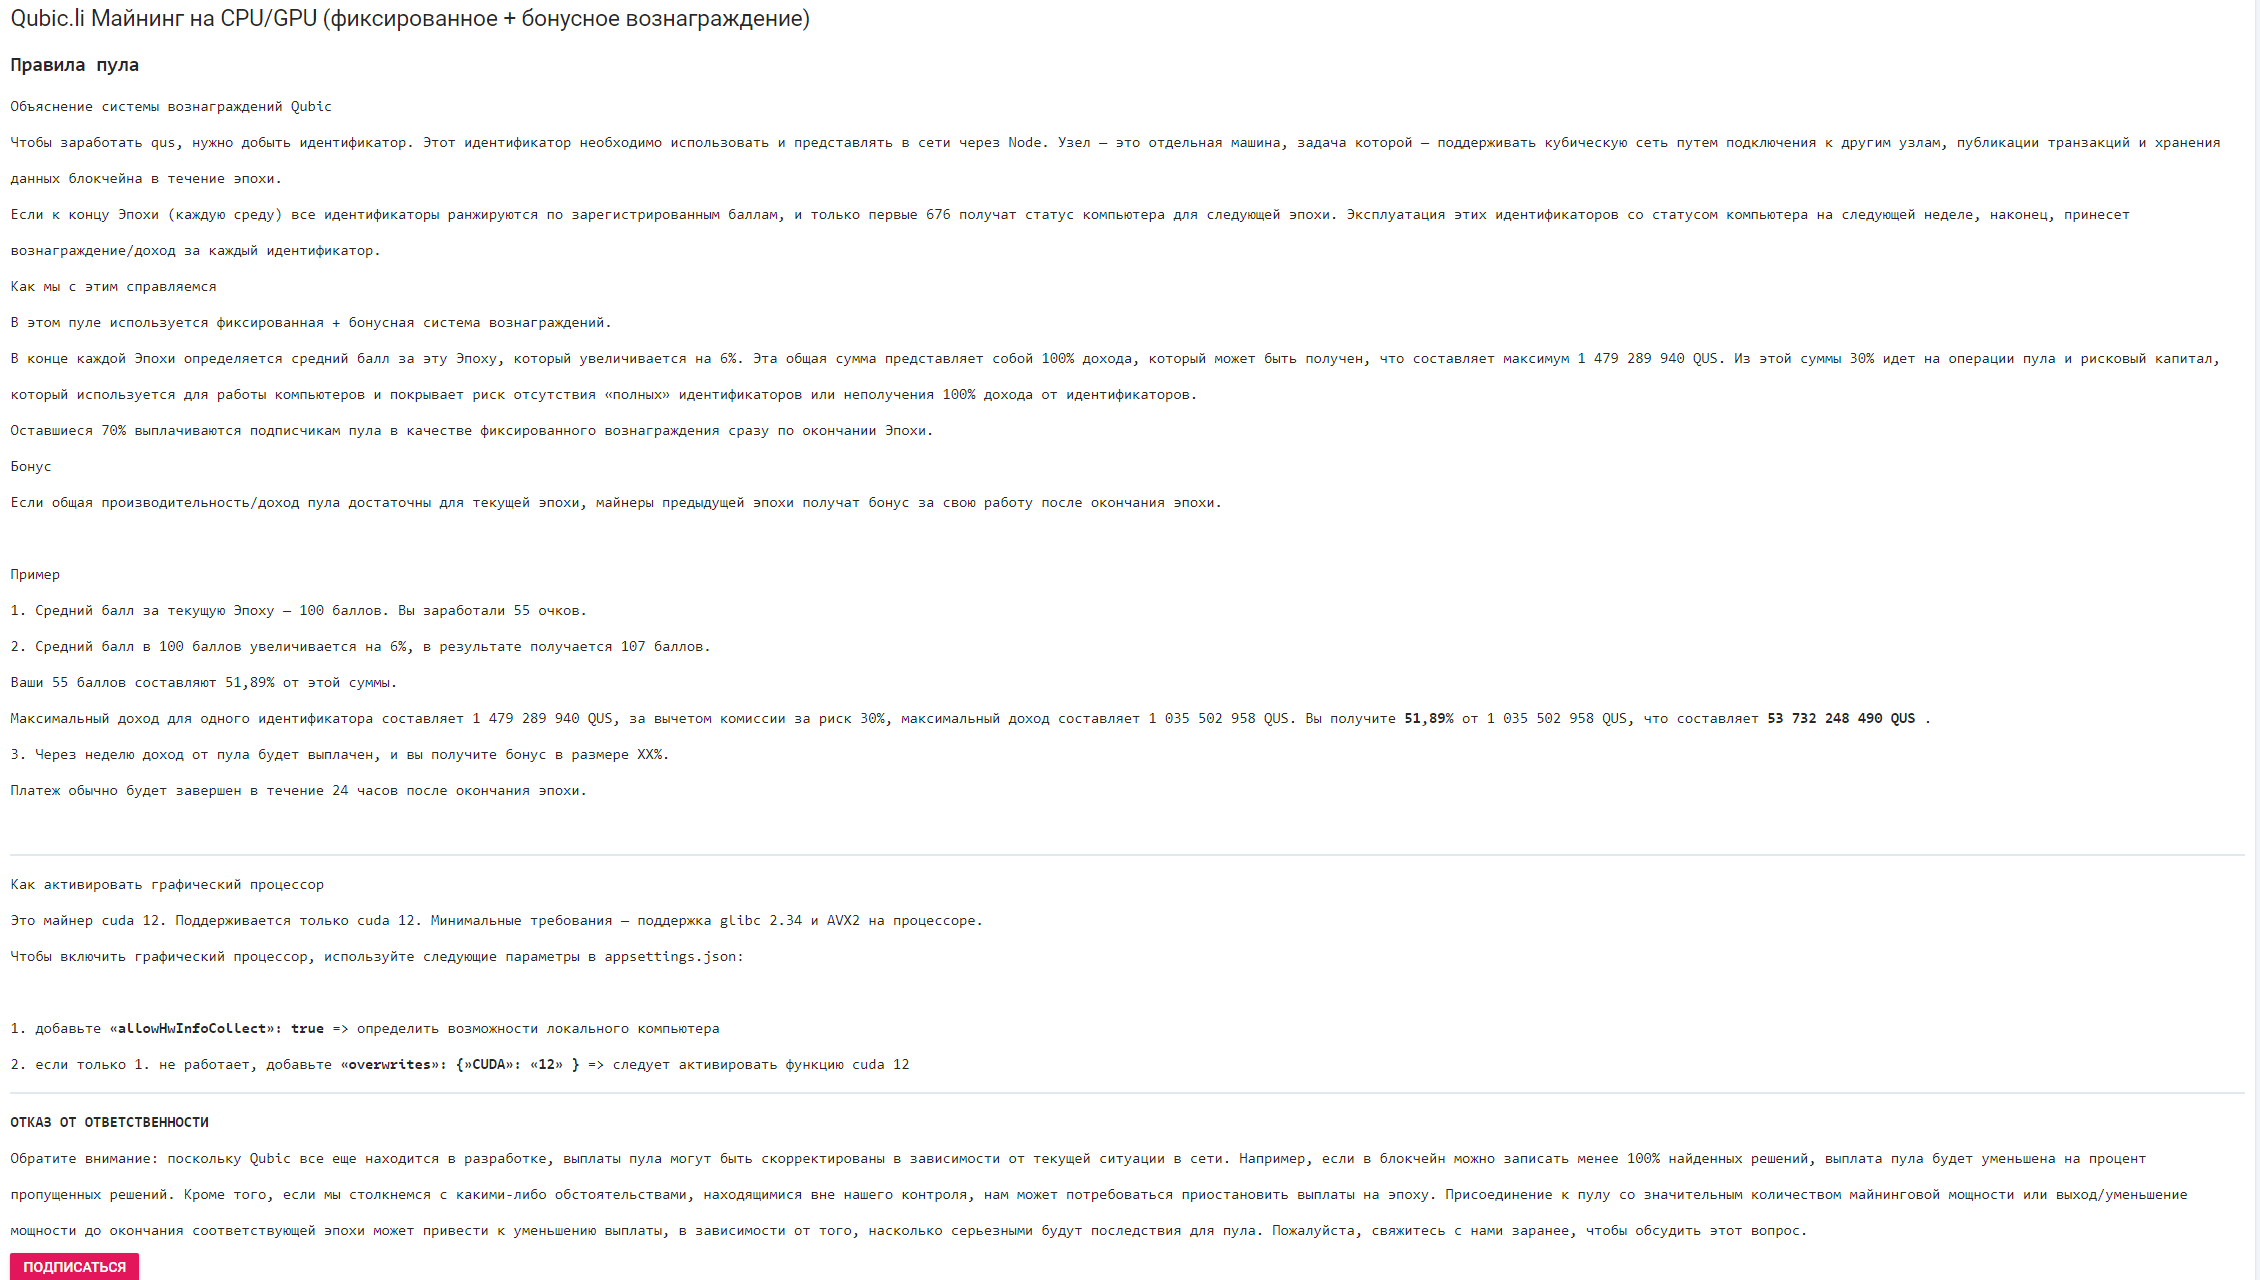
Due to the risks of not receiving rewards from the network, pool computers typically charge a 15% commission. That is, only 85% of the reward earned by the Computer over the past era will be distributed among the miners. There is also a “Computer” (pool) that pays only 70% at the end of an era to its miners, and the remaining 30% after the end of the next era, provided that it receives a reward, thus reducing its risks. You, as the final miner, are free to choose any of these options. In our case, we chose a fixed reward of 85% at the end of the era.
After we have described the general aspects of Qubic mining, let's move on to setting up the app.qubic.li service, which is one of these pool computers.
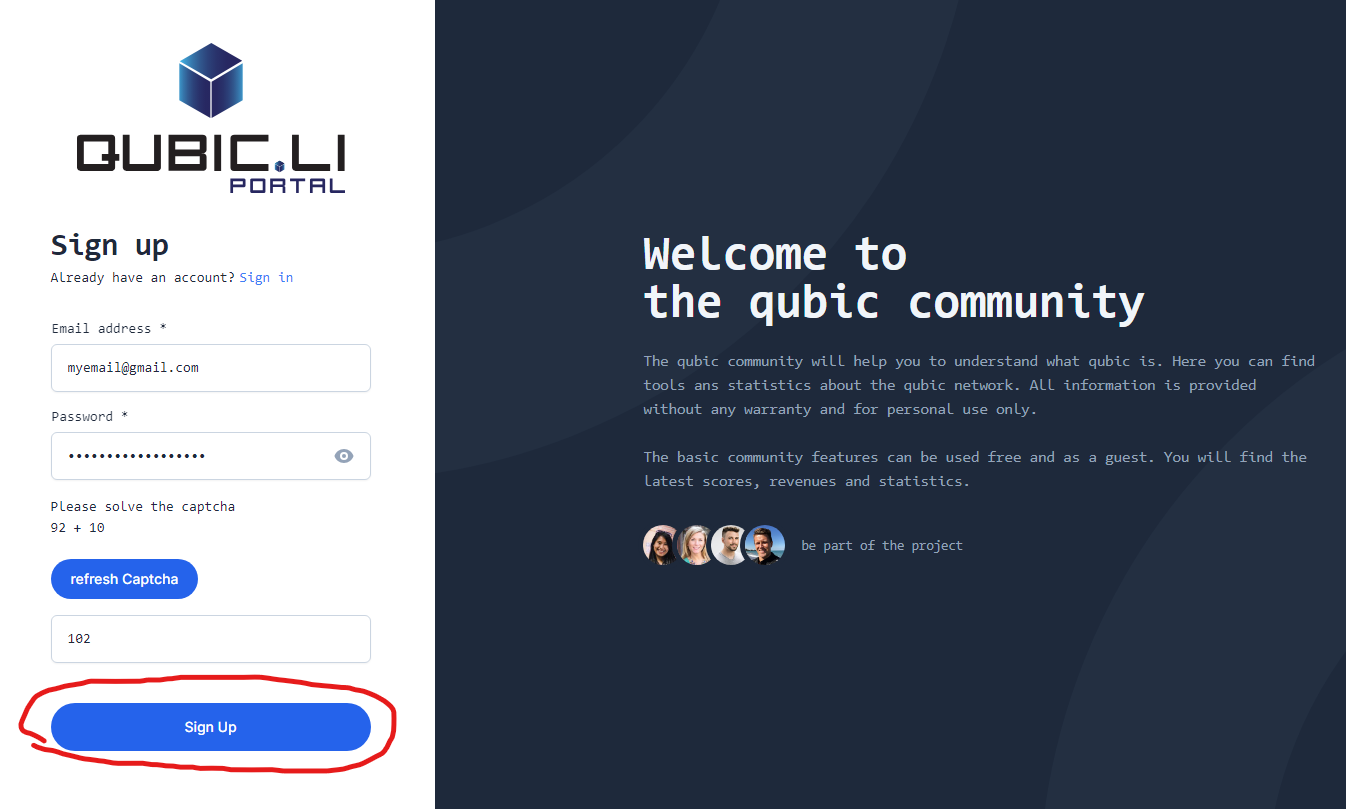
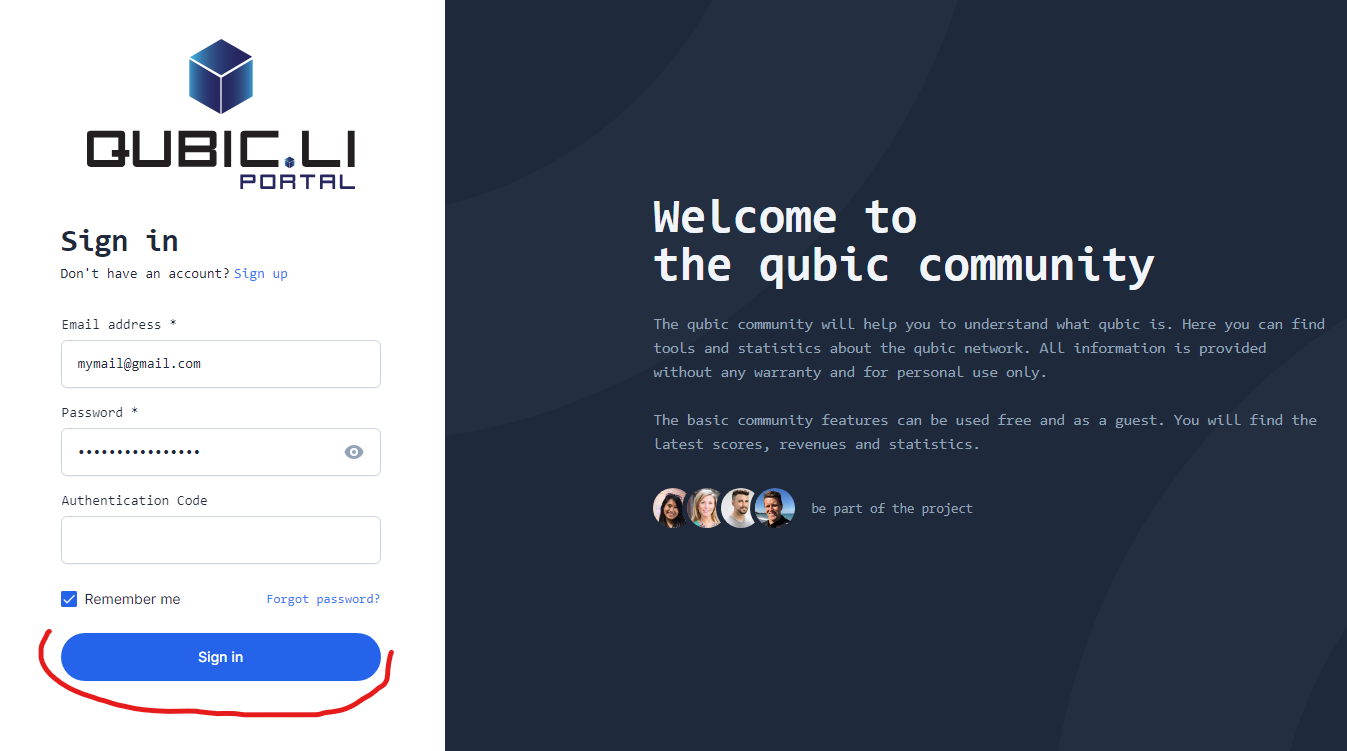
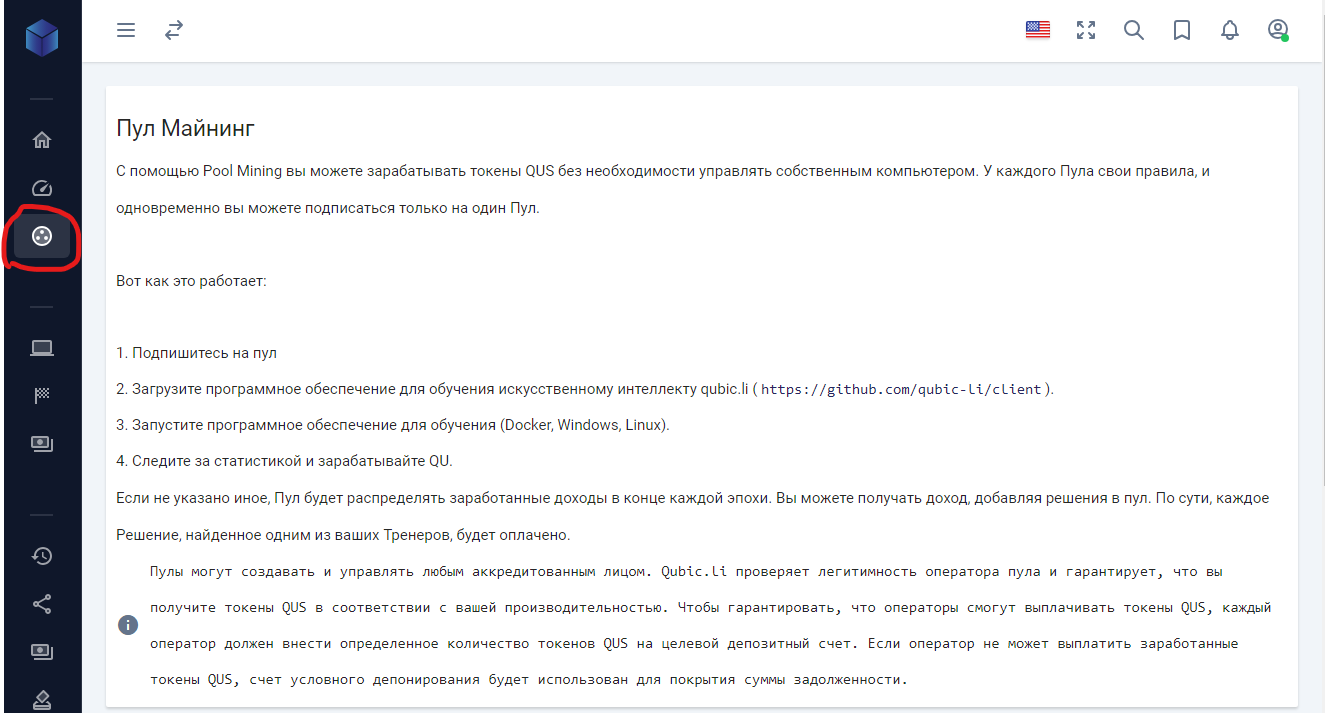
First, go to the website https://app.qubic.li and register on it, enter your e-mail and password, solve the captcha and click Sign Up. Then log in to the site by entering your username and password, leave the Authentication Code field empty, and click Sign In. after logging in, you will be taken to the control panel, go to the Pool Mining section (3rd menu item at the top) and select a pool with the type of reward that suits you, Fixed Reward 85% or Fixed + Bonus Reward. In our case, we chose the first one. After you have selected a pool, click on the “Subscribe” button at the very bottom of the description of the pool you have chosen.
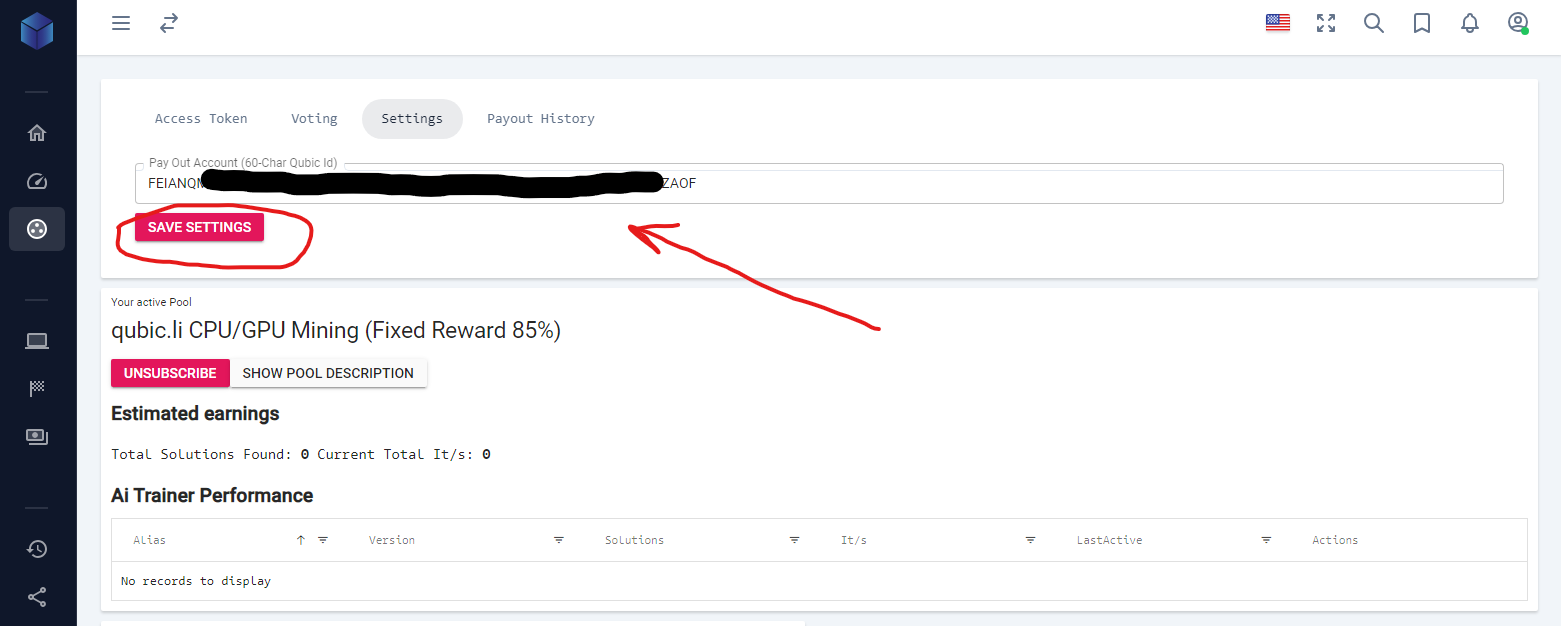
Now we go to the very top of this page and go to the “Settings” tab, where we enter your Qubic address (aka public address, aka wallet address, aka payout address - not to be confused with a password, private key or seed phrase) which You received a wallet when registering, you can view it in your wallet so that the pool can withdraw your reward for mining and click “Save Settings” to save.
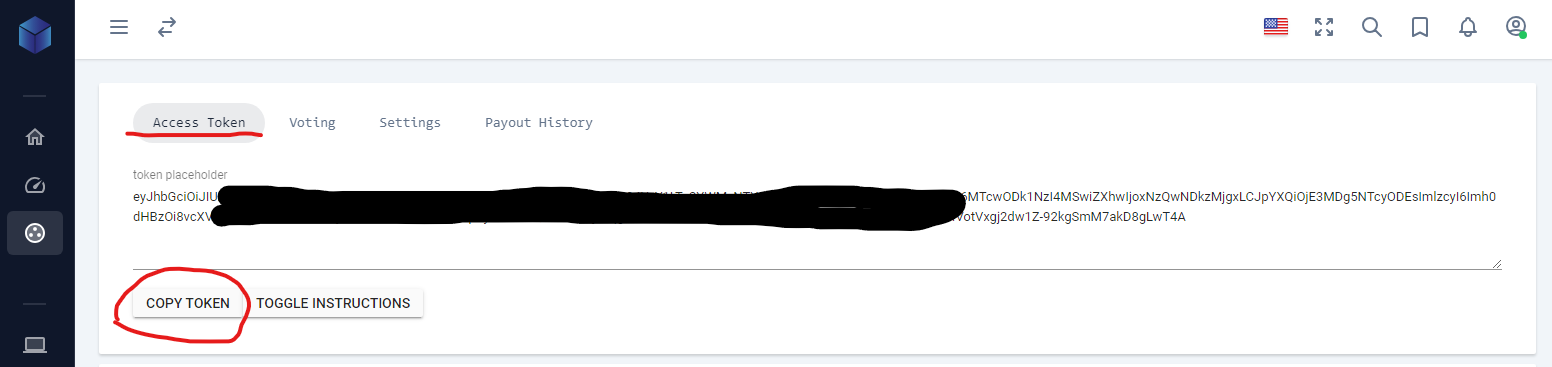
Now select the first tab at the top of the same page “Access token”, click “Show Token”, and then “Copy Token” to copy your token to the pool, which you will need later to set up the miner. All preparatory steps are ready, now you can switch to the HiveOs or Windows operating system and configure the miner.
Setting up Qubic mining for HiveOs
Follow this link to GitHub. Scroll down the page to Mandatory Installation Instruction. You must be sure that your processor on which you want to run Qubic mining supports AVX2 or AVX512 instructions; you can check this point here. I’ll say right away that powerful processors of the latest generations from AMD or Intel are recommended (for example, one of the best options would be the AMD Ryzen 7950X or AMD Ryzen 7950X3D), old processors, as well as entry-level “stones” such as Celeron or Pentium are not suitable, since they are not support AVX instructions. In addition, in order to get the maximum hashrate, 16 GB of RAM or more is required.
To accurately check whether your processor supports AVX instructions, use the command cat /proc/cpuinfo | grep in the HiveOs console.
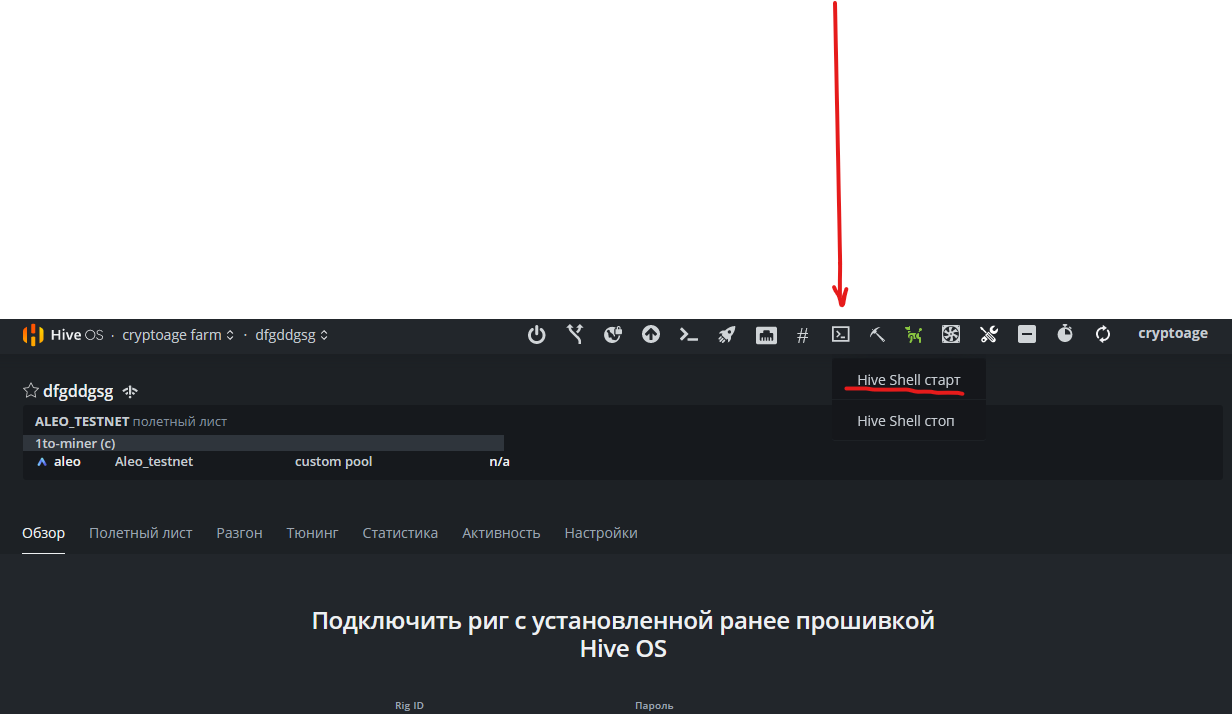

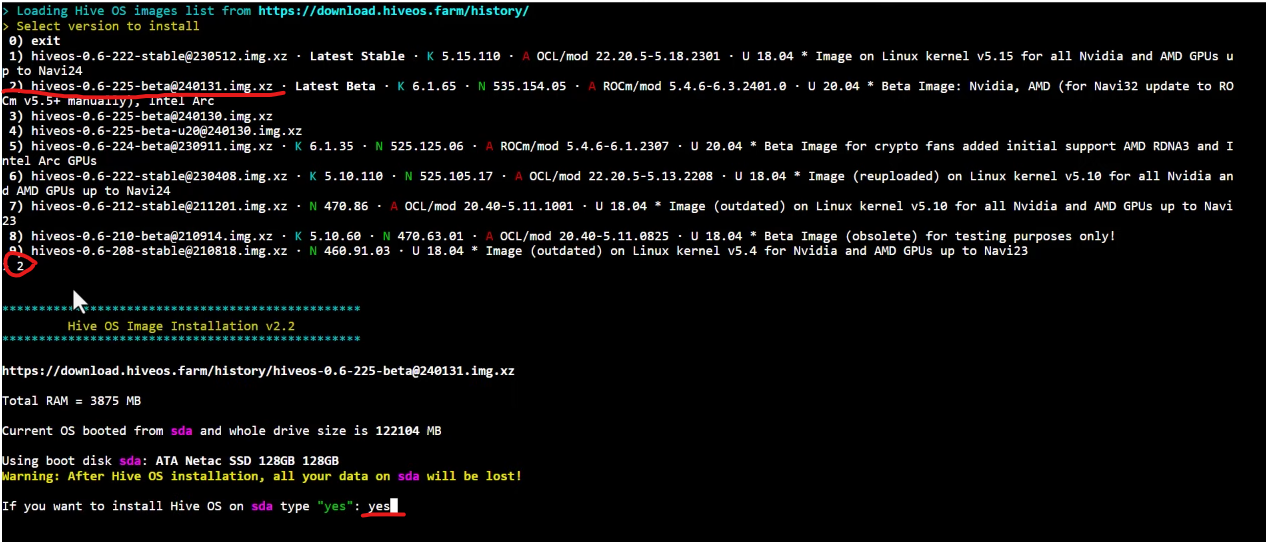
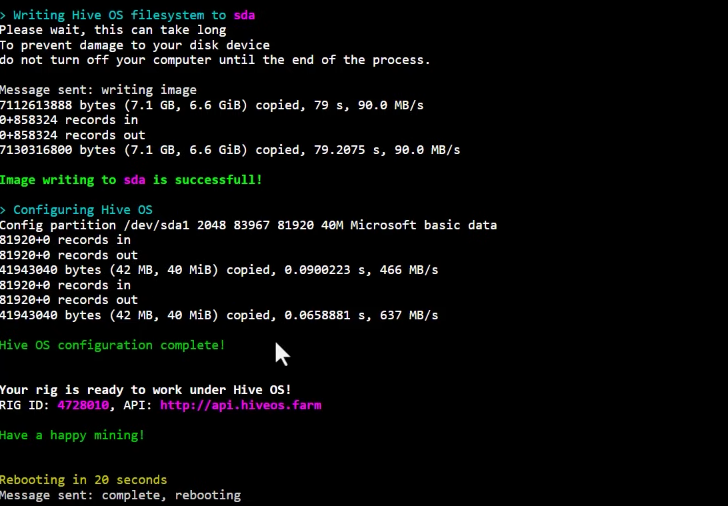
You should then update your HiveOs version to the latest Hive Os beta (Ubuntu 20.04), (which is always number two in the list). To do this, in the same console, enter the command /hive/sbin/hive-replace --list then enter the number 2 and press Enter, then enter yes from the keyboard and press enter again. Now you need to wait a bit for the update process to complete. After the message “Have a happy mining” appears and the rig reboots, you can continue the setup procedure.
We disable all working flight sheets, go to the Hive Shell console again and install the GLIBC 2.34 library, without which mining will not work. To do this, enter the command apt update && apt upgrade -y && echo "deb http://archive.ubuntu.com/ubuntu jammy main" >> /etc/apt/sources.list && apt update && apt install tmux -y && apt install libc6 -y then press enter, and when installing, answer “y” and Enter to each question in the console. In the window that appears, click on Yes.


Now we write the reboot command in the console to reboot the machine again.
It is also possible to slightly overclock the video card; the miner developer has prepared several commands for overclocking equipment in Qubic mining. If you are interested in overclocking, select one of the available commands to overclock your series of video cards:
- Average overclock for Nvidia 3000 series: nvtool --setcoreoffset 250 --setclocks 1500 --setmem 5001
- Average overclock for Nvidia 4000 series: nvtool --setcoreoffset 250 --setclocks 2400 --setmem 5001
- Strong overclocking for Nvidia 3000 series: nvtool --setcoreoffset 200 --setclocks 1600 --setmem 7000 --setmemoffset 2000
- Strong overclocking for Nvidia 4000 series: nvtool --setcoreoffset 200 --setclocks 2900 --setmem 7000 --setmemoffset 2000
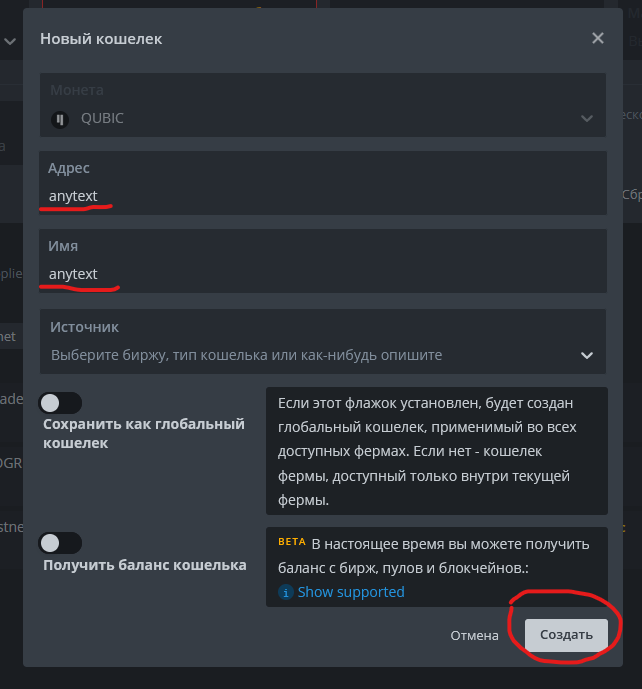
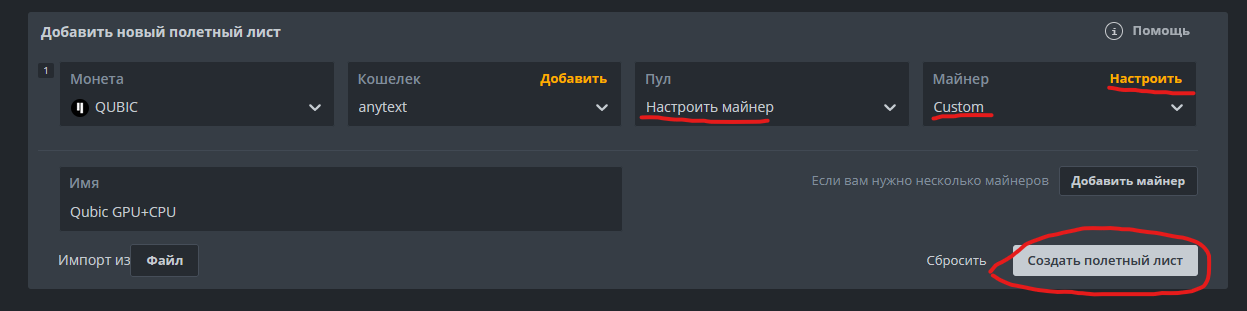
Next, you should create a new flight sheet; to do this, go to flight sheets and add a new flight sheet. In the Coin field, select Qubic, in the wallet item, click Add and write any text in the address and name fields (we will specify the wallet settings in the miner itself) and then click Create. In the Name field, write your name for the flight sheet. In the Pool item, select Configure miner. In the Miner item, select Custom and click Configure.

Depending on how exactly you want to mine (CPU+GPU or only GPU or only CPU), you specify different miner settings. For all cases, the first points will be the same, only the Additional point will be different. configuration parameters.
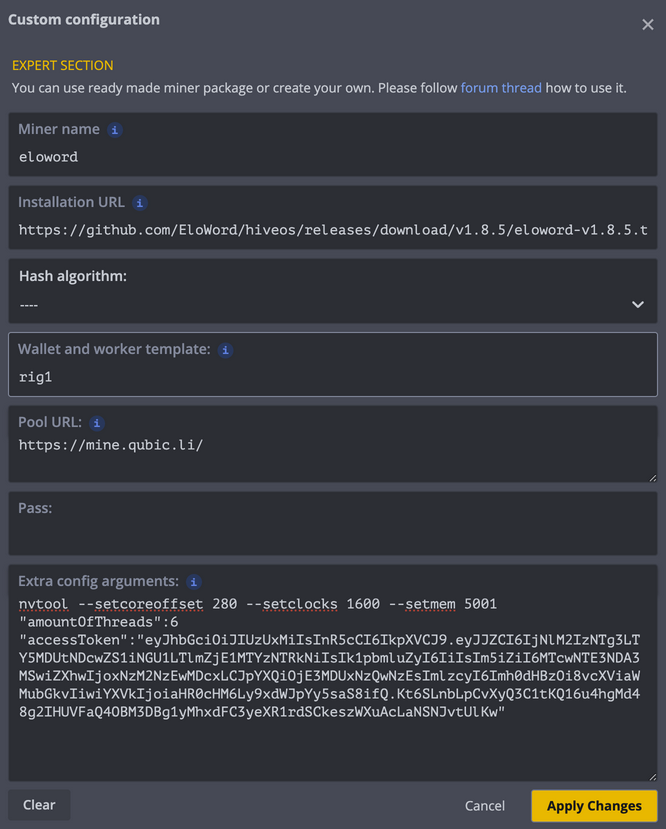
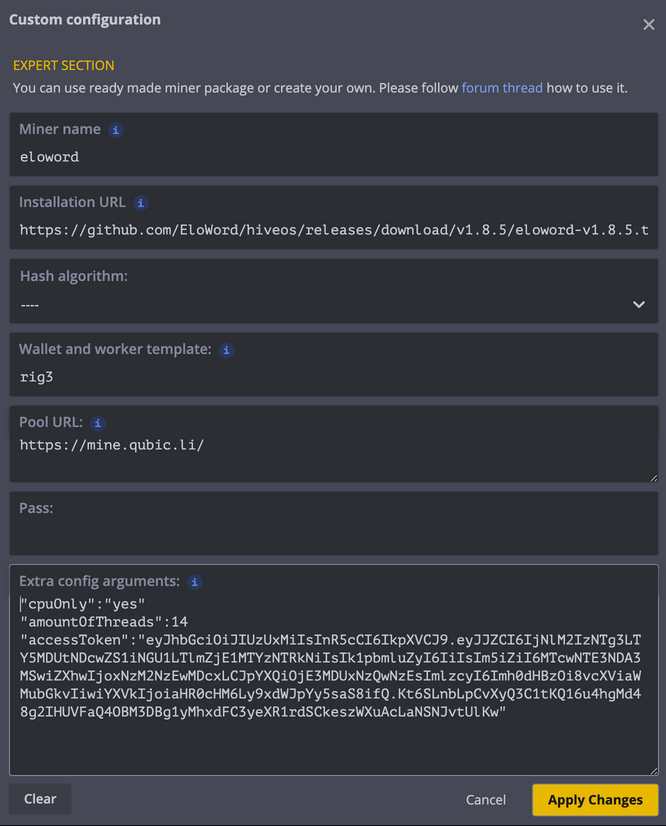
- Miner name: eloword
- Installation URL: https://github.com/EloWord/hiveos/releases/download/v1.8.6/eloword-v1.8.6fix2.tar.gz
- Hash algorithm: ----
- Template wallet and worker: come up with a name for your worker (for example RTX4090)
- Pool address: https://mine.qubic.li
- Password: leave blank.
- Add. configuration parameters: and here we register all the settings, as well as overclocking.
Now let's set up Additional. configuration options:
in the access token we indicate your token, which you received when registering on the pool in the previous step, the line starting with nvtool is responsible for overclocking, here you need to write one of the 4 lines for overclocking video cards (if you need it).
For mining on a processor, the amountOfThreads parameter is required, which is responsible for the number of processor threads that will be used for CPU mining. I recommend experimenting with this parameter; specifying the maximum number of threads for your processor does not always improve performance; often it has the opposite effect and the hashrate drops. try to select this parameter manually experimentally. On my own behalf, I will say that on the Ryzen 7950X (which has 16 cores and 32 threads), the optimal value turned out to be 16; when setting 24 threads, performance dropped. If this parameter is not specified, the processor will not be used for mining. However, if you have a powerful processor, then I recommend using it; a powerful processor may be faster than an average video card. For example, in our case, the Ryzen 7950X delivers almost half the performance of the top-end Geforce RTX 4090 video card (850 It/s versus 2100 It/s for the 4090)
To use only the processor for mining (disable video cards), use the "cpuOnly": "yes" parameter. This can be useful if you want to run several flight sheets on one rig, for example, the processor will mine Qubic, and the video cards will mine something else at the same time.
Below you will see 3 examples of miner settings for different cases:
CPU+GPU dual mining
nvtool --setcoreoffset 200 --setclocks 1500 --setmem 7000 --setmemoffset 2000
"amountOfThreads":24
"accessToken":"YOUROWNTOKEN"
GPU only
nvtool --setcoreoffset 200 --setclocks 1500 --setmem 7000 --setmemoffset 2000
"accessToken":"YOUROWNTOKEN"
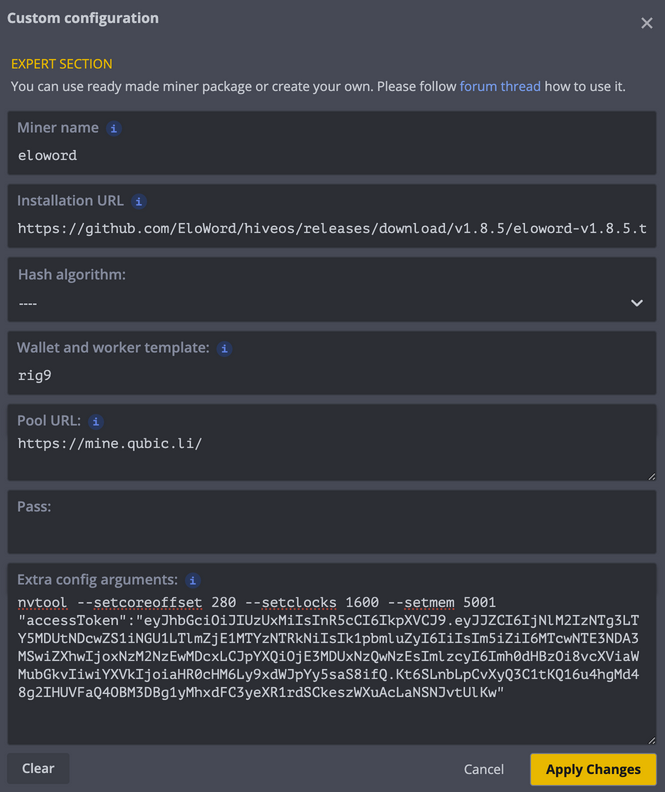
CPU only
"cpuOnly":"yes"
"amountOfThreads":14
"accessToken":"YOUROWNTOKEN"
This is what your flight sheet settings should look like before starting mining. And finally, click on Create flight sheet. Also, if you wish, you can limit the Power Limit of video cards; the algorithm puts a lot of load on video cards and they operate at the maximum possible consumption.
Congratulations, you can select the created flight sheet and click apply, after which Qubic mining will start.
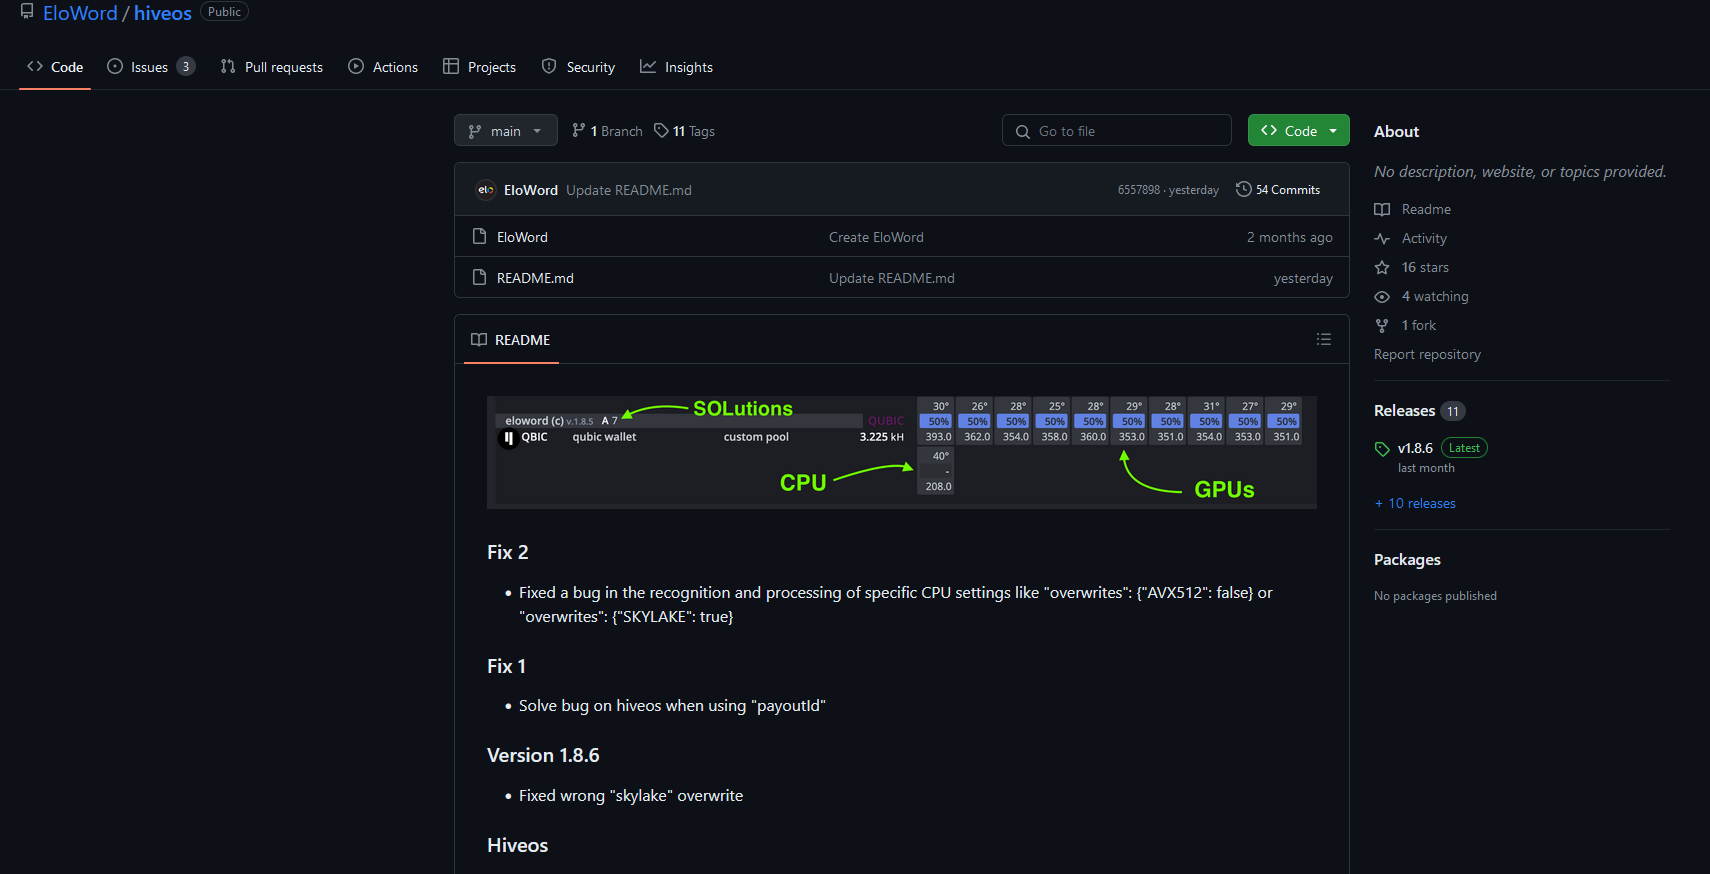
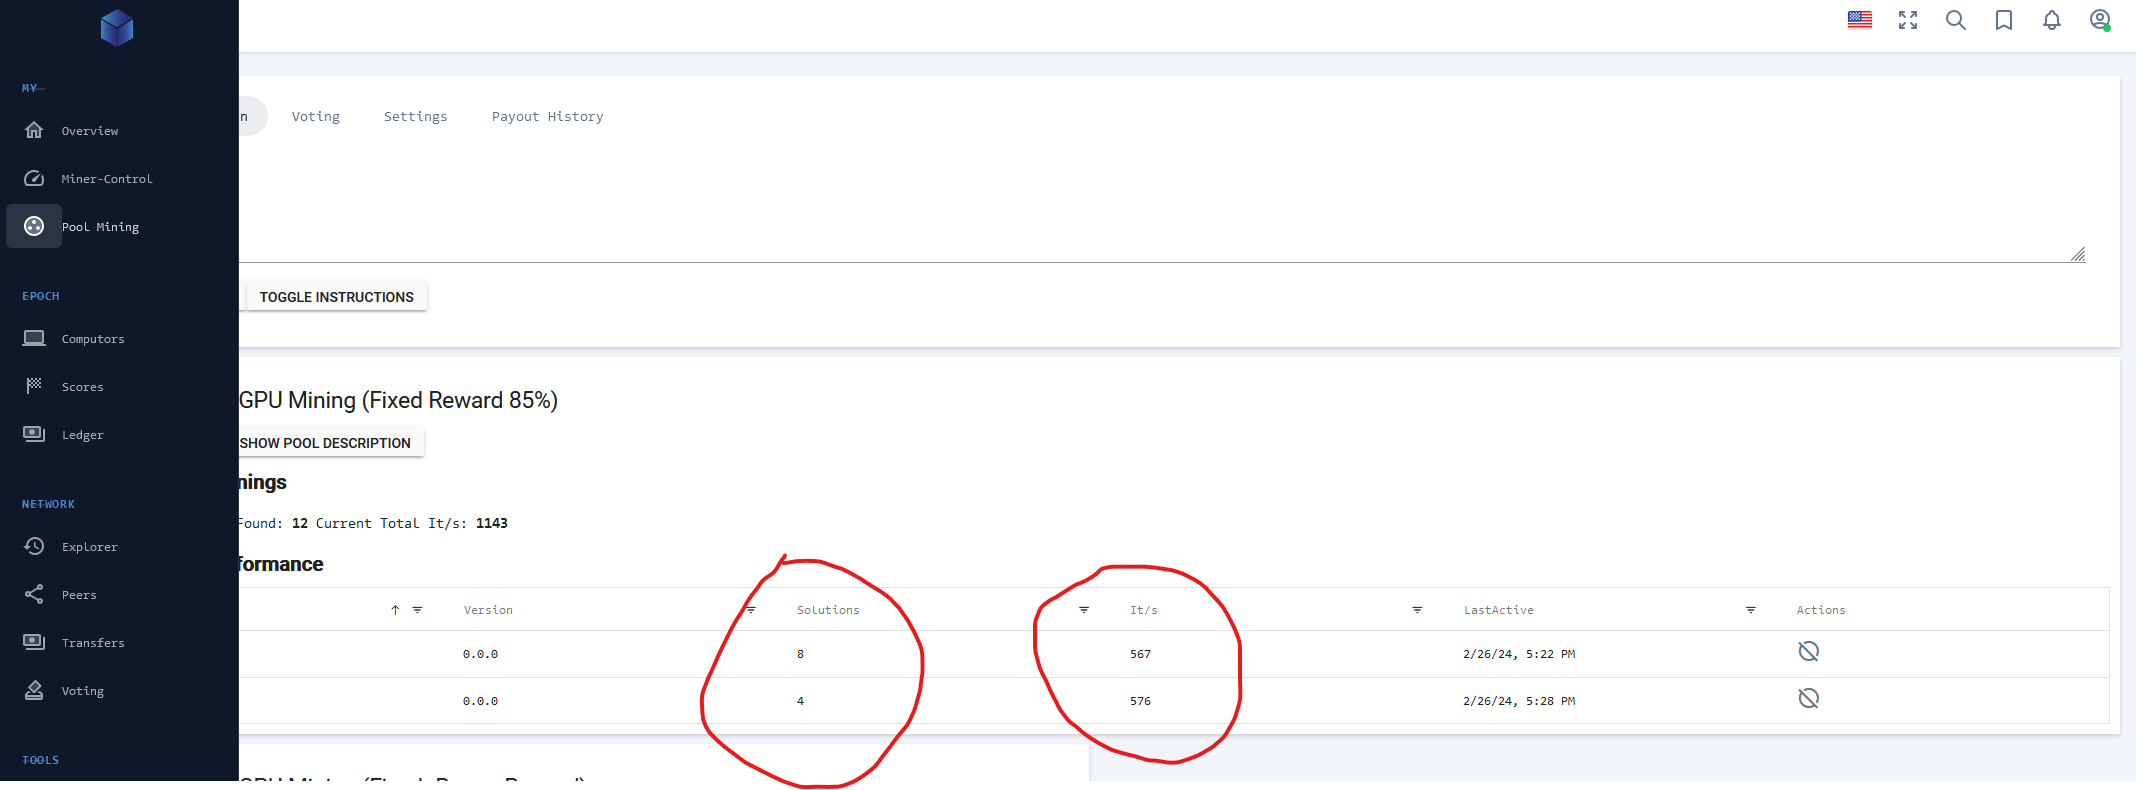
To monitor workers, their hashrate (Iterations) and the number of shares found (Sulutions), go to the pool in the Pool mining section.
The day after the end of the epoch, which lasts 7 days, the reward payment will be sent to your wallet (if you correctly entered your wallet address on the pool in the Settings section). The new era begins on Wednesdays, and payments take place on Thursdays.
Setting up Qubic mining on Windows.
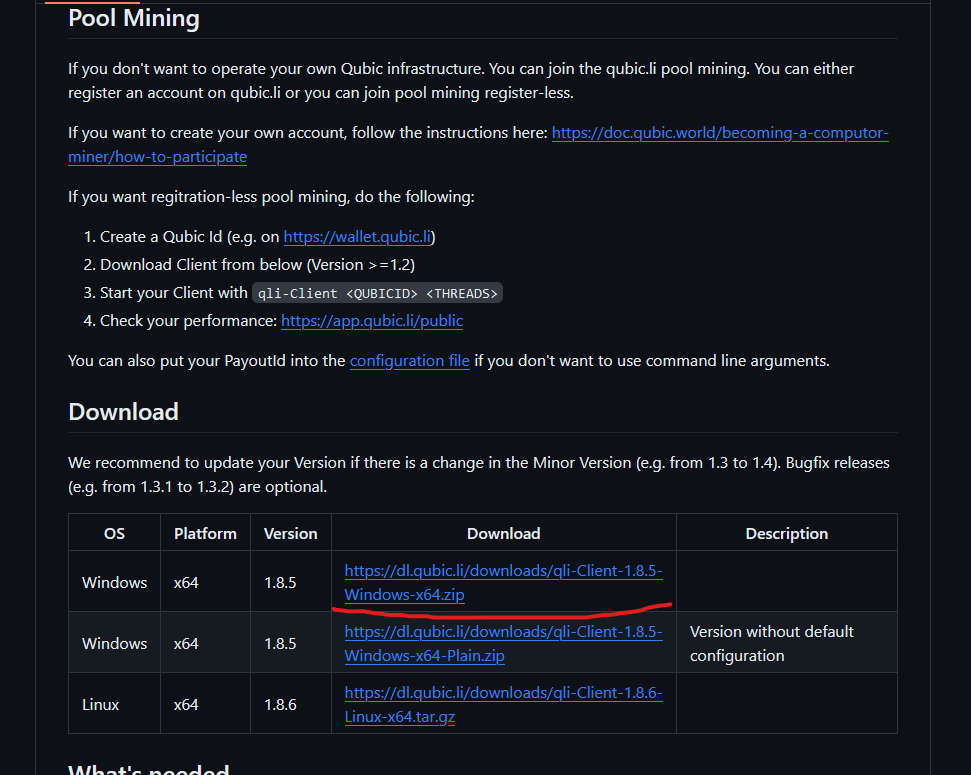
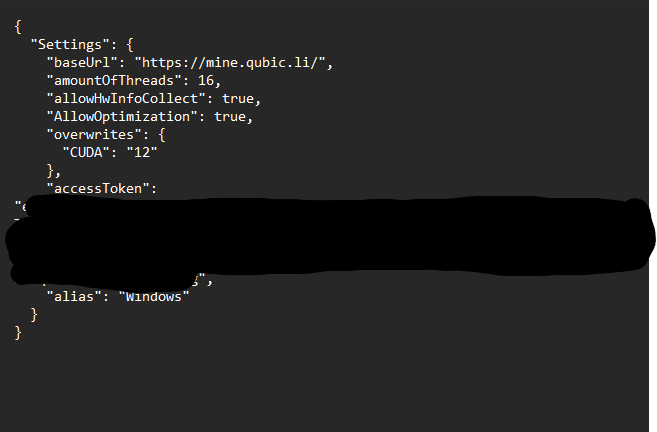
Go to the GitHub repository of the miner for Windows using qubic client and download the archive from the first line of the Download table, or from this link. We unpack the archive with the miner to a place convenient for you. Go to the unpacked folder and open the appsettings.json file for editing in Notepad or any other text editor. We register all the necessary parameters, first of all, your AccessToken which you received on the pool, then “baseUrl”: “https://mine.qubic.li/”, the number of threads for mining on the processor “amountOfThreads”: 16, in my case for Ryzen 7950X the optimal value turned out to be 16, "alias": "The name of your worker." To start mining not only on the processor, but also on the video card, set parameters such as "allowHwInfoCollect": true and "overwrites": {"CUDA": "12" }. Your config should now look something like the image below.
However, there is one unpleasant moment: not everyone is able to start mining on a video card; unfortunately, under Windows, our video card would not start either, no matter what we did, and most people have this problem. The miner developer advises installing all versions of the Visual C Redistributable libraries, and also be sure to specify the parameters "allowHwInfoCollect": true and "overwrites": {"CUDA": "12" }, but in our case, none of this helped.
Therefore, if you want to mine simultaneously on CPU+GPU, we recommend using HiveOS, or the Linux version of the miner.
There is, however, another way to run CPU+GPU double mining under Windows, namely to use the Linux Subsystem for Windows - WSL2, in our case it was this option that we stopped at, since the computer on which the coin was tested was working, and there was no possibility install HiveOs there. We will publish detailed instructions on how to do this in the very near future; this guide is already quite extensive.
Now that you have edited and saved the configuration file, you can run the executable file qli-Client.exe and the mining process will start. If you see the same errors as in our case, then your video card also does not start; apparently, your system is missing some dependencies for the allowHwInfoCollect parameter, which is responsible for determining the equipment in your system and starting mining on the video card .

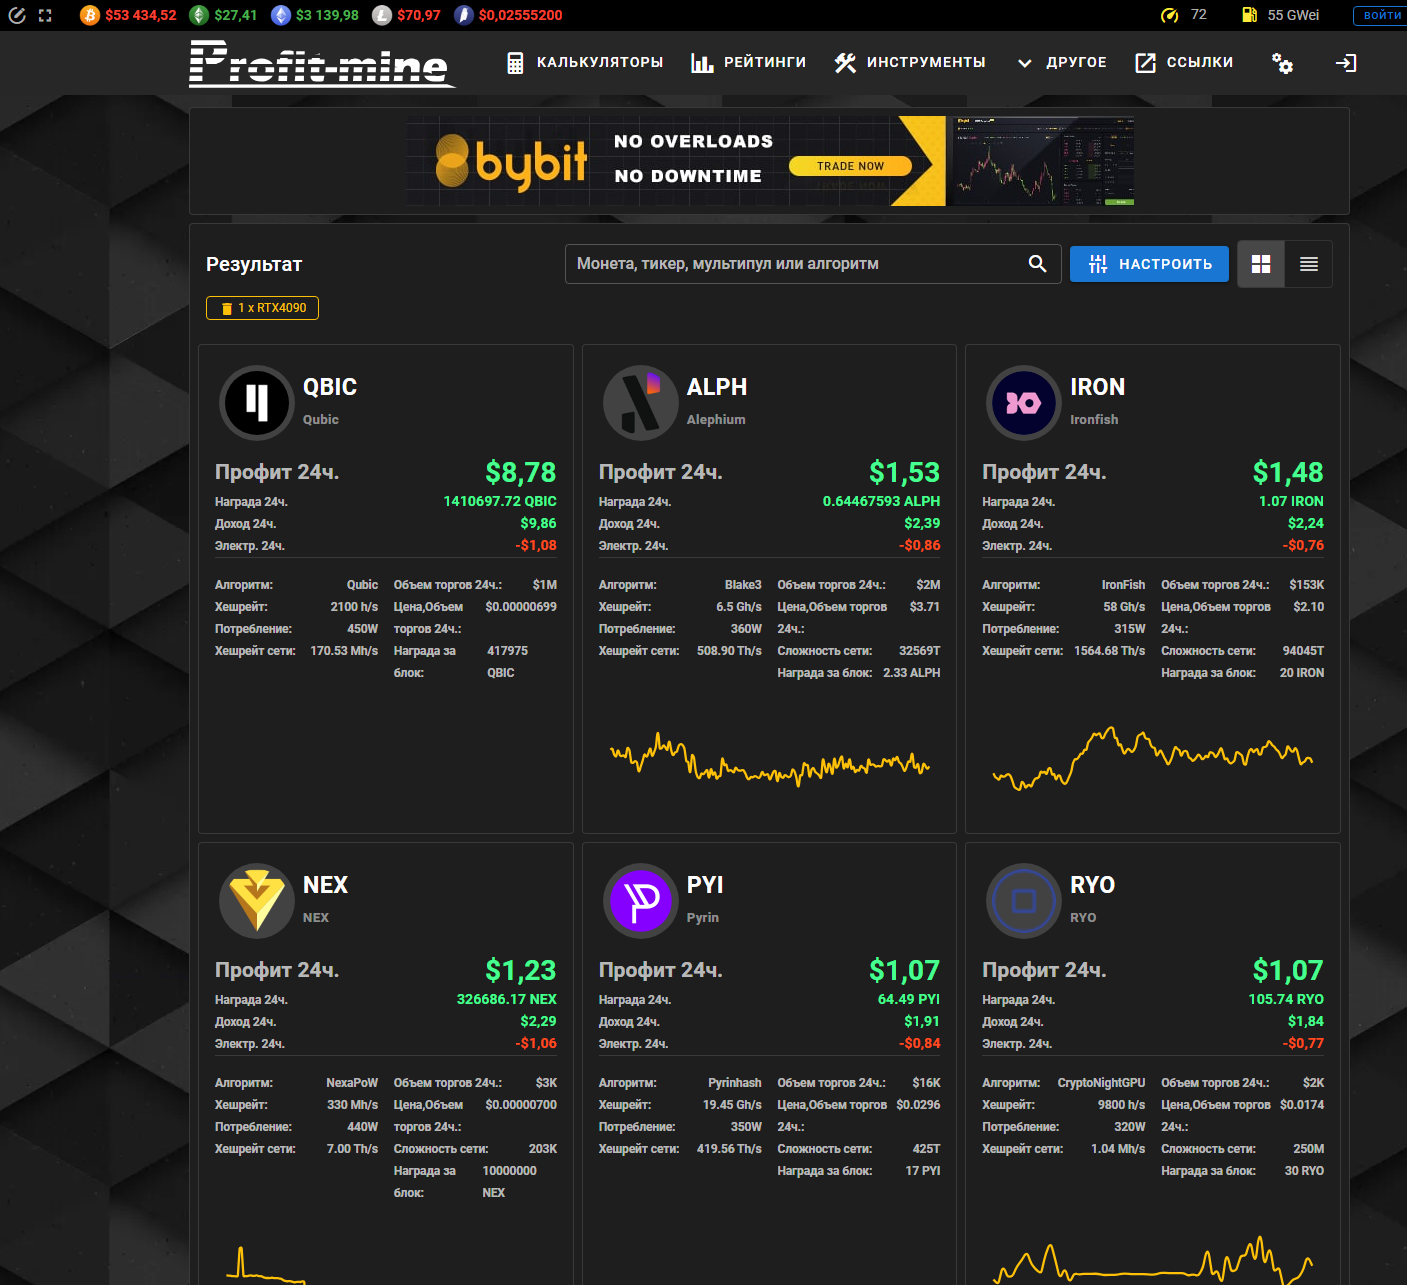
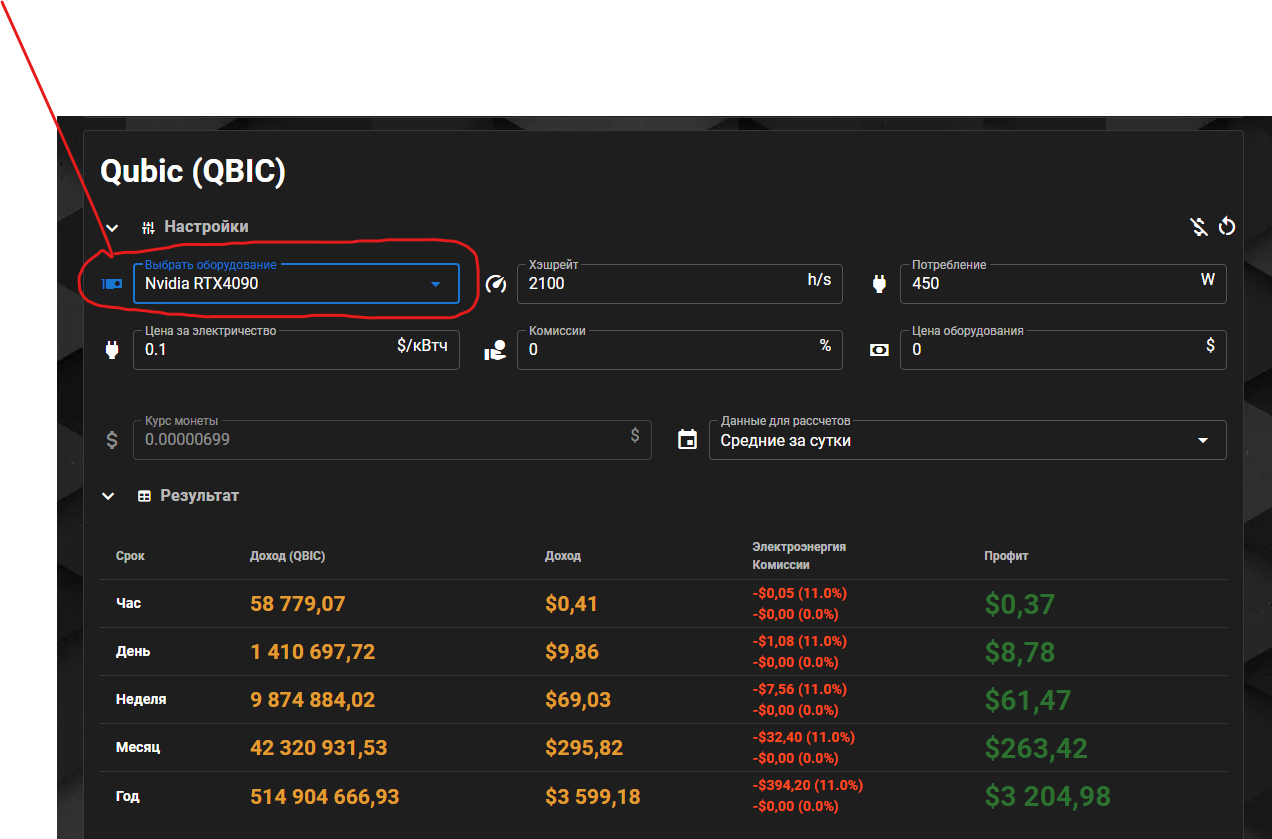
Calculation of profitability and hashrate of equipment.
This table shows the approximate hashrates of equipment (both video cards and processors) in Qubic mining. It is worth noting that they will be relevant until mid-March, after which the coin will switch to a different algorithm, where, according to rumors, mining will be available only on processors and the hashrates will be different. The table is available at this link.

In addition, the Qubic mining profitability calculator is already available on the Profit-mine.com website, as well as hashrates for a fairly large number of processors and video cards.