")
")
")
")
")


![]() Nockchain - more than just a privacy coin. It is the first L1 blockchain integrating ZK-Proof of Work (zkPoW) directly at the base level and using Nock ZKVM for verifiable compute - a breakthrough in scalable mining with zero pre-mine. Thanks to built-in support for Zero-Knowledge Proofs, Nockchain is not just money, it is "programmable digital gold" and the future of decentralized applications. In addition, all cryptography in the Nockchain protocol is oriented toward post-quantum security, making it resistant to future quantum threats. In this article, we will explain how to set up Nockchain (NOCK) mining. Initially, mining was available only on CPU, but now GPU mining is also available on the Golden Miner pool.
Nockchain - more than just a privacy coin. It is the first L1 blockchain integrating ZK-Proof of Work (zkPoW) directly at the base level and using Nock ZKVM for verifiable compute - a breakthrough in scalable mining with zero pre-mine. Thanks to built-in support for Zero-Knowledge Proofs, Nockchain is not just money, it is "programmable digital gold" and the future of decentralized applications. In addition, all cryptography in the Nockchain protocol is oriented toward post-quantum security, making it resistant to future quantum threats. In this article, we will explain how to set up Nockchain (NOCK) mining. Initially, mining was available only on CPU, but now GPU mining is also available on the Golden Miner pool.
Core Technologies Implemented in Nockchain
-
zkPoW (ZK-Proof of Work) - implemented at the first level. Miners generate a ZK proof of a fixed computational task, then hash it. Each block contains proof of computation.
-
Nock ZKVM - a virtual machine for decentralized applications, providing scalability without compromising security.
-
Post-quantum security - cryptography resistant to quantum attacks.
-
ZK-integration - native support for Zero-Knowledge Proofs for privacy in applications.
For more details on the technologies implemented in Nockchain, you can read on the official website.
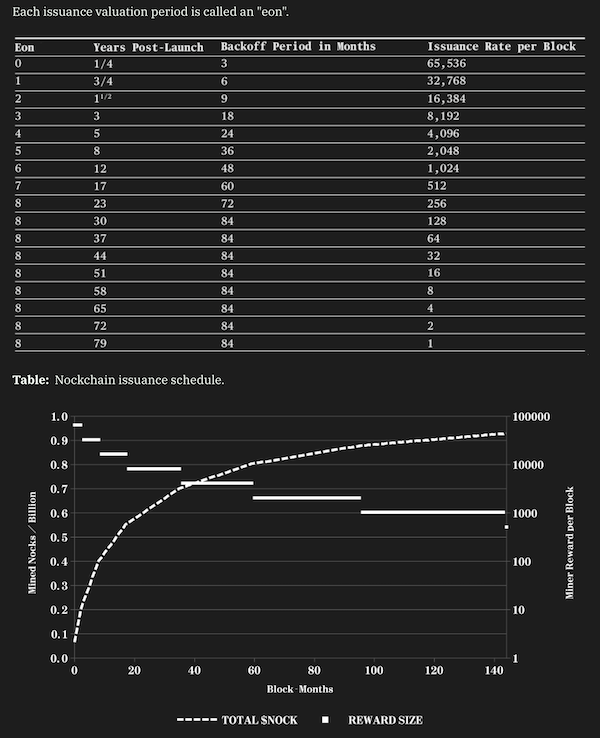
Nockchain Tokenomics:
- Average block time: 10 min.
- Halving: the next one in 216 days from the current moment.
- Total supply: 4,294,967,296 NOCK.
- Pre-mine: none.
Main Links and Requirements
- Official Nockchain website.
- Documentation.
- Blockchain explorer.
- Node installation.
- Main mining pool: Goldenminer.net
- Exchange for selling Nockchain (NOCK): Safetrade.com. Currently, the coin is trading at around $0.07.
- GPU miner for Nockchain.
- Operating systems: HiveOS or Ubuntu 22.04+.
- System requirements for rig/computer: Powerful Nvidia graphics card, preferably Geforce RTX 5090 or RTX 4090.
Detailed Instructions for Starting Nockchain Mining
Step 1: Wallet (Node) Installation.
To start mining, you will need a public address (wallet) in the Nockchain network. To do this, you need to install and run the Nockchain wallet, or (simpler way) get a deposit address on the Safetrade.com exchange.
- Wallet installation requires Debian/Ubuntu Linux.
- Install Rustup. Detailed instructions here.
- Install dependencies:
sudo apt update sudo apt install clang llvm-dev libclang-dev make protobuf-compiler - Clone the project repository from GitHub and enter the Nockchain folder:
git clone https://github.com/zorp-corp/nockchain.git && cd nockchain - Copy the environment parameters file and rename it to .env
cp .env_example .env - Linux users must manually set the memory overcommit status:
# Enable always-overcommit: echo 'vm.overcommit_memory=1' | sudo tee /etc/sysctl.d/99-overcommit.conf # Reload kernel parameters: sudo sysctl --system # or: sudo sysctl -p /etc/sysctl.d/99-overcommit.conf - Install Hoon Compiler:
make install-hoonc export PATH="$HOME/.cargo/bin:$PATH" - Install the wallet:
make install-nockchain-wallet export PATH="$HOME/.cargo/bin:$PATH" - For additional information on using the wallet, read the README.
- Install Nockchain node:
make install-nockchain export PATH="$HOME/.cargo/bin:$PATH" - Create keys. Get a pair of public key (wallet address) and private key.
nockchain-wallet keygen - The previous command will display a new public and private key, as well as a seed phrase for the private key.
- Wallet backup. We recommend making a backup of your keys:
nockchain-wallet export-keys - This command will save your keys to a file keys.export in the current directory.
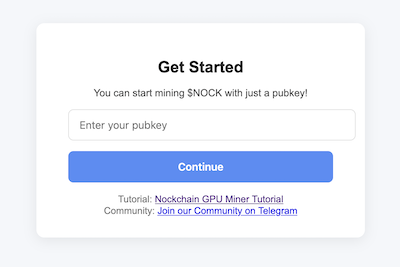
Step 2: Register on the pool.
- Go to the pool website https://goldenminer.net/ and enter your public key that you received in the previous step or on the Safetrade.com exchange. Then click "Continue".
Step 3.1: Setting up mining on HiveOS (from USMFOX).
- Open a new Hive Shell, create a new directory and navigate to it:
sudo mkdir -p /hive/miners/gmnock && cd /hive/miners/gmnock - Download the miner:
sudo wget https://github.com/GoldenMinerNetwork/golden-miner-nockchain-gpu-miner/releases/download/v0.1.5/golden-miner-pool-prover - Grant execution permissions to the miner:
sudo chmod +x golden-miner-pool-prover - Create a configuration file. Replace the text YOUR WALLET with your wallet in the PUBKEY field:
sudo tee /hive/miners/gmnock/gmnock.env >/dev/null << 'EOF' PUBKEY=YOUR WALLET # необязательно: # CUDA_VISIBLE_DEVICES=0,1 # PROXY=192.168.1.10:9000 # LABEL=my_group # NAME=$(hostname) EOF - Create a file to launch the miner:
sudo tee /hive/miners/gmnock/run.sh >/dev/null << 'EOF' #!/usr/bin/env bash set -Eeuo pipefail cd /hive/miners/gmnock # Подтянем переменные из env, если есть if [ -f ./gmnock.env ]; then set -a source ./gmnock.env set +a fi # Ограничение карт (необязательно) if [ -n "${CUDA_VISIBLE_DEVICES:-}" ]; then export CUDA_VISIBLE_DEVICES fi # Сбор аргументов ARGS=() if [ -n "${PROXY:-}" ]; then # режим прокси ARGS+=( --proxy="${PROXY}" ) [ -n "${LABEL:-}" ] && ARGS+=( --label="${LABEL}" ) [ -n "${NAME:-}" ] && ARGS+=( --name="${NAME}" ) else # прямое подключение по pubkey ARGS+=( --pubkey="${PUBKEY}" ) fi exec /hive/miners/gmnock/golden-miner-pool-prover "${ARGS[@]}" EOF - Grant execution permissions:
sudo chmod +x /hive/miners/gmnock/run.sh - Create a system service that will keep mining running even if your window closes or the rig reboots:
sudo tee /etc/systemd/system/gmnock.service >/dev/null << 'EOF' [Unit] Description=Golden Miner NOCK GPU Prover After=network-online.target Wants=network-online.target [Service] Type=simple WorkingDirectory=/hive/miners/gmnock # Запускаем явно под bash ExecStart=/bin/bash -lc '/hive/miners/gmnock/run.sh' Restart=always RestartSec=5 LimitNOFILE=1048576 [Install] WantedBy=multi-user.target EOF - Reload system services:
sudo systemctl daemon-reload - Enable the mining service:
sudo systemctl enable --now gmnock - Start the miner service:
sudo systemctl start gmnock - To view miner logs, use the following command:
journalctl -u gmnock -n 100 --no-pager - When you decide to stop mining Nockchain, you can simply reinstall HiveOS to the latest version; this will remove all unnecessary files and services. This is the easiest way for Linux beginners.
Step 3.2: Setting up mining on Ubuntu
- Download the latest version of the miner from the GoldMiner pool.
mkdir -p ~/nock cd ~/nock sudo wget https://github.com/GoldenMinerNetwork/golden-miner-nockchain-gpu-miner/releases/download/v0.1.5+1/golden-miner-pool-prover - Grant execution permissions:
chmod +x golden-miner-pool-prover - Start mining, replacing <WALLET ADDRESS> with yours:
-
./golden-miner-pool-prover --pubkey=<WALLET ADDRESS>