")
")
")
")
")


![]() In addition to purchasing new video cards (which is now quite problematic, given that there are no video cards in stores that are slightly better than budget ones and prices that are up to 2 times higher), overclocking video cards is an excellent way to increase mining income. In this article, we will talk about how to overclock Nvidia and AMD video cards using the most popular operating system for miners based on Linux - Hive OS. To overclock the GPU in Hive OS, there are so-called "overclocking profiles" and thanks to the correctly selected parameters of overclocking and undervolting the GPU, you can significantly increase the hash rate of your rigs, as well as reduce their power consumption, which in turn will allow you to increase the mining efficiency and install even more video cards if you are suddenly limited by wiring, as well as reduce the temperature of the equipment.
In addition to purchasing new video cards (which is now quite problematic, given that there are no video cards in stores that are slightly better than budget ones and prices that are up to 2 times higher), overclocking video cards is an excellent way to increase mining income. In this article, we will talk about how to overclock Nvidia and AMD video cards using the most popular operating system for miners based on Linux - Hive OS. To overclock the GPU in Hive OS, there are so-called "overclocking profiles" and thanks to the correctly selected parameters of overclocking and undervolting the GPU, you can significantly increase the hash rate of your rigs, as well as reduce their power consumption, which in turn will allow you to increase the mining efficiency and install even more video cards if you are suddenly limited by wiring, as well as reduce the temperature of the equipment.
It is worth warning right away that any settings that differ from the factory values can lead to unstable system operation. Use equipment overclocking and undervolting at your own risk. So, as we said, overclocking is setting your hardware settings outside the factory, which is likely to improve mining performance, as well as reduce electricity consumption (thanks to undervolting - reducing the voltage applied to the GPU and video memory). Often overclocking and undervolting are used at the same time, thanks to which it is possible to achieve an increase in hash rate with lower consumption, sounds good, doesn't it? For overclocking and undervolting in Hive OS, you can use "overclocking profiles".
If you are a beginner, or until now have not dealt with Hive OS, we recommend that you read the article Install and configure HiveOS - Linux operating system for GPU mining rigs and ASICs, which describes in detail and step by step the installation and initial configuration of this operating system. systems for mining.
Ideal overclocking is always a matter of trial and error, so if you want to get the optimal hash rate per watt you will have to experiment a lot. However, Hive OS will be able to help you a lot with this, since it has a built-in database of overclocking profiles of other users, with a convenient filter by the type of video cards. If you are not sure which setting you want to set initially, you can choose one of the popular presets for your video card, and then start changing the settings. After each change of overclocking and undervolting settings, we recommend running mining for some more or less long time to make sure that your equipment continues to work stably and "rejected shares" do not appear (these may be like incorrect decisions that your video card sends in connection with excessive overclocking, and balls sent at the wrong time). A large number of deflected balls is often one of the signs of unstable operation, in this case we recommend slightly lowering the acceleration and re-checking.
Overclocking profile creation
For each farm, its own individual overclocking profiles are created and they cannot be used in another farm. You have the option to create an overclocking profile for the entire farm or for a specific worker. The profile of a particular worker will always have a higher priority and will override the general settings for the farm. Thus, it is recommended to first set the optimal parameter values for the entire farm, and then (if necessary) already configure each rig (aka worker) separately.
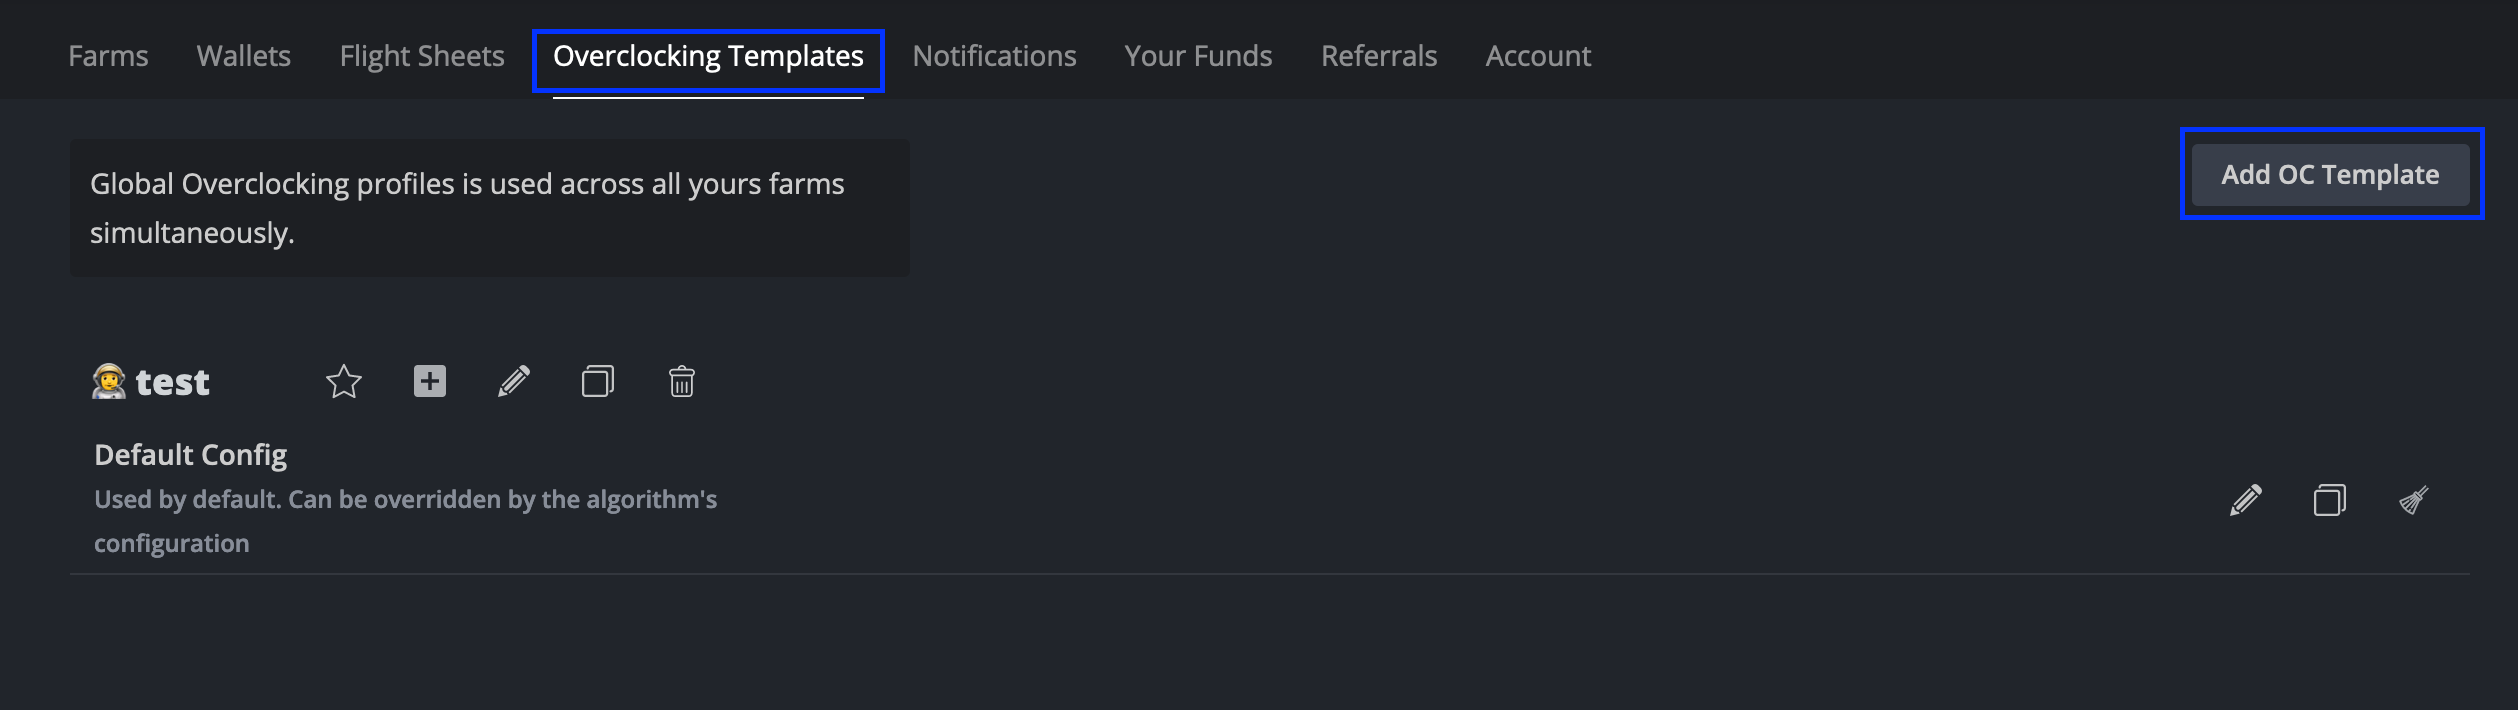
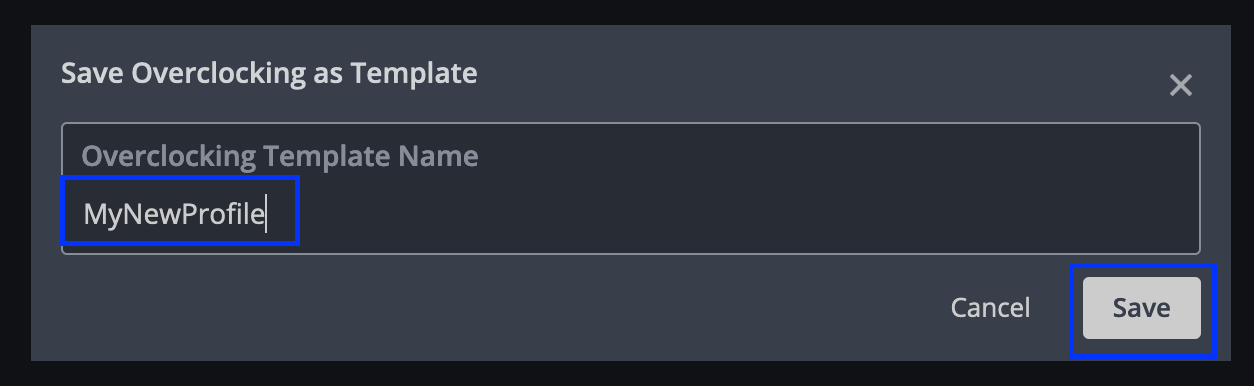
So, to create a new overclocking profile, simply go to the "Overclocking Profiles" tab for your farm and then click the "Add OC Profile" button. Now in the "Save Overclocking as Template" window that appears, name your new profile and click "Save".
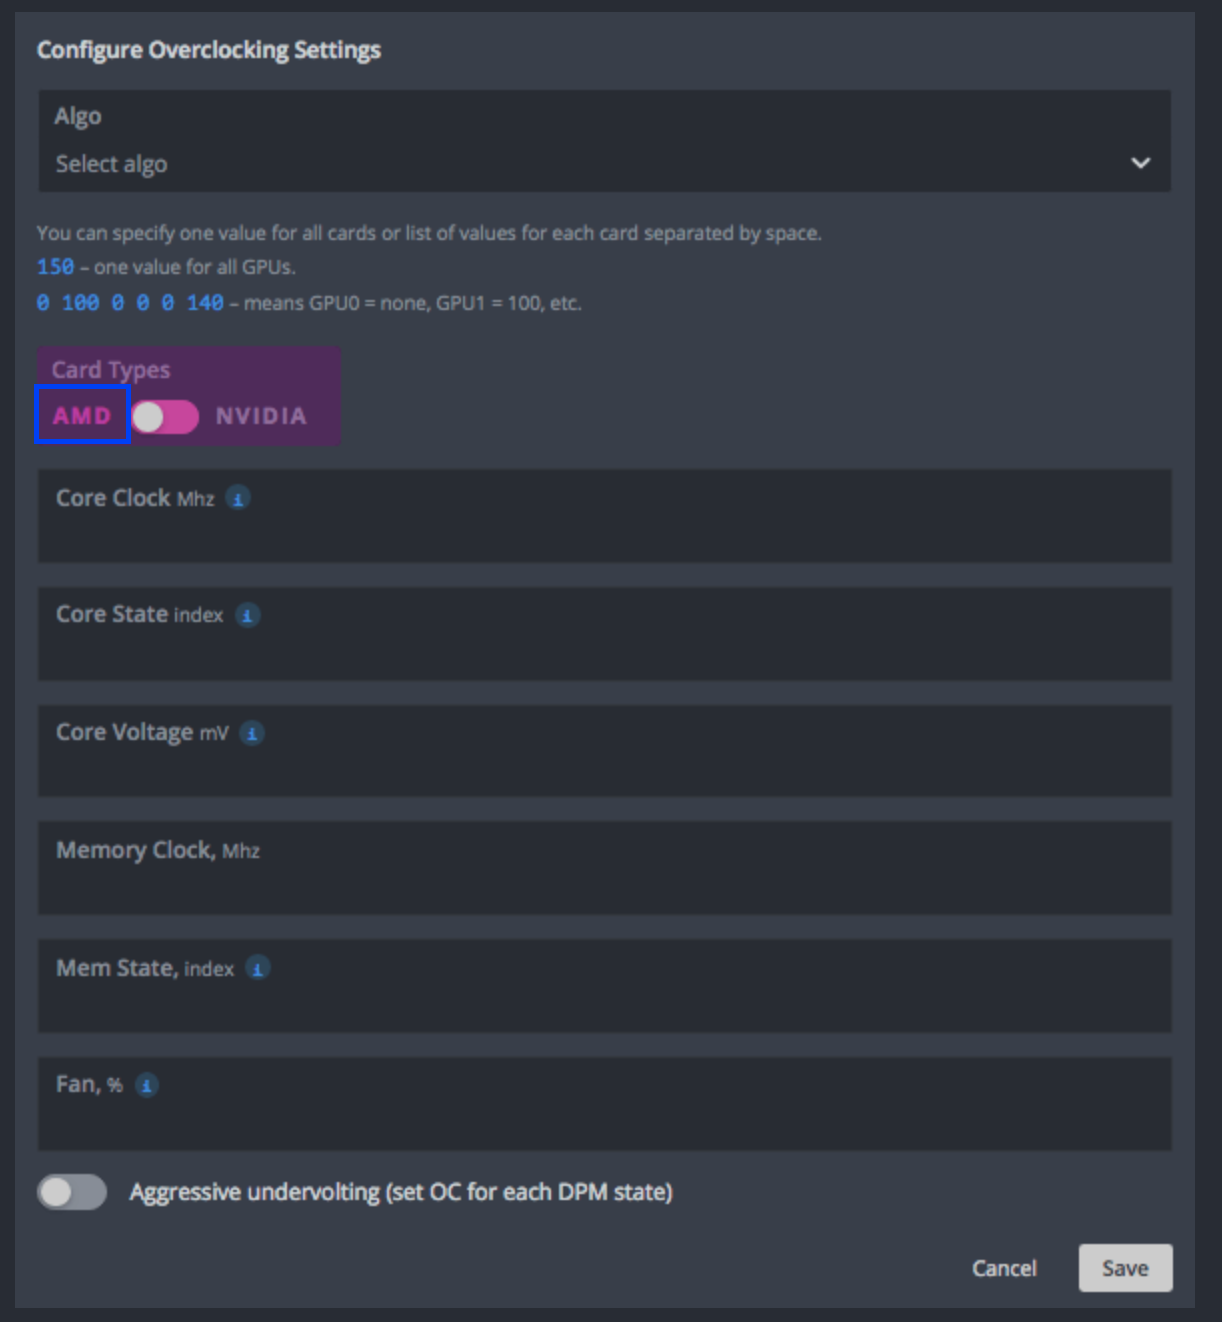
You've created an overclocking template that can be used by specific workers or your entire farm. You can always copy and change it for different algorithms and miners. Although the template you create will be used for all your GPUs, the overclocking settings are different for Nvidia and AMD graphics cards. Keep in mind that you can have different sets of settings for different types of GPUs (Nvidia, AMD) in the same profile and if your worker is running on Nvidia and AMD, then the settings will apply to each type of GPU individually.
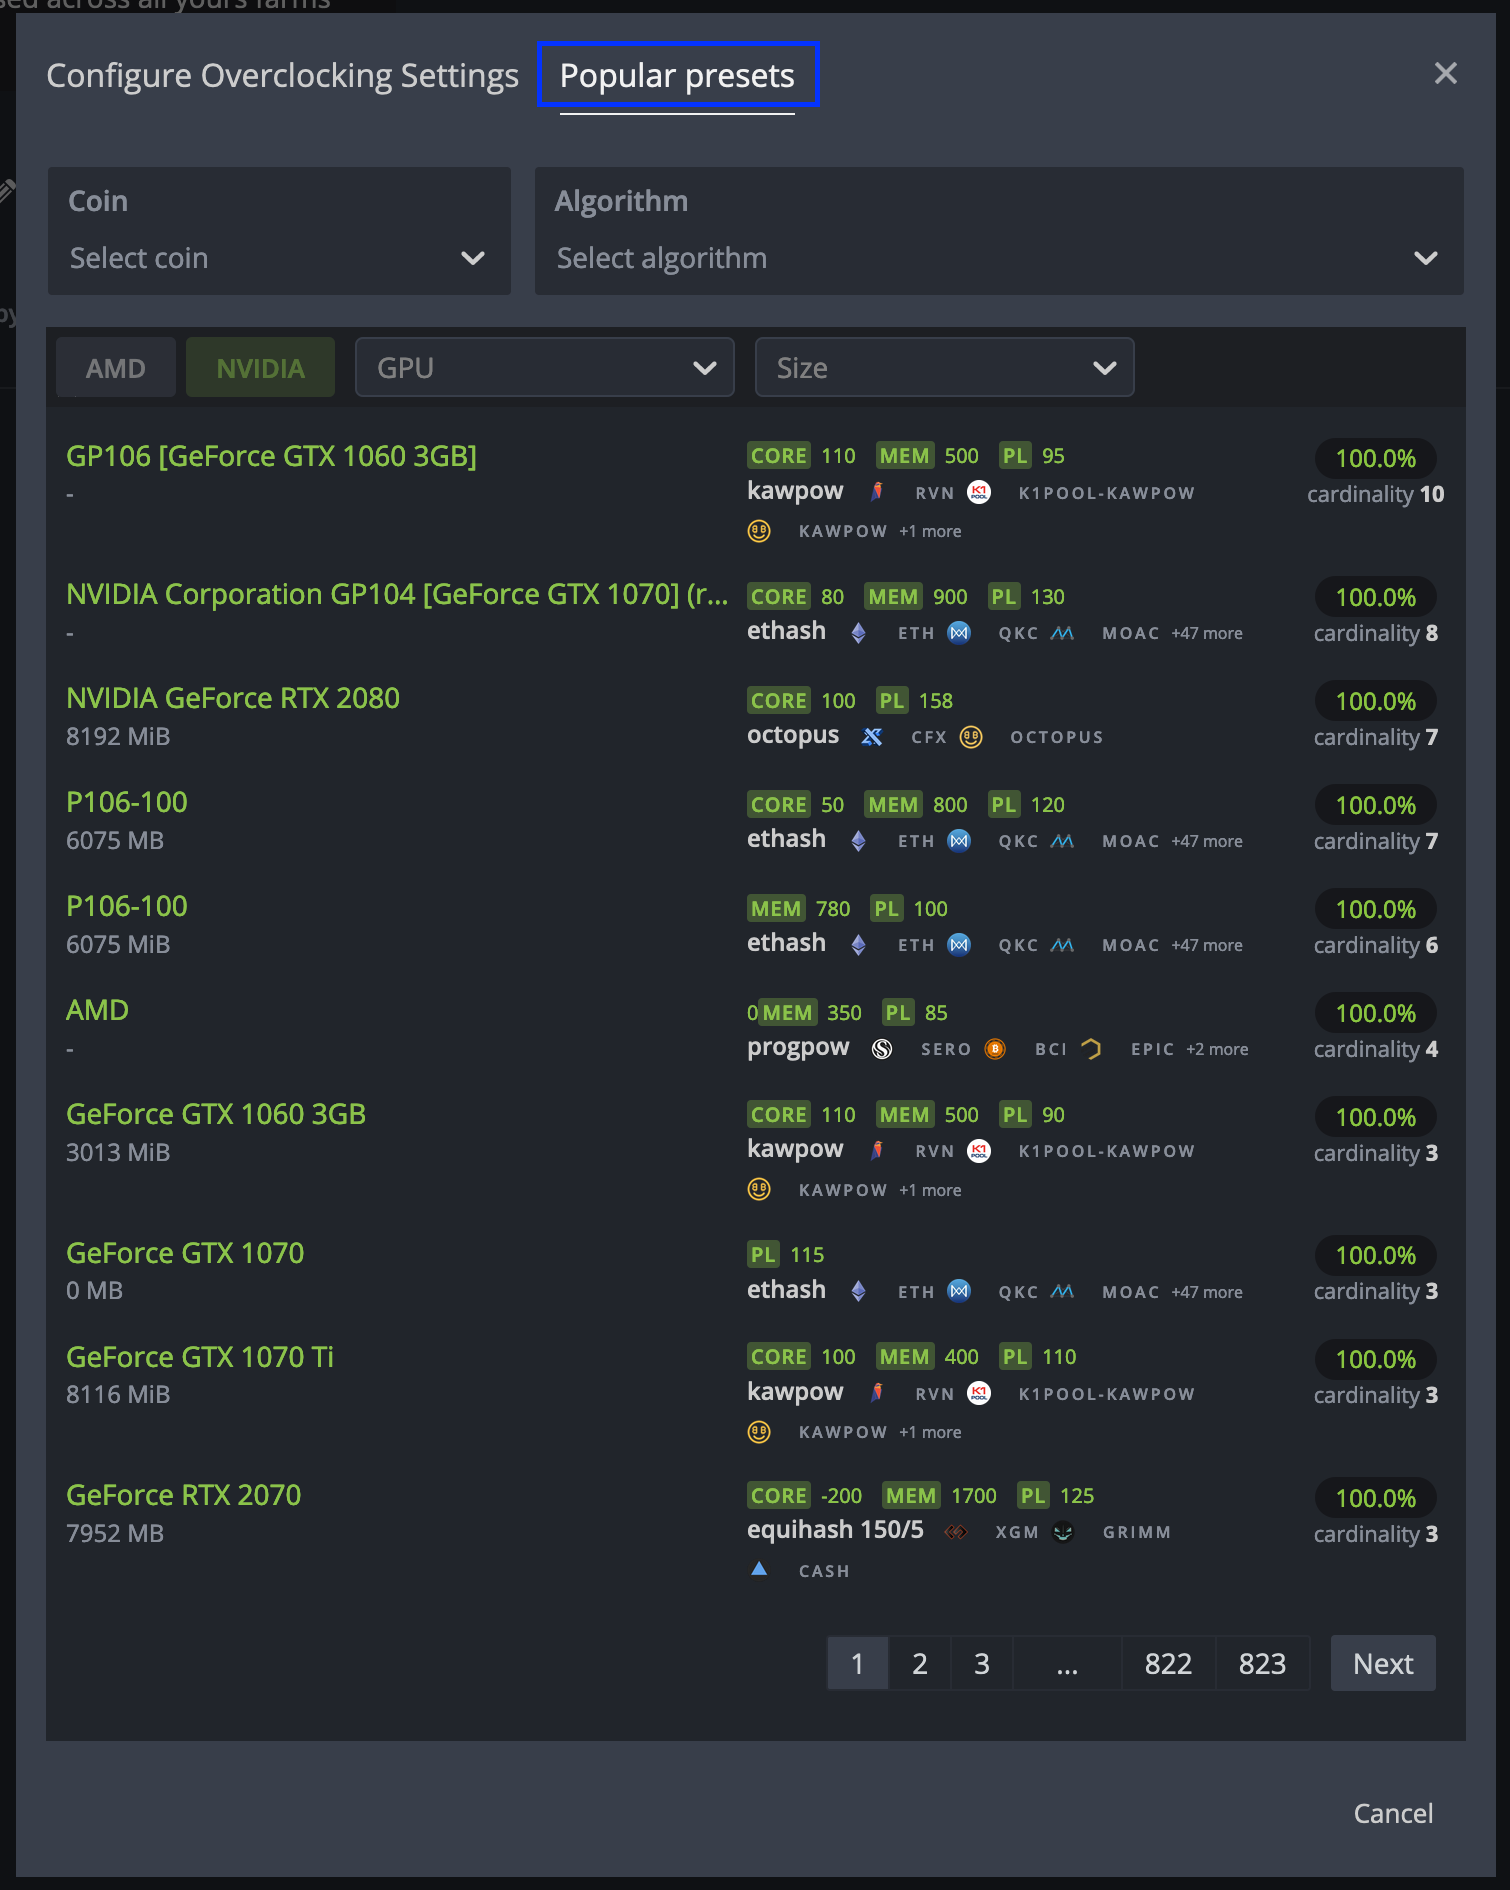
To edit your overclocking profile, simply click on the plus icon to the right of your profile name. In addition, you can use popular overclocking patterns from other users by going to the "Popular Presets" tab and choosing your graphics card model from the list.

Overclocking Nvidia graphics cards.
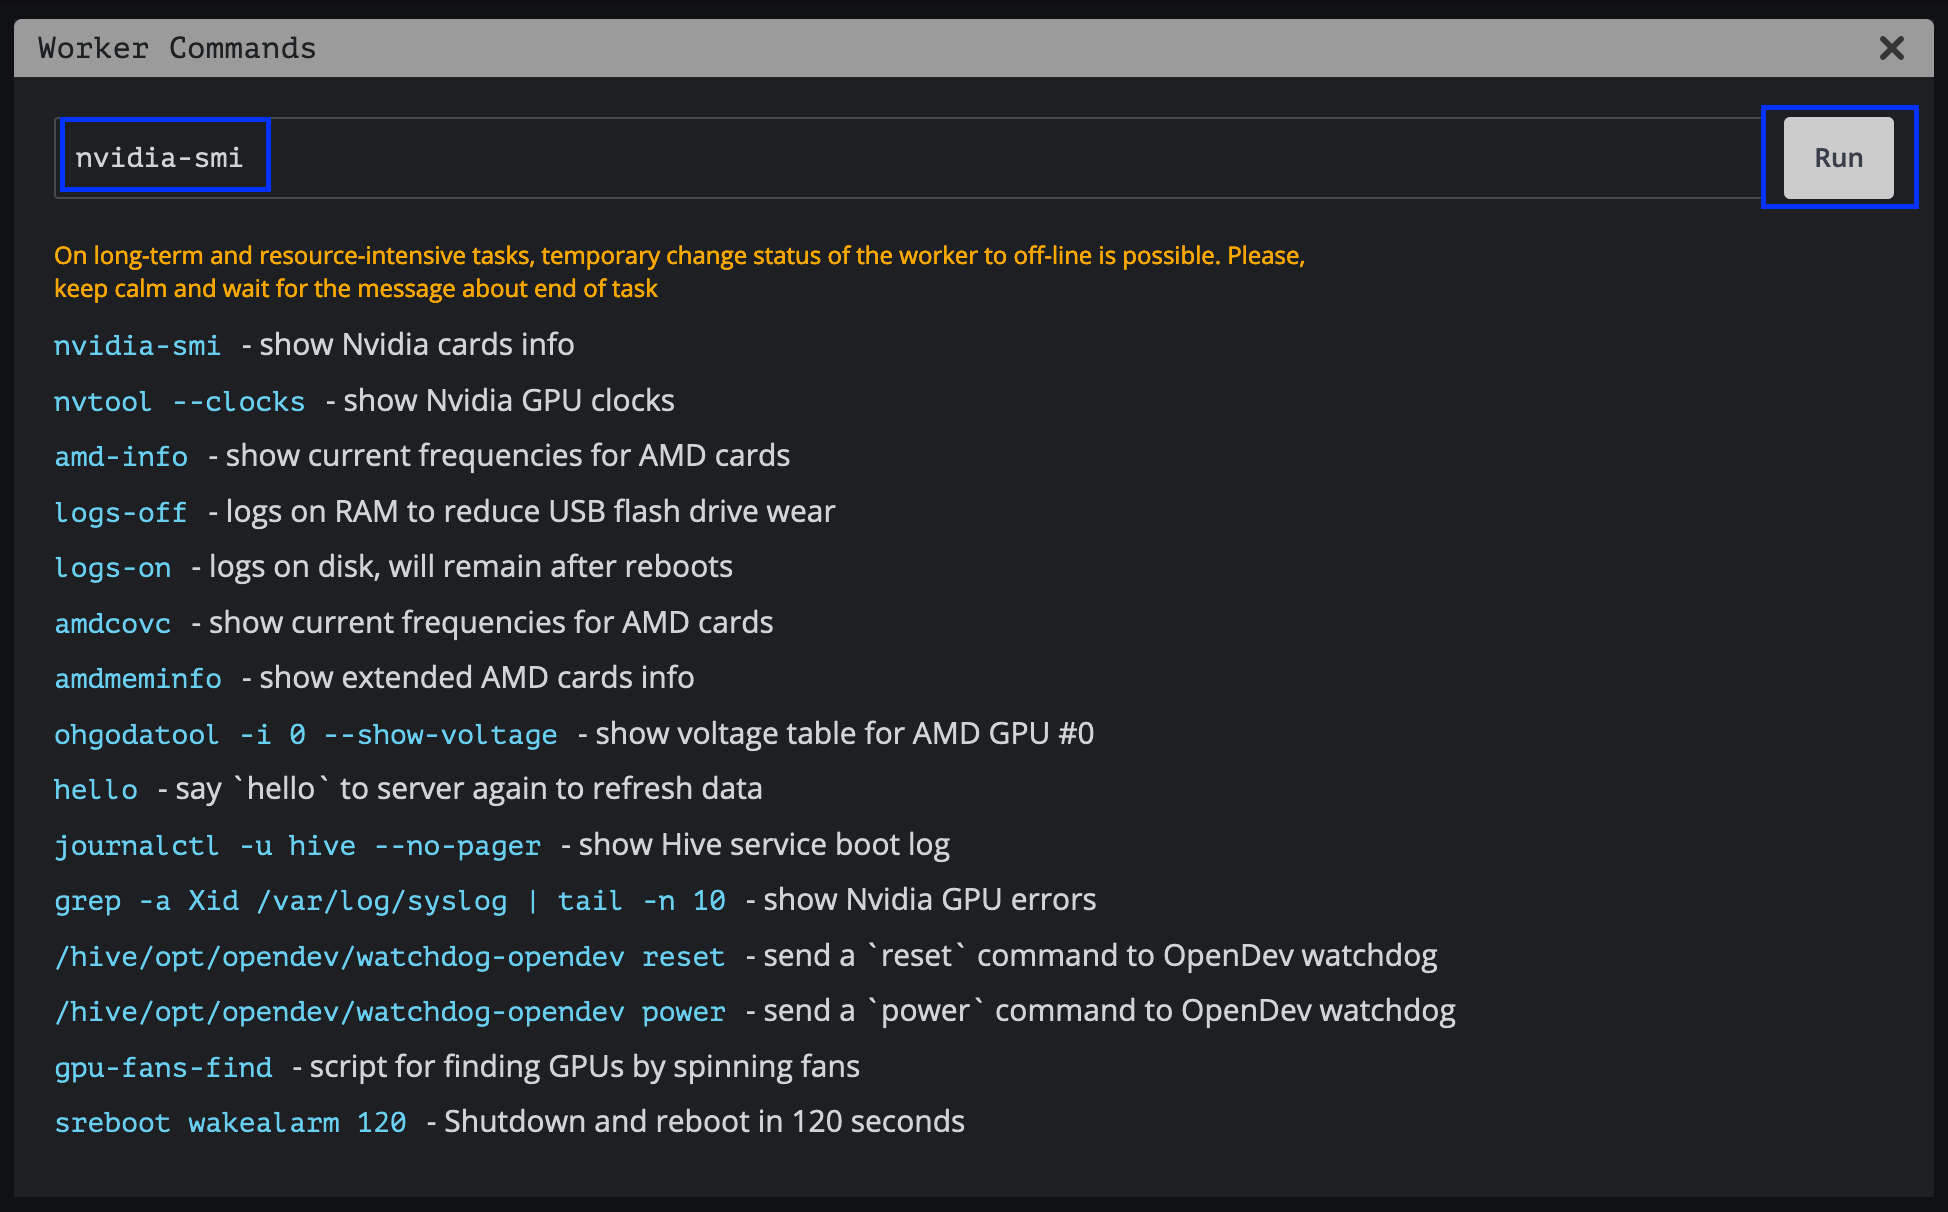
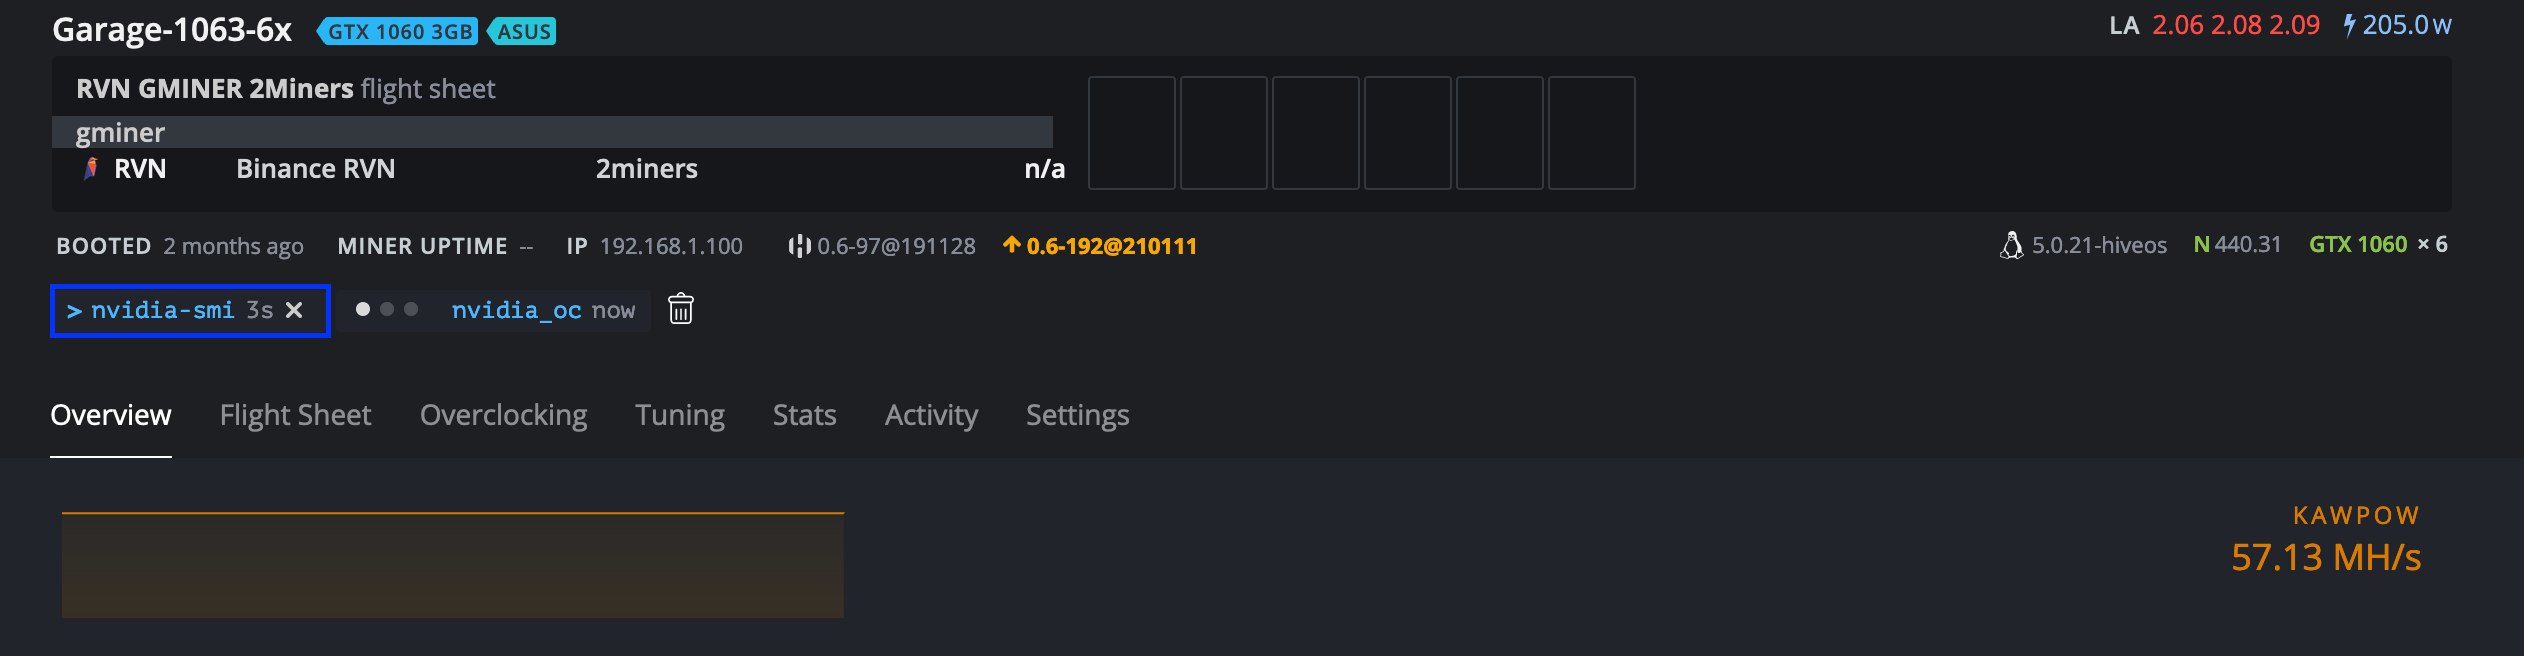
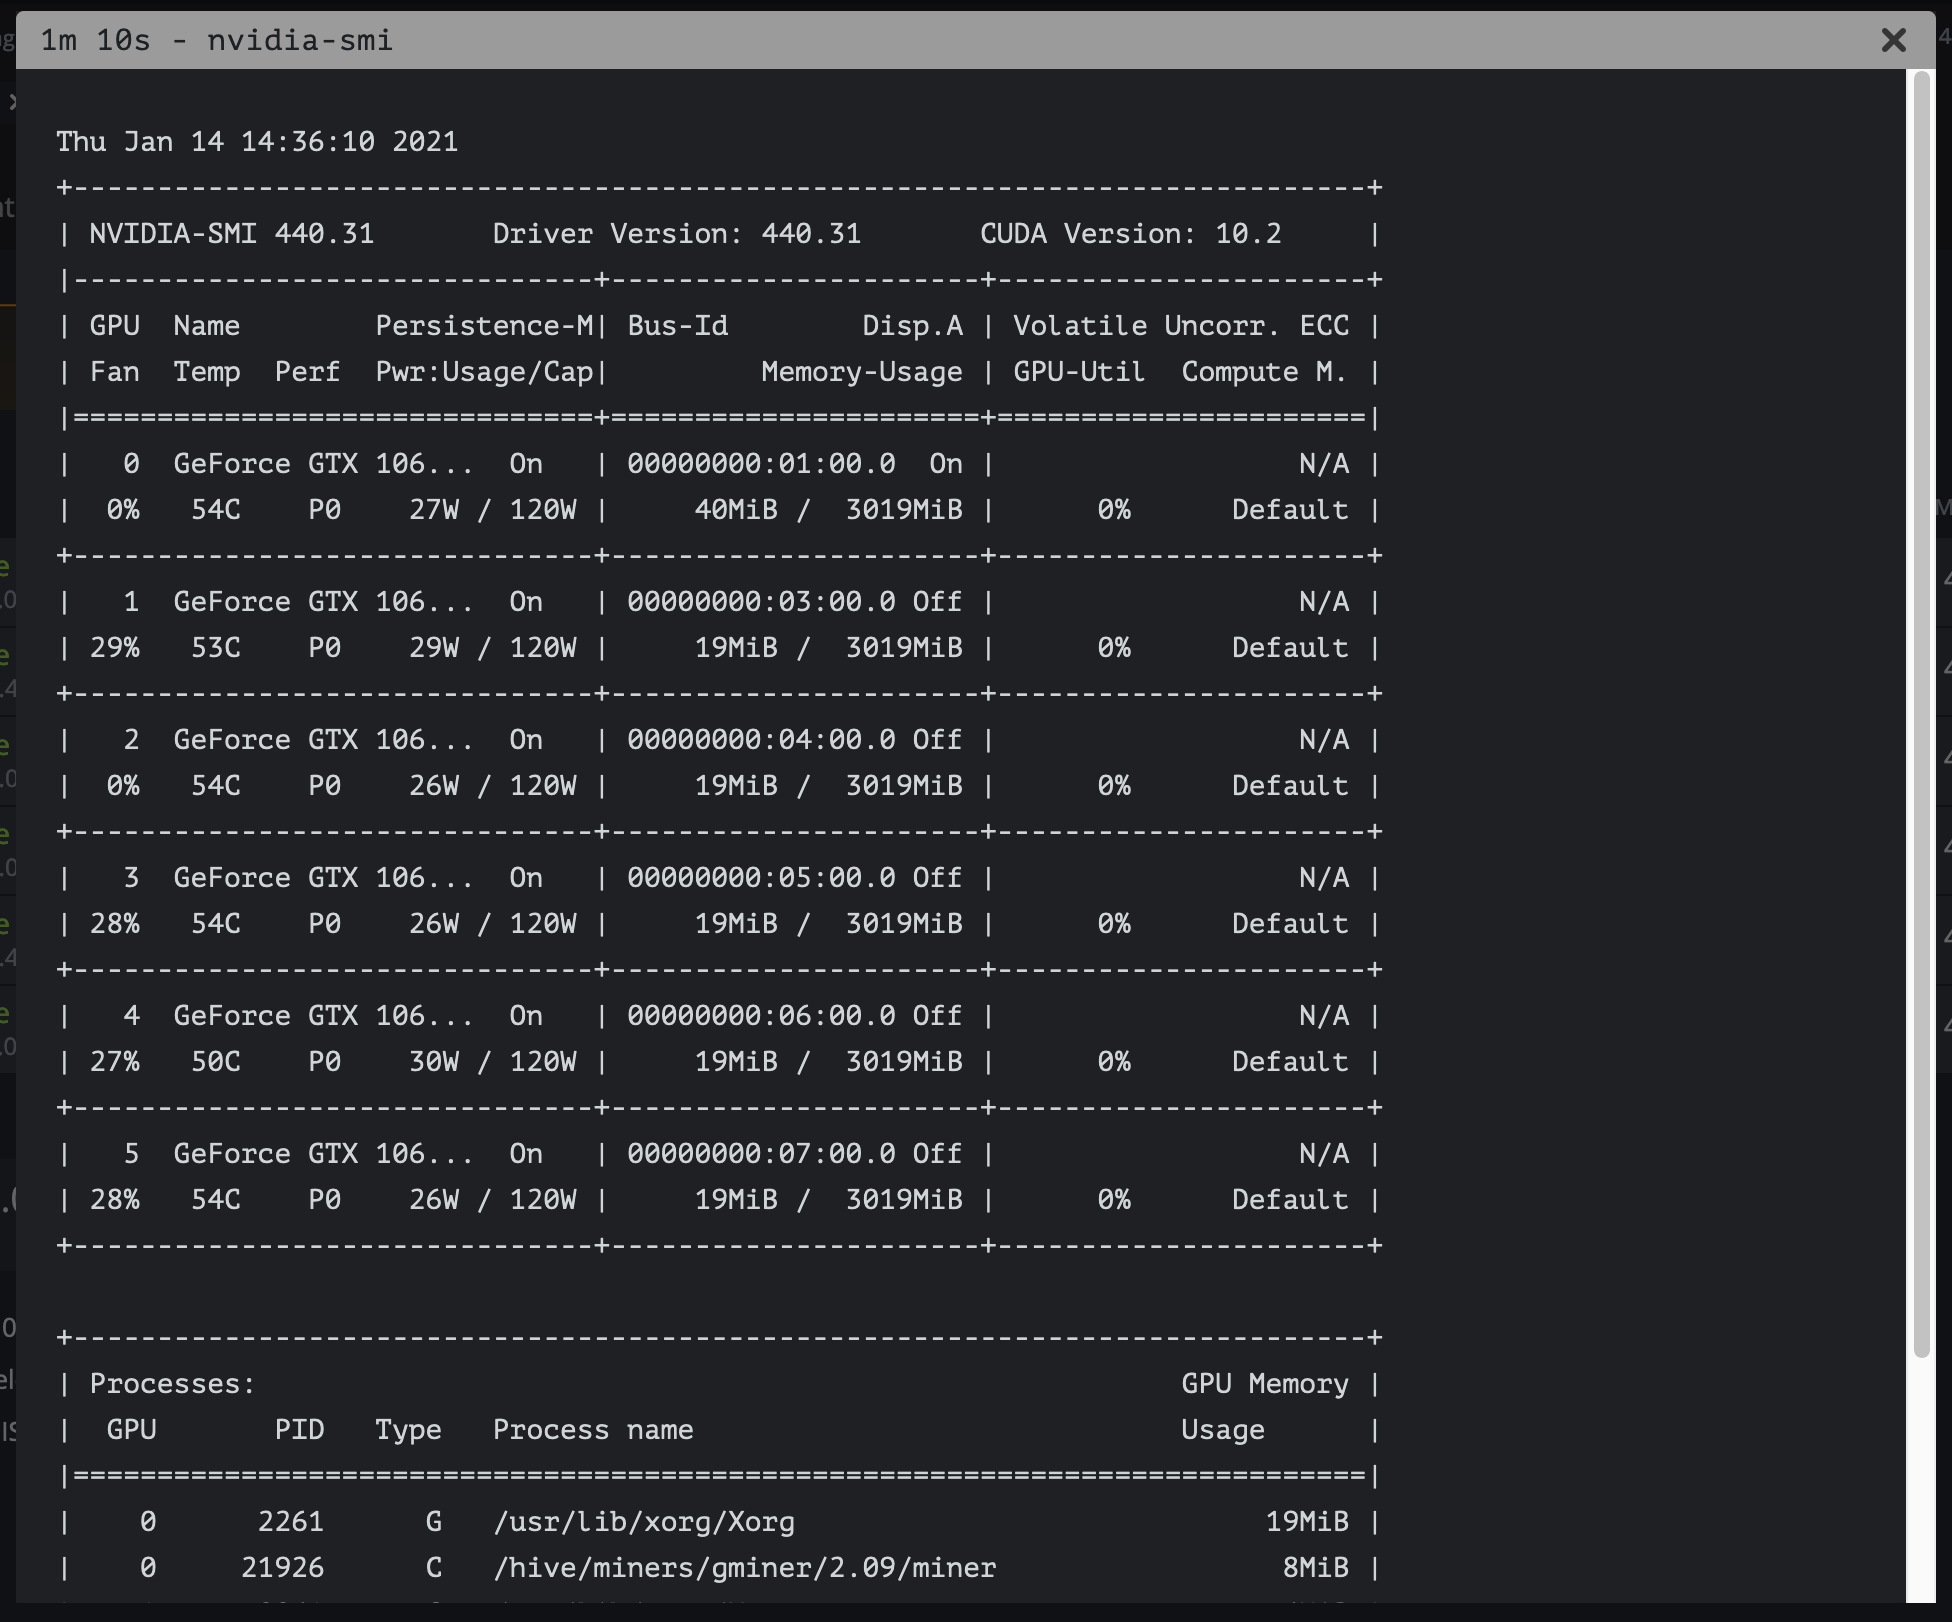
Before changing the overclocking settings, you can run the "nvidia-smi" command through the Hive Os built-in terminal to determine the current settings of your GPUs. To do this remotely from the HiveOS control panel, go to your worker and then click on the "Run command" button on the main toolbar at the top of the screen. In the window that appears, there will also be background information on other useful commands that can be useful when overclocking and configuring your rigs. In the window that appears, in the field to the left of the start button, enter the command, and then click on "Start". After closing the window, wait for a while (from several seconds to several minutes) until the report is generated. To view the report, just click on it.

Now let's talk directly about the overclocking and undervolting settings for the Nvidia GPU. You have the ability to set one common value for each parameter for all GPUs in the rig, or specify separate values for each video card separated by a space.
For example:
- 100 is the total value for all video cards in the rig.
- 0 100 0 150 0 - value 0 for GPU0, 100 for GPU1, 0 for GPU2, 150 for GPU3 and 0 for GPU4.
To specify settings for a specific algorithm, select it in the "Algo" list. For each algorithm, you can create an individual set of settings. When you select the "Default config" item, your settings will apply to all algorithms, but they can be overwritten by the settings in the algorithms themselves.
More about settings
- +Core Clock (Mhz) - Increases the GPU core clock speed in MHz. If you enter a value of 0, this will set the default value for your video cards.
- Memory clock (Mhz) - increases the clock frequency of the video memory. You should specify twice the value you see in MSI Afterburner on Windows. For example, if in Windows you set the memory clock to +500, then you must specify the value 1000.
- Fan (%) - serves to adjust the fan speed on your video cards in percentage. If you enter a value of 0, this will set the default value for your video cards. The fan speed is by default registered in the BIOS of your video cards and does not depend on the miner used.
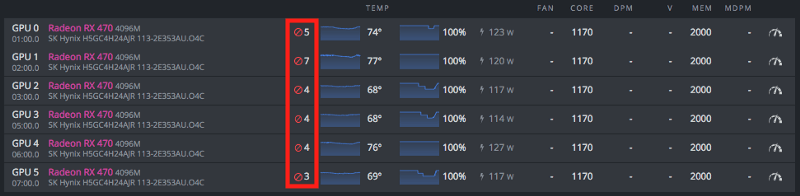
- Power Limit (W) - This option is designed to control the power consumption of your graphics cards. Unlike Afterburner, where values are indicated in percentages, in the case of HiveOS, absolute values should be indicated in Watts. You can find out the limit values for your video cards in the list of video cards for your rig. For example, the values PL 60 W, 120 W, 140 W mean that the first value at 60W is the minimum, the second is 120W is the default and the third is 140W is the maximum possible setting. If you set values greater than the maximum or less than the minimum, then this parameter will not be applied.

-
Delay in seconds before applying overclock - this option speaks for itself, you can specify the delay in seconds to apply overclocking after saving changes.
- Turn off leds - turns off the glow of LEDs on your video cards. May not work in some cases.
- OhGodAnETHlargementPill (pill) - This option is required to be enabled on GTX 1080 and GTX 1080Ti video cards. Optimizes work with GDDR5X memory, and can increase performance in algorithms that actively use video memory up to 30-40%. For other models of video cards, you do not need to enable.
After changing the parameters, just click on the "Save" button.
For example, overclocking the Nvidia GTX 1060.
- Algorithm: Default value.
- +Core clock (Mhz) - 130.
- Memory clock (Mhz) - 2000.
- Fan (%) - leave blank for default settings.
- Power limit (W) - 120.
- Delay in seconds before applying overclock - leave it blank, we don't need it now.
- Turn off LEDs - our video card does not have backlight LEDs, let's skip this option.
- OhGodAnETHlargementPill (pill) - no pill required for our card. We will not include it.
- Click the "Save" button
Overclocking AMD graphics cards.
Before changing the overclocking settings, you can run the "amd-info" command through the Hive Os built-in terminal to determine the current settings of your GPUs. To do this remotely from the HiveOS control panel, go to your worker and then click on the "Run command" button on the main toolbar at the top of the screen. In the window that appears, there will also be background information on other useful commands that can be useful when overclocking and configuring your rigs. In the window that appears, in the field to the left of the start button, enter the command, and then click on "Start". After closing the window, wait for a while (from several seconds to several minutes) until the report is generated. To view the report, just click on it.
You have the ability to set one common value for each parameter for all GPUs in the rig, or specify separate values for each video card separated by a space. For example:
- 100 is the total value for all video cards in the rig.
- 0 100 0 150 0 - value 0 for GPU0, 100 for GPU1, 0 for GPU2, 150 for GPU3 and 0 for GPU4.
To specify settings for a specific algorithm, select it in the "Algo" list. For each algorithm, you can create an individual set of settings. When you select the "Default config" item, your settings will apply to all algorithms, but they can be overwritten by the settings in the algorithms themselves.
More about settings
- Core clock (Mhz) - Used to adjust the core frequency. 1100 might be a good place to start. If Kernel State is not configured, the default value of 5 will be used to tune the frequency. All values must be absolute.
- Core state, index - this option will be necessary if you want to reduce the power consumption of the video card. This option should be used in conjunction with "Core clock" and "Core Voltage". This is called DPM (Dynamic Power Management) or the "Power Level" of the GPU core. For RX GPUs, this is a value between 1 and 7. The default is 5. Lower this value for downvolting. If you choose to use one of the default values, then you do not need to adjust the values in "Core clock" and "Core Voltage".
- Core Voltage, mV - Needed if you are trying to lower the voltage on your GPU. You will also need to adjust the "Core state" or the default "5" will be used to adjust the voltage. You can, for example, set the value to 900 (mV), or the value 65284 from the VBIOS table.
- Memory clock (Mhz) - used to set the memory clock. All values are absolute.
- Mem state, index is a very advanced option. Change it if there are problems with undervoltage. If everything works within the specification, do not change this value. RX cards are known to have 1 or 2 memory values (3 including 0 - idle state). The highest value will be selected by default. But some rare cards are not capable of andevolting at a higher value, and need a lower value. For example, the highest value is 2, and for undervolting you can set it to 1. This parameter should be used with the Memory clock setting.
- Memory Controller Voltage, m - sets the voltage for the memory controller (VDDCI). Currently applicable only for video cards of the NAVI series. The default is 850 mV. The allowed range is 750-850 mV. Use this parameter only if you understand what you are doing that may affect the stability of the system.
- Fan (%) - is used to adjust the fan speed on video cards. Keep in mind that some miners like Claymore will still control the fan speed themselves. You must disable fan control in miner config for this setting to work. We recommend leaving this field blank if you have AutoFan enabled.
- Power Limit (W) - Sets the maximum power consumption in Watts for the GPU core. In most cases, it is not necessary to configure this parameter for AMD cards if the Core clock and Core Voltage parameters were previously configured. The option is not currently applicable for VEGA and NAVI cards.
- SoC frequency, Mhz - This option sets the maximum SoC frequency and is available for modern AMD GPUs starting with the VEGA family. The default for the RX 5700 is 1267 MHz. Lowering the frequency may result in lower power consumption and temperature drop. but can also cause your GPU to become unstable. Please use this parameter very carefully!
-
SoC VDDmax, mV -This parameter sets the maximum SoC voltage and is available for modern AMD GPUs starting with the Vega family. The default for RX 5700 is 1050 mV. Lowering the SoC's maximum voltage can reduce power consumption and temperature drop, but it can also cause your GPU to become unstable. Please use this parameter very carefully!
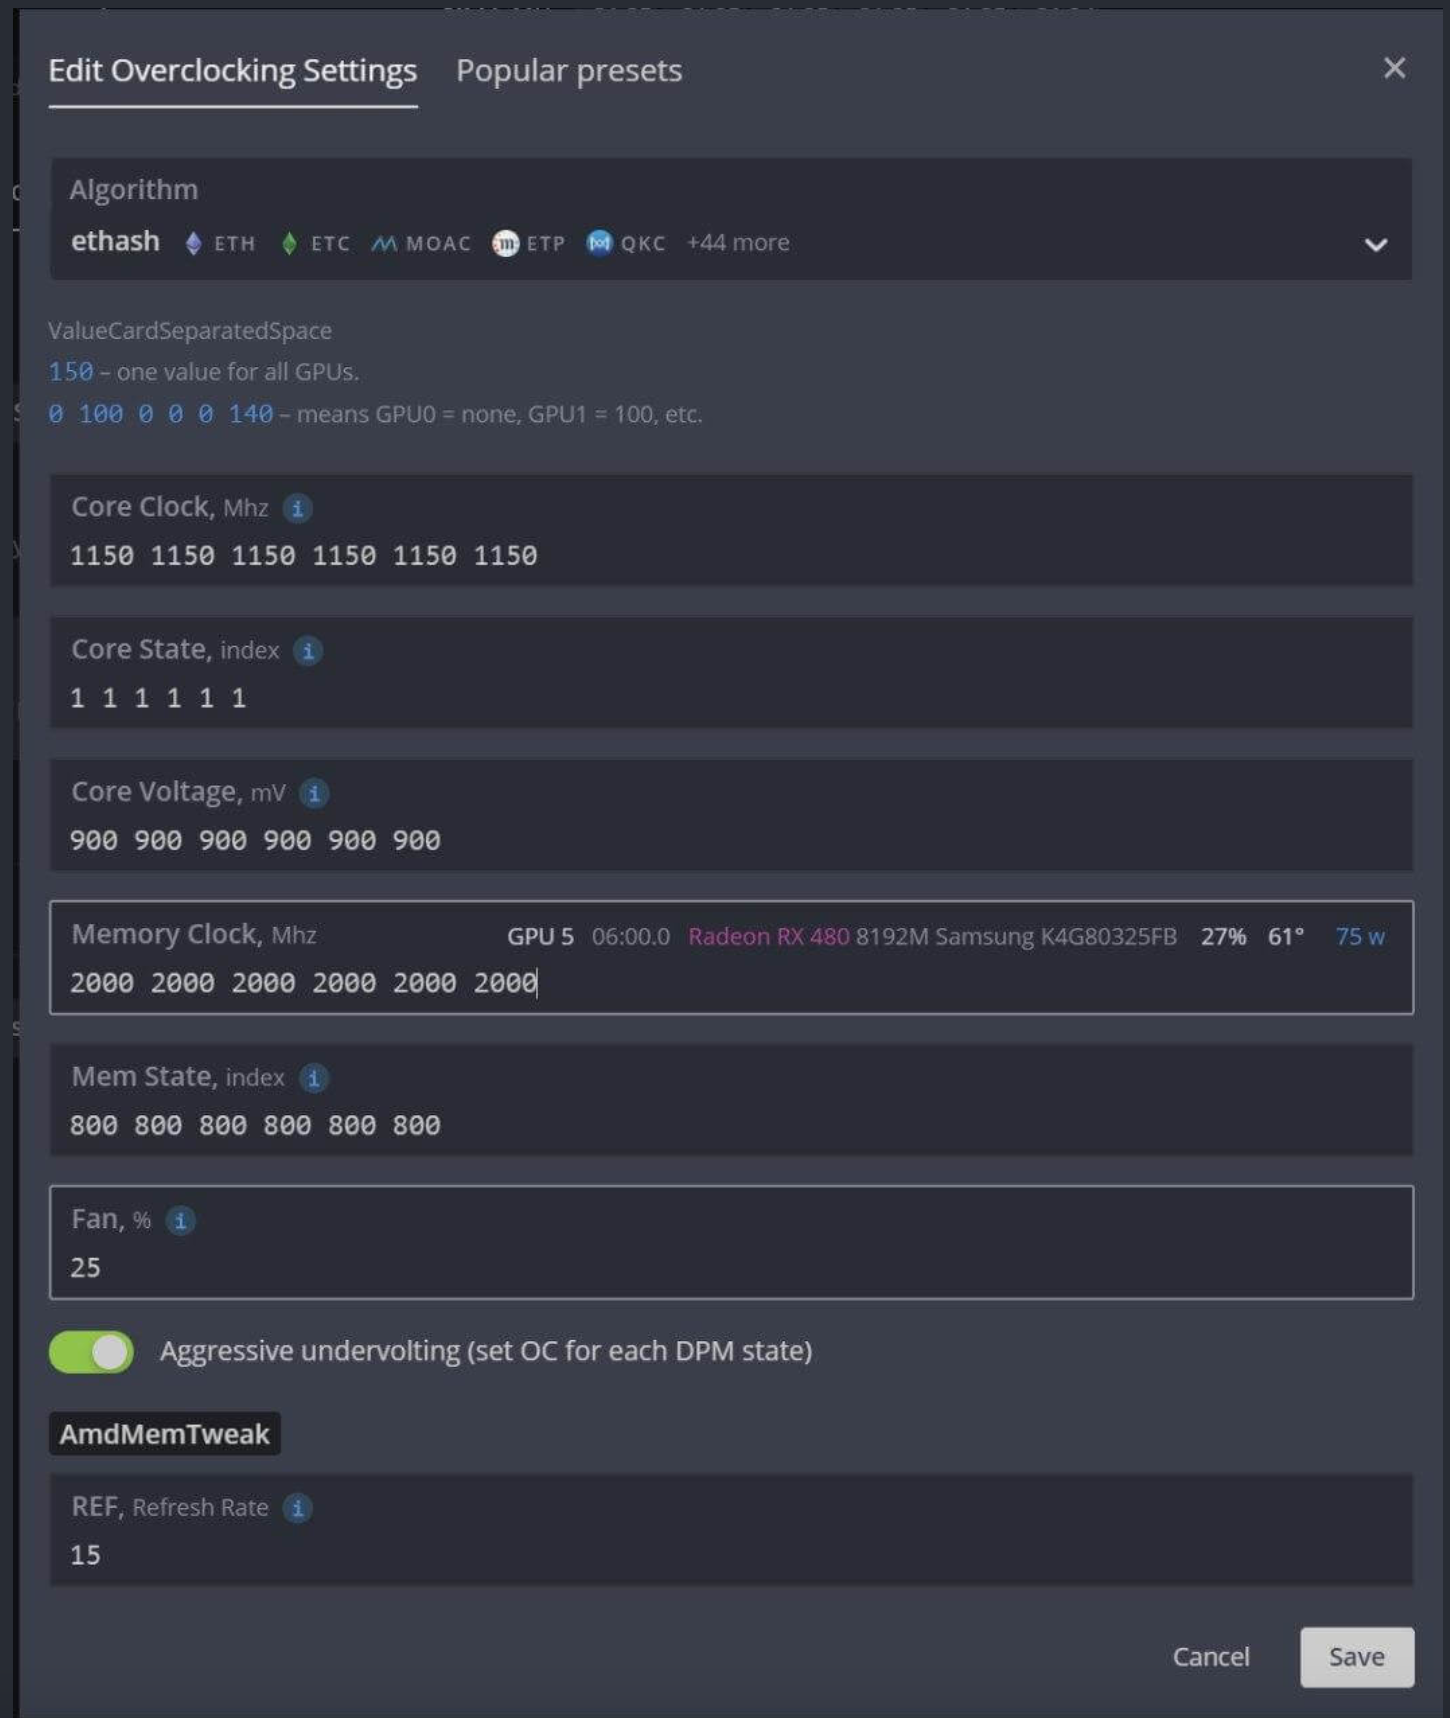
- Aggressive undervolting - selects the set overclock parameter for each DPM state.
- AmdMemTweak - Also known as 'rxboost'. Recommended value for RX cards is 20. AMDMemTweak manual.
Now it remains to click on the "Save" button.
Overclocking example for 6 AMD RX 580 cards
The values shown below are given as an example, maybe other values will be optimal for your cards. Use at your own risk.
Applying the overclocking profile
Now, in order to apply the profile you created, go to the tab with workers and check the box on the left of those workers to which you are going to apply the overclocking profile. You should see a speedometer icon in the menu bar in the upper right corner of the screen.

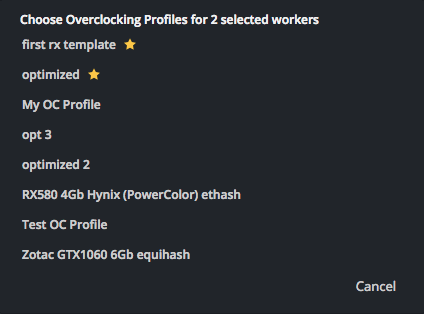
If you click on this speedometer icon, a window will appear in front of you, which will display the number of workers you have selected and a list of all your flight lists. Select the overclocking profile you want to use and click on the "Apply" button. As a result, you should see a message that the overclocking command has been sent to the worker. After a while, your workers will need to apply the changes.
Perhaps overclocking video cards under HiveOS is not such a trivial task for a beginner, but we tried to tell you about the overclocking process as detailed and understandable as possible for both AMD video cards and Nvidia GPUs. Although some miners always use the default settings, and do not overclock the hardware, it seems to us that overclocking and undervolting is a good help to increase the hash rate in mining or reduce the consumption of rigs. Often, thanks to overclocking and undervolting, it is possible to achieve an increase in the hash rate while simultaneously reducing the consumption and temperatures of video cards.
Other interesting articles and guides on how to work and configure Hive OS.
Install and configure HiveOS - Linux operating system for GPU mining rigs and ASICs
Configuring HiveOS for mining the GRIN cryptocurrency
Mining Ethereum on Binance Pool. Pool setup, RaveOS and HiveOS.